Spring IoC
Spring IoC
IoC 简介
IoC 是什么
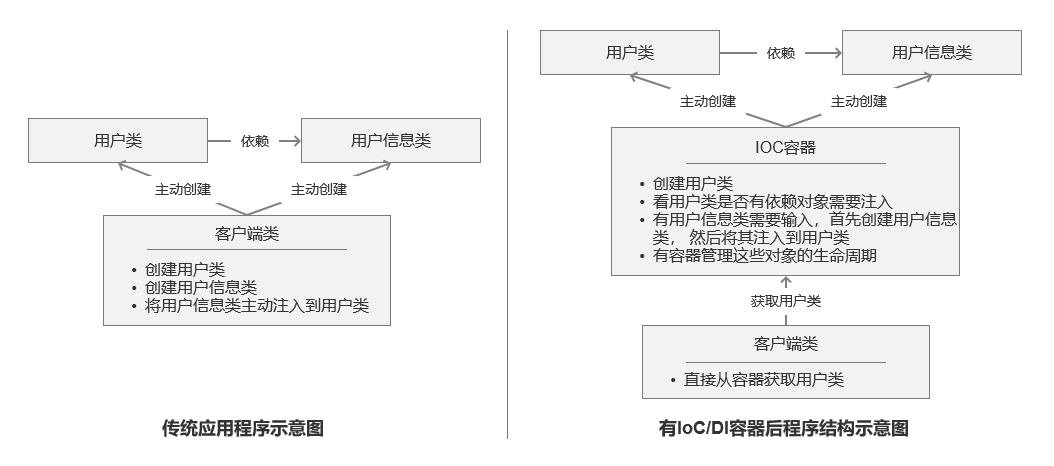
IoC 即控制反转(Inversion of Control,缩写为 IoC)。IoC 又称为依赖倒置原则(设计模式六大原则之一),它的要点在于:程序要依赖于抽象接口,不要依赖于具体实现。它的作用就是用于降低代码间的耦合度。
IoC 的实现方式有两种:
- 依赖注入(Dependency Injection,简称 DI):不通过
new()的方式在类内部创建依赖类对象,而是将依赖的类对象在外部创建好之后,通过构造函数、函数参数等方式传递(或注入)给类使用。 - 依赖查找(Dependency Lookup):容器中的受控对象通过容器的 API 来查找自己所依赖的资源和协作对象。
理解 Ioc 的关键是要明确两个要点:
- 谁控制谁,控制什么:传统 Java SE 程序设计,我们直接在对象内部通过 new 进行创建对象,是程序主动去创建依赖对象;而 IoC 是有专门一个容器来创建这些对象,即由 Ioc 容器来控制对象的创建;谁控制谁?当然是 IoC 容器控制了对象;控制什么?那就是主要控制了外部资源获取(不只是对象包括比如文件等)。
- 为何是反转,哪些方面反转了:有反转就有正转,传统应用程序是由我们自己在对象中主动控制去直接获取依赖对象,也就是正转;而反转则是由容器来帮忙创建及注入依赖对象;为何是反转?因为由容器帮我们查找及注入依赖对象,对象只是被动的接受依赖对象,所以是反转;哪些方面反转了?依赖对象的获取被反转了。
IoC 能做什么
IoC 不是一种技术,而是编程思想,一个重要的面向对象编程的法则,它能指导我们如何设计出松耦合、更优良的程序。传统应用程序都是由我们在类内部主动创建依赖对象,从而导致类与类之间高耦合,难于测试;有了 IoC 容器后,把创建和查找依赖对象的控制权交给了容器,由容器进行注入组合对象,所以对象与对象之间是松散耦合,这样也方便测试,利于功能复用,更重要的是使得程序的整个体系结构变得非常灵活。
其实 IoC 对编程带来的最大改变不是从代码上,而是从思想上,发生了“主从换位”的变化。应用程序原本是老大,要获取什么资源都是主动出击,但是在 IoC/DI 思想中,应用程序就变成被动的了,被动的等待 IoC 容器来创建并注入它所需要的资源了。
IoC 很好的体现了面向对象设计法则之一—— 好莱坞法则:“别找我们,我们找你”;即由 IoC 容器帮对象找相应的依赖对象并注入,而不是由对象主动去找。
IoC 和 DI
其实它们是同一个概念的不同角度描述,由于控制反转概念比较含糊(可能只是理解为容器控制对象这一个层面,很难让人想到谁来维护对象关系),所以 2004 年大师级人物 Martin Fowler 又给出了一个新的名字:“依赖注入”,相对 IoC 而言,“依赖注入”明确描述了“被注入对象依赖 IoC 容器配置依赖对象”。
注:如果想要更加深入的了解 IoC 和 DI,请参考大师级人物 Martin Fowler 的一篇经典文章 Inversion of Control Containers and the Dependency Injection pattern 。
IoC 容器
IoC 容器就是具有依赖注入功能的容器。IoC 容器负责实例化、定位、配置应用程序中的对象及建立这些对象间的依赖。应用程序无需直接在代码中 new 相关的对象,应用程序由 IoC 容器进行组装。在 Spring 中 BeanFactory 是 IoC 容器的实际代表者。
Spring IoC 容器如何知道哪些是它管理的对象呢?这就需要配置文件,Spring IoC 容器通过读取配置文件中的配置元数据,通过元数据对应用中的各个对象进行实例化及装配。一般使用基于 xml 配置文件进行配置元数据,而且 Spring 与配置文件完全解耦的,可以使用其他任何可能的方式进行配置元数据,比如注解、基于 java 文件的、基于属性文件的配置都可以。
Bean
JavaBean 是一种 JAVA 语言写成的可重用组件。为写成 JavaBean,类必须是具体的和公共的,并且具有无参数的构造器。JavaBean 对外部通过提供 getter / setter 方法来访问其成员。
由 IoC 容器管理的那些组成你应用程序的对象我们就叫它 Bean。Bean 就是由 Spring 容器初始化、装配及管理的对象,除此之外,bean 就与应用程序中的其他对象没有什么区别了。那 IoC 怎样确定如何实例化 Bean、管理 Bean 之间的依赖关系以及管理 Bean 呢?这就需要配置元数据,在 Spring 中由 BeanDefinition 代表,后边会详细介绍,配置元数据指定如何实例化 Bean、如何组装 Bean 等。
Spring IoC
Spring IoC 容器中的对象仅通过构造函数参数、工厂方法的参数或在对象实例被构造或从工厂方法返回后设置的属性来定义它们的依赖关系(即与它们一起工作的其他对象)。然后容器在创建 bean 时注入这些依赖项。这个过程基本上是 bean 本身通过使用类的直接构造或诸如服务定位器模式之类的机制来控制其依赖关系的实例化或位置的逆过程(因此称为控制反转)。
org.springframework.beans 和 org.springframework.context 是 IoC 容器的基础。
IoC 容器
在 Spring 中,有两种 IoC 容器:BeanFactory 和 ApplicationContext。
BeanFactory:**BeanFactory是 Spring 基础 IoC 容器**。BeanFactory提供了 Spring 容器的配置框架和基本功能。ApplicationContext:**ApplicationContext是具备应用特性的BeanFactory的子接口**。它还扩展了其他一些接口,以支持更丰富的功能,如:国际化、访问资源、事件机制、更方便的支持 AOP、在 web 应用中指定应用层上下文等。
实际开发中,更推荐使用 ApplicationContext 作为 IoC 容器,因为它的功能远多于 BeanFactory。
org.springframework.context.ApplicationContext 接口代表 Spring IoC 容器,负责实例化、配置和组装 bean。容器通过读取配置元数据来获取关于要实例化、配置和组装哪些对象的指令。配置元数据以 XML、Java 注释或 Java 代码表示。它允许您表达组成应用程序的对象以及这些对象之间丰富的相互依赖关系。
Spring 提供了 ApplicationContext 接口的几个实现,例如:
- **ClassPathXmlApplicationContext**:
ApplicationContext的实现,从 classpath 获取配置信息。
1 | BeanFactory beanFactory = new ClassPathXmlApplicationContext("classpath.xml"); |
- **FileSystemXmlApplicationContext**:
ApplicationContext的实现,从文件系统获取配置信息。
1 | BeanFactory beanFactory = new FileSystemXmlApplicationContext("fileSystemConfig.xml"); |
在大多数应用场景中,不需要显式通过用户代码来实例化 Spring IoC 容器的一个或多个实例。
下图显示了 Spring IoC 容器的工作步骤
使用 IoC 容器可分为三步骤:
- 配置元数据:需要配置一些元数据来告诉 Spring,你希望容器如何工作,具体来说,就是如何去初始化、配置、管理 JavaBean 对象。
- 实例化容器:由 IoC 容器解析配置的元数据。IoC 容器的 Bean Reader 读取并解析配置文件,根据定义生成 BeanDefinition 配置元数据对象,IoC 容器根据
BeanDefinition进行实例化、配置及组装 Bean。 - 使用容器:由客户端实例化容器,获取需要的 Bean。
配置元数据
元数据(Metadata)又称中介数据、中继数据,为描述数据的数据(data about data),主要是描述数据属性(property)的信息。
配置元数据的方式:
- 基于 xml 配置:Spring 的传统配置方式。通常是在顶级元素
<beans>中通过<bean>元素配置元数据。这种方式的缺点是:如果 JavaBean 过多,则产生的配置文件足以让你眼花缭乱。 - **基于注解配置**:Spring 2.5 引入了对基于注解的配置元数据的支持。可以大大简化你的配置。
- **基于 Java 配置**:从 Spring 3.0 开始,Spring 支持使用 Java 代码来配置元数据。通常是在
@Configuration修饰的类中通过@Bean指定实例化 Bean 的方法。更多详情,可以参阅@Configuration、@Bean、@Import和@DependsOn注释。
这些 bean 定义对应于构成应用程序的实际对象。例如:定义服务层对象、数据访问对象 (DAO)、表示对象(如 Struts Action 实例)、基础设施对象(如 Hibernate SessionFactories、JMS 队列等)。通常,不会在容器中配置细粒度的域对象,因为创建和加载域对象通常是 DAO 和业务逻辑的责任。但是,可以使用 Spring 与 AspectJ 的集成来配置在 IoC 容器控制之外创建的对象。
以下示例显示了基于 XML 的配置元数据的基本结构:
1 |
|
实例化容器
可以通过为 ApplicationContext 的构造函数指定外部资源路径,来加载配置元数据。
1 | ApplicationContext context = new ClassPathXmlApplicationContext("services.xml", "daos.xml"); |
以下示例显示了服务层对象 (services.xml) 配置文件:
1 |
|
以下示例显示了数据访问对象 (daos.xml) 配置文件:
1 |
|
上面的示例中,服务层由 PetStoreServiceImpl 类和类型为 JpaAccountDao 和 JpaItemDao 的两个数据访问对象(基于 JPA 对象关系映射标准)组成。 property name 元素指的是 JavaBean 属性的名称,ref 元素指的是另一个 bean 定义的名称。 id 和 ref 元素之间的这种联系表达了协作对象之间的依赖关系。
Spring 支持通过多个 xml 文件来定义 Bean,每个单独的 XML 配置文件都代表架构中的一个逻辑层或模块。可以使用 ApplicationContext 构造函数从所有这些 XML 片段加载 bean 定义。或者,使用 <import/> 元素从另一个或多个文件加载 bean 定义。如下所示:
1 | <beans> |
在上面的示例中,外部 bean 定义从三个文件加载:services.xml、messageSource.xml 和 themeSource.xml。services.xml 文件必须和当前 xml 文件位于同一目录或类路径位置;而 messageSource.xml 和 themeSource.xml 必须位于当前文件所在目录的子目录 resources 下。/resources 的 / 会被忽略。但是,鉴于这些路径是相对的,最好不要使用 /。根据 Spring Schema,被导入文件的内容,包括顶级 <beans/> 元素,必须是有效的 XML bean 定义。
注意:
可以,但不推荐使用相对
“../”路径来引用父目录中的文件。这样做会创建对当前应用程序之外的文件的依赖。特别是,不建议将此引用用于classpath:URL(例如,classpath:../services.xml),其中运行时解析过程会选择“最近的”类路径根,然后查看其父目录。类路径配置更改可能会导致选择不同的、不正确的目录。可以使用完全限定的资源位置而不是相对路径:例如,
file:C:/config/services.xml或classpath:/config/services.xml。建议为此类绝对路径保留一定的间接性 — 例如,通过“${...}”占位符来引用运行时指定 的 JVM 参数。
命名空间本身提供了导入指令功能。 Spring 提供的一系列 XML 命名空间中提供了除了普通 bean 定义之外的更多配置特性 — 例如,context 和 util 命名空间。
使用容器
ApplicationContext 能够维护不同 bean 及其依赖项的注册表。通过使用方法 T getBean(String name, Class T requiredType),可以检索并获取 bean 的实例。
ApplicationContext 允许读取 bean 定义并访问它们,如以下示例所示:
1 | // create and configure beans |
最灵活的变体是 GenericApplicationContext 结合阅读器委托 — 例如,结合 XML 文件的 XmlBeanDefinitionReader,如下例所示:
1 | GenericApplicationContext context = new GenericApplicationContext(); |
可以在同一个 ApplicationContext 上混合和匹配此类读取器委托,从不同的配置源读取 bean 定义。
然后,可以使用 getBean 检索 bean 的实例。 ApplicationContext 接口还有一些其他方法用于检索 bean,但理想情况下,应用程序代码不应该使用它们。实际上,应用程序代码根本不应该调用 getBean() 方法,因此根本不依赖 Spring API。例如,Spring 与 Web 框架的集成为各种 Web 框架组件(例如控制器和 JSF 管理的 bean)提供了依赖注入,让您可以通过元数据(例如自动装配注释)声明对特定 bean 的依赖。
IoC 依赖来源
自定义 Bean
容器内建 Bean 对象
容器内建依赖
IoC 配置元数据
IoC 容器的配置有三种方式:
- 基于 xml 配置
- 基于 properties 配置
- 基于注解配置
- 基于 Java 配置
作为 Spring 传统的配置方式,xml 配置方式一般为大家所熟知。
如果厌倦了 xml 配置,Spring 也提供了注解配置方式或 Java 配置方式来简化配置。
本文,将对 Java 配置 IoC 容器做详细的介绍。
Xml 配置
1 |
|
标签说明:
<beans>是 Spring 配置文件的根节点。<bean>用来定义一个 JavaBean。id属性是它的标识,在文件中必须唯一;class属性是它关联的类。<alias>用来定义 Bean 的别名。<import>用来导入其他配置文件的 Bean 定义。这是为了加载多个配置文件,当然也可以把这些配置文件构造为一个数组(new String[] {“config1.xml”, config2.xml})传给ApplicationContext实现类进行加载多个配置文件,那一个更适合由用户决定;这两种方式都是通过调用 Bean Definition Reader 读取 Bean 定义,内部实现没有任何区别。<import>标签可以放在<beans>下的任何位置,没有顺序关系。
实例化容器
实例化容器的过程:
定位资源(XML 配置文件)
读取配置信息(Resource)
转化为 Spring 可识别的数据形式(BeanDefinition)
1 | ApplicationContext context = |
组合 xml 配置文件
配置的 Bean 功能各不相同,都放在一个 xml 文件中,不便管理。
Java 设计模式讲究职责单一原则。配置其实也是如此,功能不同的 JavaBean 应该被组织在不同的 xml 文件中。然后使用 import 标签把它们统一导入。
1 | <import resource="classpath:spring/applicationContext.xml"/> |
使用容器
使用容器的方式就是通过getBean获取 IoC 容器中的 JavaBean。
Spring 也有其他方法去获得 JavaBean,但是 Spring 并不推荐其他方式。
1 | // create and configure beans |
注解配置
Spring2.5 引入了注解。
于是,一个问题产生了:使用注解方式注入 JavaBean 是不是一定完爆 xml 方式?
未必。正所谓,仁者见仁智者见智。任何事物都有其优缺点,看你如何取舍。来看看注解的优缺点:
优点:大大减少了配置,并且可以使配置更加精细——类,方法,字段都可以用注解去标记。
缺点:使用注解,不可避免产生了侵入式编程,也产生了一些问题。
你需要将注解加入你的源码并编译它;
注解往往比较分散,不易管控。
注:spring 中,先进行注解注入,然后才是 xml 注入,因此如果注入的目标相同,后者会覆盖前者。
启动注解
Spring 默认是不启用注解的。如果想使用注解,需要先在 xml 中启动注解。
启动方式:在 xml 中加入一个标签,很简单吧。
1 | <context:annotation-config/> |
注:
<context:annotation-config/>只会检索定义它的上下文。什么意思呢?就是说,如果你
为 DispatcherServlet 指定了一个WebApplicationContext,那么它只在 controller 中查找@Autowired注解,而不会检查其它的路径。
@Required
@Required 注解只能用于修饰 bean 属性的 setter 方法。受影响的 bean 属性必须在配置时被填充在 xml 配置文件中,否则容器将抛出BeanInitializationException。
1 | public class AnnotationRequired { |
@Autowired
@Autowired注解可用于修饰属性、setter 方法、构造方法。
@Autowired 注入过程
- 元信息解析
- 依赖查找
- 依赖注入(字段、方法)
注:
@Autowired注解也可用于修饰构造方法,但如果类中只有默认构造方法,则没有必要。如果有多个构造器,至少应该修饰一个,来告诉容器哪一个必须使用。
可以使用 JSR330 的注解@Inject来替代@Autowired。
范例
1 | public class AnnotationAutowired { |
xml 中的配置
1 | <!-- 测试@Autowired --> |
@Qualifier
在@Autowired注解中,提到了如果发现有多个候选的 bean 都符合修饰类型,Spring 就会抓瞎了。
那么,如何解决这个问题。
可以通过@Qualifier指定 bean 名称来锁定真正需要的那个 bean。
范例
1 | public class AnnotationQualifier { |
xml 中的配置
1 | <!-- 测试@Qualifier --> |
@Resource
Spring 支持 JSP250 规定的注解@Resource。这个注解根据指定的名称来注入 bean。
如果没有为@Resource指定名称,它会像@Autowired一样按照类型去寻找匹配。
在 Spring 中,由CommonAnnotationBeanPostProcessor来处理@Resource注解。
范例
1 | public class AnnotationResource { |
xml 的配置
1 | <!-- 测试@Resource --> |
@PostConstruct 和 @PreDestroy
@PostConstruct 和 @PreDestroy 是 JSR 250 规定的用于生命周期的注解。
从其名号就可以看出,一个是在构造之后调用的方法,一个是销毁之前调用的方法。
1 | public class AnnotationPostConstructAndPreDestroy { |
@Inject
从 Spring3.0 开始,Spring 支持 JSR 330 标准注解(依赖注入)。
注:如果要使用 JSR 330 注解,需要使用外部 jar 包。
若你使用 maven 管理 jar 包,只需要添加依赖到 pom.xml 即可:
1 | <dependency> |
@Inject 和 @Autowired 一样,可以修饰属性、setter 方法、构造方法。
范例
1 | public class AnnotationInject { |
Java 配置
基于 Java 配置 Spring IoC 容器,实际上是Spring 允许用户定义一个类,在这个类中去管理 IoC 容器的配置。
为了让 Spring 识别这个定义类为一个 Spring 配置类,需要用到两个注解:@Configuration和@Bean。
如果你熟悉 Spring 的 xml 配置方式,你可以将@Configuration等价于<beans>标签;将@Bean等价于<bean>标签。
@Bean
@Bean 的修饰目标只能是方法或注解。
@Bean 只能定义在 @Configuration 或 @Component 注解修饰的类中。
声明一个 bean
此外,@Configuration 类允许在同一个类中通过@Bean 定义内部 bean 依赖。
声明一个 bean,只需要在 bean 属性的 set 方法上标注@Bean 即可。
1 |
|
这等价于配置
1 | <beans> |
@Bean 注解用来表明一个方法实例化、配置合初始化一个被 Spring IoC 容器管理的新对象。
如果你熟悉 Spring 的 xml 配置,你可以将@Bean 视为等价于<beans>标签。
@Bean 注解可以用于任何的 Spring @Component bean,然而,通常被用于@Configuration bean。
@Configuration
@Configuration 是一个类级别的注解,用来标记被修饰类的对象是一个BeanDefinition。
@Configuration 声明 bean 是通过被 @Bean 修饰的公共方法。此外,@Configuration 允许在同一个类中通过 @Bean 定义内部 bean 依赖。
1 |
|
这等价于配置
1 | <beans> |
用 AnnotationConfigApplicationContext 实例化 IoC 容器。
依赖解决过程
容器执行 bean 依赖解析如下:
ApplicationContext使用配置元数据创建和初始化 Bean。配置元数据可以由 XML、Java 代码或注解指定。- 对于每个 bean,其依赖关系以属性、构造函数参数或静态工厂方法的参数的形式表示。这些依赖项在实际创建 bean 时提供给 bean。
- 每个属性或构造函数参数都是要设置的值的实际定义,或者是对容器中另一个 bean 的引用。
- 作为值的每个属性或构造函数参数都从其指定格式转换为该属性或构造函数参数的实际类型。默认情况下,Spring 可以将以字符串格式提供的值转换为所有内置类型,例如 int、long、String、boolean 等。
Spring 容器在创建容器时验证每个 bean 的配置。但是,在实际创建 bean 之前,不会设置 bean 属性本身。在创建容器时会创建 singleton 型的实例并设置为默认的 Bean。否则,只有在请求时才会创建 bean。
需注意:构造器注入,可能会导致无法解决循环依赖问题。
例如:A 类通过构造器注入需要 B 类的实例,B 类通过构造器注入需要 A 类的实例。Spring IoC 容器会在运行时检测到此循环引用,并抛出 BeanCurrentlyInCreationException。
一种解决方案是使用 setter 方法注入替代构造器注入。
另一种解决方案是:bean A 和 bean B 之间的循环依赖关系,强制其中一个 bean 在完全初始化之前注入另一个 bean(典型的先有鸡还是先有蛋的场景)。
Spring 会在容器加载时检测配置问题,例如引用不存在的 bean 或循环依赖。在实际创建 bean 时,Spring 会尽可能晚地设置属性并解析依赖关系。这意味着,如果在创建该对象或其依赖项之一时出现问题,则正确加载的 Spring 容器稍后可以在您请求对象时生成异常 — 例如,bean 由于丢失或无效而引发异常。某些配置问题的这种潜在的延迟可见性是默认情况下 ApplicationContext 实现预实例化单例 bean 的原因。以在实际需要之前创建这些 bean 的一些前期时间和内存为代价,您会在创建 ApplicationContext 时发现配置问题,而不是稍后。您仍然可以覆盖此默认行为,以便单例 bean 延迟初始化,而不是急切地预先实例化。
最佳实践
singleton 的 Bean 如何注入 prototype 的 Bean
Spring 创建的 Bean 默认是单例的,但当 Bean 遇到继承的时候,可能会忽略这一点。
假设有一个 SayService 抽象类,其中维护了一个类型是 ArrayList 的字段 data,用于保存方法处理的中间数据。每次调用 say 方法都会往 data 加入新数据,可以认为 SayService 是有状态,如果 SayService 是单例的话必然会 OOM。
1 | /** |
但实际开发的时候,开发同学没有过多思考就把 SayHello 和 SayBye 类加上了 @Service 注解,让它们成为了 Bean,也没有考虑到父类是有状态的。
1 |
|
在为类标记上 @Service 注解把类型交由容器管理前,首先评估一下类是否有状态,然后为 Bean 设置合适的 Scope。
调用代码:
1 |
|
可能有人认为,为 SayHello 和 SayBye 两个类都标记了 @Scope 注解,设置了 PROTOTYPE 的生命周期就可以解决上面的问题。
1 |
但实际上还是有问题。因为@RestController 注解 =@Controller 注解 +@ResponseBody 注解,又因为 @Controller 标记了 @Component 元注解,所以 @RestController 注解其实也是一个 Spring Bean。
Bean 默认是单例的,所以单例的 Controller 注入的 Service 也是一次性创建的,即使 Service 本身标识了 prototype 的范围也没用。
修复方式是,让 Service 以代理方式注入。这样虽然 Controller 本身是单例的,但每次都能从代理获取 Service。这样一来,prototype 范围的配置才能真正生效。
1 |
参考资料
Spring 依赖查找
Spring 依赖查找
依赖查找是主动或手动的依赖查找方式,通常需要依赖容器或标准 API 实现。
IoC 依赖查找大致可以分为以下几类:
- 根据 Bean 名称查找
- 根据 Bean 类型查找
- 根据 Bean 名称 + 类型查找
- 根据 Java 注解查找
此外,根据查找的 Bean 对象是单一或集合对象,是否需要延迟查找等特定常见,有相应不同的 API。
单一类型依赖查找
单一类型依赖查找接口- BeanFactory
- 根据 Bean 名称查找
getBean(String)- Spring 2.5 覆盖默认参数:
getBean(String,Object...)
- 根据 Bean 类型查找
- Bean 实时查找
- Spring 3.0
getBean(Class) - Spring 4.1 覆盖默认参数:
getBean(Class,Object...)
- Spring 3.0
- Spring 5.1 Bean 延迟查找
getBeanProvider(Class)getBeanProvider(ResolvableType)
- Bean 实时查找
- 根据 Bean 名称 + 类型查找:
getBean(String,Class)
集合类型依赖查找
集合类型依赖查找接口- ListableBeanFactory
根据 Bean 类型查找
- 获取同类型 Bean 名称列表
getBeanNamesForType(Class)- Spring 4.2
getBeanNamesForType(ResolvableType)
- 获取同类型 Bean 实例列表
getBeansOfType(Class)以及重载方法
- 获取同类型 Bean 名称列表
通过注解类型查找
Spring 3.0 获取标注类型 Bean 名称列表
getBeanNamesForAnnotation(Class<? extends Annotation>)
Spring 3.0 获取标注类型 Bean 实例列表
getBeansWithAnnotation(Class<? extends Annotation>)
Spring 3.0 获取指定名称+ 标注类型 Bean 实例
findAnnotationOnBean(String,Class<? extends Annotation>)
层次性依赖查找
层次性依赖查找接口- HierarchicalBeanFactory
- 双亲
BeanFactory:getParentBeanFactory() - 层次性查找
- 根据 Bean 名称查找
- 基于
containsLocalBean方法实现
- 基于
- 根据 Bean 类型查找实例列表
- 单一类型:
BeanFactoryUtils#beanOfType - 集合类型:
BeanFactoryUtils#beansOfTypeIncludingAncestors
- 单一类型:
- 根据 Java 注解查找名称列表
BeanFactoryUtils#beanNamesForTypeIncludingAncestors
- 根据 Bean 名称查找
延迟依赖查找
Bean 延迟依赖查找接口
org.springframework.beans.factory.ObjectFactoryorg.springframework.beans.factory.ObjectProvider(Spring 5 对 Java 8 特性扩展)- 函数式接口
getIfAvailable(Supplier)ifAvailable(Consumer)
- Stream 扩展- stream()
安全依赖查找
| 依赖查找类型 | 代表实现 | 是否安全 |
|---|---|---|
| 单一类型查找 | BeanFactory#getBean |
否 |
ObjectFactory#getObject |
否 | |
ObjectProvider#getIfAvailable |
是 | |
| 集合类型查找 | ListableBeanFactory#getBeansOfType |
是 |
ObjectProvider#stream |
是 |
注意:层次性依赖查找的安全性取决于其扩展的单一或集合类型的 BeanFactory 接口
内建可查找的依赖
AbstractApplicationContext 内建可查找的依赖
| Bean | 名称 Bean | 实例使用场景 |
|---|---|---|
| environment | Environment 对象 | 外部化配置以及 Profiles |
| systemProperties | java.util.Properties 对象 | Java 系统属性 |
| systemEnvironment | java.util.Map 对象 | 操作系统环境变量 |
| messageSource | MessageSource 对象 | 国际化文案 |
| lifecycleProcessor | LifecycleProcessor 对象 | Lifecycle Bean 处理器 |
| applicationEventMulticaster | ApplicationEventMulticaster 对象 | Spring 事件广播器 |
注解驱动 Spring 应用上下文内建可查找的依赖(部分)
| Bean 名称 | Bean 实例 | 使用场景 |
|---|---|---|
| org.springframework.context.annotation.internalConfigurationAnnotationProcessor | ConfigurationClassPostProcessor 对象 | 处理 Spring 配置类 |
| org.springframework.context.annotation.internalAutowiredAnnotationProcessor | AutowiredAnnotationBeanPostProcessor 对象 | 处理@Autowired 以及@Value 注解 |
| org.springframework.context.annotation.internalCommonAnnotationProcessor | CommonAnnotationBeanPostProcessor 对象 | (条件激活)处理 JSR-250 注解,如@PostConstruct 等 |
| org.springframework.context.event.internalEventListenerProcessor | EventListenerMethodProcessor 对象 | 处理标注@EventListener 的 Spring 事件监听方法 |
| org.springframework.context.event.internalEventListenerFactory | DefaultEventListenerFactory 对象 | @EventListener 事件监听方法适配为 ApplicationListener |
| org.springframework.context.annotation.internalPersistenceAnnotationProcessor | PersistenceAnnotationBeanPostProcessor 对象 | (条件激活)处理 JPA 注解场景 |
依赖查找中的经典异常
BeansException 子类型
| 异常类型 | 触发条件(举例) | 场景举例 |
|---|---|---|
NoSuchBeanDefinitionException |
当查找 Bean 不存在于 IoC 容器时 | BeanFactory#getBeanObjectFactory#getObject |
NoUniqueBeanDefinitionException |
类型依赖查找时,IoC 容器存在多个 Bean 实例 | BeanFactory#getBean(Class) |
BeanInstantiationException |
当 Bean 所对应的类型非具体类时 | BeanFactory#getBean |
BeanCreationException |
当 Bean 初始化过程中 | Bean 初始化方法执行异常时 |
BeanDefinitionStoreException |
当 BeanDefinition 配置元信息非法时 |
XML 配置资源无法打开时 |
参考资料
Spring 依赖注入
Spring 依赖注入
DI,是 Dependency Injection 的缩写,即依赖注入。依赖注入是 IoC 的最常见形式。依赖注入是手动或自动绑定的方式,无需依赖特定的容器或 API。
依赖注入 (Dependency Injection,简称 DI) 是一个过程,其中对象仅通过构造函数参数、工厂方法的参数或对象实例在构造或从工厂方法返回。然后容器在创建 bean 时注入这些依赖项。这个过程基本上是 bean 本身的逆过程(因此得名,控制反转),它通过使用类的直接构造或服务定位器模式自行控制其依赖项的实例化或位置。
使用 DI,代码更干净,当对象具有依赖关系时,解耦更有效。对象不查找其依赖项,也不知道依赖项的位置或类别。结果,您的类变得更容易测试,特别是当依赖关系在接口或抽象基类上时,它们允许在单元测试中使用存根或模拟实现。
容器全权负责组件的装配,它会把符合依赖关系的对象通过 JavaBean 属性或者构造函数传递给需要的对象。
DI 是组件之间依赖关系由容器在运行期决定,形象的说,即由容器动态的将某个依赖关系注入到组件之中。依赖注入的目的并非为软件系统带来更多功能,而是为了提升组件重用的频率,并为系统搭建一个灵活、可扩展的平台。通过依赖注入机制,我们只需要通过简单的配置,而无需任何代码就可指定目标需要的资源,完成自身的业务逻辑,而不需要关心具体的资源来自何处,由谁实现。
理解 DI 的关键是:“谁依赖谁,为什么需要依赖,谁注入谁,注入了什么”,那我们来深入分析一下:
- 谁依赖于谁:当然是应用程序依赖于 IoC 容器;
- 为什么需要依赖:应用程序需要 IoC 容器来提供对象需要的外部资源;
- 谁注入谁:很明显是 IoC 容器注入应用程序某个对象,应用程序依赖的对象;
- 注入了什么:就是注入某个对象所需要的外部资源(包括对象、资源、常量数据)。
IoC 依赖注入 API
- 根据 Bean 名称注入
- 根据 Bean 类型注入
- 注入容器内建 Bean 对象
- 注入非 Bean 对象
- 注入类型
- 实时注入
- 延迟注入
依赖注入模式
依赖注入模式可以分为手动注入模式和自动注入模式。
手动注入模式
手动注入模式:配置或者编程的方式,提前安排注入规则
- XML 资源配置元信息
- Java 注解配置元信息
- API 配置元信息
自动注入模式
自动注入模式即自动装配。自动装配(Autowiring)是指 Spring 容器可以自动装配 Bean 之间的关系。Spring 可以通过检查 ApplicationContext 的内容,自动解析合作者(其他 Bean)。
- 自动装配可以显著减少属性或构造函数参数的配置。
- 随着对象的发展,自动装配可以更新配置。
注:由于自动装配存在一些限制和不足,官方不推荐使用。
自动装配策略
当使用基于 XML 的配置元数据时,可以使用 <bean/> 元素的 autowire 属性为 Bean 指定自动装配模式。自动装配模式有以下类型:
| 模式 | 说明 |
|---|---|
no |
默认值,未激活 Autowiring,需要手动指定依赖注入对象。 |
byName |
根据被注入属性的名称作为 Bean 名称进行依赖查找,并将对象设置到该属性。 |
byType |
根据被注入属性的类型作为依赖类型进行查找,并将对象设置到该属性。 |
constructor |
特殊 byType 类型,用于构造器参数。 |
org.springframework.beans.factory.config.AutowireCapableBeanFactory 是 BeanFactory 的子接口,它是 Spring 中用于实现自动装配的容器。
@Autowired 注入过程
- 元信息解析
- 依赖查找
- 依赖注入(字段、方法)
自动装配的限制和不足
自动装配有以下限制和不足:
- 属性和构造函数参数设置中的显式依赖项会覆盖自动装配。您不能自动装配简单属性,例如基础数据类型、字符串和类(以及此类简单属性的数组)。
- 自动装配不如显式装配精准。Spring 会尽量避免猜测可能存在歧义的结果。
- Spring 容器生成文档的工具可能无法解析自动装配信息。
- 如果同一类型存在多个 Bean 时,自动装配时会存在歧义。容器内的多个 Bean 定义可能与要自动装配的 Setter 方法或构造函数参数指定的类型匹配。对于数组、集合或 Map 实例,这不一定是问题。但是,对于期望单值的依赖项,如果没有唯一的 Bean 定义可用,则会引发异常。
自动装配的限制和不足,详情可以参考官方文档:Limitations and Disadvantages of Autowiring 小节
依赖注入方式
依赖注入有如下方式:
| 依赖注入方式 | 配置元数据举例 |
|---|---|
| Setter 方法注入 | <proeprty name="user" ref="userBean"/> |
| 构造器注入 | <constructor-arg name="user" ref="userBean" /> |
| 字段注入 | @Autowired User user; |
| 方法注入 | @Autowired public void user(User user) { ... } |
| 接口回调注入 | class MyBean implements BeanFactoryAware { ... } |
构造器注入
- 手动模式
- xml 配置元信息
- 注解配置元信息
- Java 配置元信息
- 自动模式
- constructor
构造器注入是通过容器调用具有多个参数的构造函数来完成的,每个参数代表一个依赖项。调用带有特定参数的静态工厂方法来构造 bean 几乎是等价的,并且本次讨论对构造函数和静态工厂方法的参数进行了类似的处理。
下面是一个构造器注入示例:
1 | public class SimpleMovieLister { |
构造函数参数解析匹配通过使用参数的类型进行。如果 bean 定义的构造函数参数中不存在潜在的歧义,则在 bean 定义中定义构造函数参数的顺序是在实例化 bean 时将这些参数提供给适当构造函数的顺序。
1 | package x.y; |
假设 ThingTwo 和 ThingThree 类没有继承关系,则不存在潜在的歧义。因此,以下配置工作正常,您无需在 <constructor-arg/> 元素中显式指定构造函数参数索引或类型。
1 | <beans> |
当引用另一个 bean 时,类型是已知的,并且可以发生匹配(就像前面的示例一样)。当使用简单类型时,例如 <value>true</value> ,Spring 无法确定 value 的类型,因此无法在没有帮助的情况下按类型匹配。考虑以下类:
1 | package examples; |
构造函数参数类型匹配
在上述场景中,如果您使用 type 属性显式指定构造函数参数的类型,则容器可以使用简单类型的类型匹配,如以下示例所示:
1 | <bean id="exampleBean" class="examples.ExampleBean"> |
构造函数参数索引匹配
可以使用 index 属性显式指定构造函数参数的索引,如以下示例所示
1 | <bean id="exampleBean" class="examples.ExampleBean"> |
构造函数参数名称匹配
1 | <bean id="exampleBean" class="examples.ExampleBean"> |
可以使用 @ConstructorProperties 显式命名构造函数参数。
1 | package examples; |
Setter 方法注入
- 手动模式
- xml 配置元信息
- 注解配置元信息
- Java 配置元信息
- 自动模式
- byName
- byType
Setter 方法注入是通过容器在调用无参数构造函数或无参数静态工厂方法来实例化 bean 后调用 bean 上的 setter 方法来完成的。
以下示例显示了一个只能通过使用纯 setter 注入进行依赖注入的类。
1 | public class SimpleMovieLister { |
在 Spring 中,可以混合使用构造器注入和 setter 方法注入。建议将构造器注入用于强制依赖项;并将 setter 方法注入或配置方法用于可选依赖项。需要注意的是,在 setter 方法上使用 @Required 注解可用于使属性成为必需的依赖项;然而,更建议使用构造器注入来完成这项工作。
字段注入
手动模式(Java 注解配置元信息)
@Autowired@Resource@Inject(可选)
方法注入
手动模式(Java 注解配置元信息)
@Autowired@Resource@Inject(可选)@Bean
接口回调注入
Aware 系列接口回调
| 內建接口 | 说明 |
|---|---|
BeanFactoryAware |
获取 IoC 容器- BeanFactory |
ApplicationContextAware |
获取 Spring 应用上下文- ApplicationContext 对象 |
EnvironmentAware |
获取 Environment 对象 |
ResourceLoaderAware |
获取资源加载器对象- ResourceLoader |
BeanClassLoaderAware |
获取加载当前 Bean Class 的 ClassLoader |
BeanNameAware |
获取当前 Bean 的名称 |
MessageSourceAware |
获取 MessageSource 对象,用于 Spring 国际化 |
ApplicationEventPublisherAware |
获取 ApplicationEventPublishAware 对象,用于 Spring 事件 |
EmbeddedValueResolverAware |
获取 StringValueResolver 对象,用于占位符处理 |
依赖注入选型
- 低依赖:构造器注入
- 多依赖:Setter 方法注入
- 便利性:字段注入
- 声明类:方法注入
限定注入和延迟注入
限定注入
- 使用
@Qualifier注解限定- 通过 Bean 名称限定
- 通过分组限定
- 通过
@Qualifier注解扩展限定- 自定义注解:如 Spring Cloud 的
@LoadBalanced
- 自定义注解:如 Spring Cloud 的
延迟注入
- 使用
ObjectFactory - 使用
ObjectProvider(推荐)
依赖注入数据类型
基础类型
- 基础数据类型:
boolean、byte、char、short、int、float、long、double - 标量类型:
Number、Character、Boolean、Enum、Locale、Charset、Currency、Properties、UUID - 常规类型:
Object、String、TimeZone、Calendar、Optional等 - Spring 类型:
Resource、InputSource、Formatter等。
集合类型
数组类型:基础数据类型、标量类型、常规类型、String 类型的数组
集合类型:
Collection:List、SetMap:Properties
依赖处理过程
入口:DefaultListableBeanFactory#resolveDependency
依赖描述符:DependencyDescriptor
自定义绑定候选对象处理器:AutowireCandidateResolver
@Autowired、@Value、@javax.inject.Inject 处理器:AutowiredAnnotationBeanPostProcessor
通用注解处理器:CommonAnnotationBeanPostProcessor
- 注入注解
javax.xml.ws.WebServiceRefjavax.ejb.EJBjavax.annotation.Resources
- 生命周期注解
javax.annotation.PostConstructjavax.annotation.PreDestroy
自定义依赖注入注解:
- 生命周期处理
InstantiationAwareBeanPostProcessorMergedBeanDefinitionPostProcessor
- 元数据
InjectionMetadataInjectionMetadata.InjectedElement
依赖查找 VS. 依赖注入
| 类型 | 依赖处理 | 实现复杂度 | 代码侵入性 | API 依赖性 | 可读性 |
|---|---|---|---|---|---|
| 依赖查找 | 主动 | 相对繁琐 | 侵入业务逻辑 | 依赖容器 API | 良好 |
| 依赖注入 | 被动 | 相对便利 | 低侵入性 | 不依赖容器 API | 一般 |
参考资料
JavaWeb 之 Servlet 指南
JavaWeb 之 Servlet 指南
JavaWeb 简介
Web 应用程序
Web,在英语中 web 即表示网页的意思,它用于表示 Internet 主机上供外界访问的资源。
Web 应用程序是一种可以通过 Web 访问的应用程序,程序的最大好处是用户很容易访问应用程序,用户只需要有浏览器即可,不需要再安装其他软件。
Internet 上供外界访问的 Web 资源分为:
- 静态 web 资源:指 web 页面中供人们浏览的数据始终是不变。常见静态资源文件:html、css、各种图片类型(jpg、png)
- 动态 web 资源:指 web 页面中供人们浏览的数据是由程序产生的,不同时间点访问 web 页面看到的内容各不相同。常见动态资源技术:JSP/Servlet、ASP、PHP
常见 Web 服务器
Servlet 简介
什么是 Servlet
Servlet(Server Applet),即小服务程序或服务连接器。Servlet 是 Java 编写的服务器端程序,具有独立于平台和协议的特性,主要功能在于交互式地浏览和生成数据,生成动态 Web 内容。
- 狭义的 Servlet 是指 Java 实现的一个接口。
- 广义的 Servlet 是指任何实现了这个 Servlet 接口的类。
Servlet 运行于支持 Java 的应用服务器中。从原理上讲,Servlet 可以响应任何类型的请求,但绝大多数情况下 Servlet 只用来扩展基于 HTTP 协议的 Web 服务器。
Servlet 和 CGI 的区别
Servlet 技术出现之前,Web 主要使用 CGI 技术。它们的区别如下:
- Servlet 是基于 Java 编写的,处于服务器进程中,他能够通过多线程方式运行 service() 方法,一个实例可以服务于多个请求,而且一般不会销毁;
- CGI(Common Gateway Interface),即通用网关接口。它会为每个请求产生新的进程,服务完成后销毁,所以效率上低于 Servlet。
Servlet 版本以及主要特性
| 版本 | 日期 | JAVA EE/JDK 版本 | 特性 |
|---|---|---|---|
| Servlet 4.0 | 2017 年 10 月 | JavaEE 8 | HTTP2 |
| Servlet 3.1 | 2013 年 5 月 | JavaEE 7 | 非阻塞 I/O,HTTP 协议升级机制 |
| Servlet 3.0 | 2009 年 12 月 | JavaEE 6, JavaSE 6 | 可插拔性,易于开发,异步 Servlet,安全性,文件上传 |
| Servlet 2.5 | 2005 年 10 月 | JavaEE 5, JavaSE 5 | 依赖 JavaSE 5,支持注解 |
| Servlet 2.4 | 2003 年 11 月 | J2EE 1.4, J2SE 1.3 | web.xml 使用 XML Schema |
| Servlet 2.3 | 2001 年 8 月 | J2EE 1.3, J2SE 1.2 | Filter |
| Servlet 2.2 | 1999 年 8 月 | J2EE 1.2, J2SE 1.2 | 成为 J2EE 标准 |
| Servlet 2.1 | 1998 年 11 月 | 未指定 | First official specification, added RequestDispatcher, ServletContext |
| Servlet 2.0 | JDK 1.1 | Part of Java Servlet Development Kit 2.0 | |
| Servlet 1.0 | 1997 年 6 月 |
Servlet 任务
Servlet 执行以下主要任务:
- 读取客户端(浏览器)发送的显式的数据。这包括网页上的 HTML 表单,或者也可以是来自 applet 或自定义的 HTTP 客户端程序的表单。
- 读取客户端(浏览器)发送的隐式的 HTTP 请求数据。这包括 cookies、媒体类型和浏览器能理解的压缩格式等等。
- 处理数据并生成结果。这个过程可能需要访问数据库,执行 RMI 或 CORBA 调用,调用 Web 服务,或者直接计算得出对应的响应。
- 发送显式的数据(即文档)到客户端(浏览器)。该文档的格式可以是多种多样的,包括文本文件(HTML 或 XML)、二进制文件(GIF 图像)、Excel 等。
- 发送隐式的 HTTP 响应到客户端(浏览器)。这包括告诉浏览器或其他客户端被返回的文档类型(例如 HTML),设置 cookies 和缓存参数,以及其他类似的任务。
Servlet 生命周期

Servlet 生命周期如下:
- 加载 - 第一个到达服务器的 HTTP 请求被委派到 Servlet 容器。容器通过类加载器使用 Servlet 类对应的文件加载 servlet;
- 初始化 - Servlet 通过调用 init () 方法进行初始化。
- 服务 - Servlet 调用 service() 方法来处理客户端的请求。
- 销毁 - Servlet 通过调用 destroy() 方法终止(结束)。
- 卸载 - Servlet 是由 JVM 的垃圾回收器进行垃圾回收的。
Servlet API
Servlet 包
Java Servlet 是运行在带有支持 Java Servlet 规范的解释器的 web 服务器上的 Java 类。
Servlet 可以使用 javax.servlet 和 javax.servlet.http 包创建,它是 Java 企业版的标准组成部分,Java 企业版是支持大型开发项目的 Java 类库的扩展版本。
Java Servlet 就像任何其他的 Java 类一样已经被创建和编译。在您安装 Servlet 包并把它们添加到您的计算机上的 Classpath 类路径中之后,您就可以通过 JDK 的 Java 编译器或任何其他编译器来编译 Servlet。
Servlet 接口
Servlet 接口定义了下面五个方法:
1 | public interface Servlet { |
init() 方法
init 方法被设计成只调用一次。它在第一次创建 Servlet 时被调用,在后续每次用户请求时不再调用。因此,它是用于一次性初始化,就像 Applet 的 init 方法一样。
Servlet 创建于用户第一次调用对应于该 Servlet 的 URL 时,但是您也可以指定 Servlet 在服务器第一次启动时被加载。
当用户调用一个 Servlet 时,就会创建一个 Servlet 实例,每一个用户请求都会产生一个新的线程,适当的时候移交给 doGet 或 doPost 方法。init() 方法简单地创建或加载一些数据,这些数据将被用于 Servlet 的整个生命周期。
init 方法的定义如下:
1 | public void init() throws ServletException { |
service() 方法
service() 方法是执行实际任务的核心方法。Servlet 容器(即 Web 服务器)调用 service() 方法来处理来自客户端(浏览器)的请求,并把格式化的响应写回给客户端。
service() 方法有两个参数:ServletRequest 和 ServletResponse。ServletRequest 用来封装请求信息,ServletResponse 用来封装响应信息,因此本质上这两个类是对通信协议的封装。
每次服务器接收到一个 Servlet 请求时,服务器会产生一个新的线程并调用服务。service() 方法检查 HTTP 请求类型(GET、POST、PUT、DELETE 等),并在适当的时候调用 doGet、doPost、doPut,doDelete 等方法。
下面是该方法的特征:
1 | public void service(ServletRequest request, |
service() 方法由容器调用,service 方法在适当的时候调用 doGet、doPost、doPut、doDelete 等方法。所以,您不用对 service() 方法做任何动作,您只需要根据来自客户端的请求类型来重写 doGet() 或 doPost() 即可。
doGet() 和 doPost() 方法是每次服务请求中最常用的方法。下面是这两种方法的特征。
doGet() 方法
GET 请求来自于一个 URL 的正常请求,或者来自于一个未指定 METHOD 的 HTML 表单,它由 doGet() 方法处理。
1 | public void doGet(HttpServletRequest request, |
doPost() 方法
POST 请求来自于一个特别指定了 METHOD 为 POST 的 HTML 表单,它由 doPost() 方法处理。
1 | public void doPost(HttpServletRequest request, |
destroy() 方法
destroy() 方法只会被调用一次,在 Servlet 生命周期结束时被调用。destroy() 方法可以让您的 Servlet 关闭数据库连接、停止后台线程、把 Cookie 列表或点击计数器写入到磁盘,并执行其他类似的清理活动。
在调用 destroy() 方法之后,servlet 对象被标记为垃圾回收。destroy 方法定义如下所示:
1 | public void destroy() { |
Servlet 和 HTTP 状态码
title: JavaEE Servlet HTTP 状态码
date: 2017-11-08
categories:
- javaee
tags: - javaee
- servlet
- http
HTTP 状态码
HTTP 请求和 HTTP 响应消息的格式是类似的,结构如下:
- 初始状态行 + 回车换行符(回车+换行)
- 零个或多个标题行+回车换行符
- 一个空白行,即回车换行符
- 一个可选的消息主体,比如文件、查询数据或查询输出
例如,服务器的响应头如下所示:
1 | 200 OK |
状态行包括 HTTP 版本(在本例中为 HTTP/1.1)、一个状态码(在本例中为 200)和一个对应于状态码的短消息(在本例中为 OK)。
以下是可能从 Web 服务器返回的 HTTP 状态码和相关的信息列表:
1**:信息性状态码2**:成功状态码- 200:请求正常成功
- 204:指示请求成功但没有返回新信息
- 206:指示服务器已完成对资源的部分 GET 请求
3**:重定向状态码- 301:永久性重定向
- 302:临时性重定向
- 304:服务器端允许请求访问资源,但未满足条件
4**:客户端错误状态码- 400:请求报文中存在语法错误
- 401:发送的请求需要有通过 HTTP 认证的认证信息
- 403:对请求资源的访问被服务器拒绝了
- 404:服务器上无法找到请求的资源
5**:服务器错误状态码- 500:服务器端在执行请求时发生了错误
- 503:服务器暂时处于超负载或正在进行停机维护,现在无法处理请求
设置 HTTP 状态码的方法
下面的方法可用于在 Servlet 程序中设置 HTTP 状态码。这些方法通过 HttpServletResponse 对象可用。
| 序号 | 方法 & 描述 |
|---|---|
| 1 | **public void setStatus ( int statusCode )**该方法设置一个任意的状态码。setStatus 方法接受一个 int(状态码)作为参数。如果您的反应包含了一个特殊的状态码和文档,请确保在使用 PrintWriter 实际返回任何内容之前调用 setStatus。 |
| 2 | **public void sendRedirect(String url)**该方法生成一个 302 响应,连同一个带有新文档 URL 的 Location 头。 |
| 3 | **public void sendError(int code, String message)**该方法发送一个状态码(通常为 404),连同一个在 HTML 文档内部自动格式化并发送到客户端的短消息。 |
HTTP 状态码实例
下面的例子把 407 错误代码发送到客户端浏览器,浏览器会显示 “Need authentication!!!” 消息。
1 | // 导入必需的 java 库 |
现在,调用上面的 Servlet 将显示以下结果:
1 | HTTP Status 407 - Need authentication!!! |
参考资料
JavaWeb 之 Filter 和 Listener
JavaWeb 之 Filter 和 Listener
引入了 Servlet 规范后,你不需要关心 Socket 网络通信、不需要关心 HTTP 协议,也不需要关心你的业务类是如何被实例化和调用的,因为这些都被 Servlet 规范标准化了,你只要关心怎么实现的你的业务逻辑。这对于程序员来说是件好事,但也有不方便的一面。所谓规范就是说大家都要遵守,就会千篇一律,但是如果这个规范不能满足你的业务的个性化需求,就有问题了,因此设计一个规范或者一个中间件,要充分考虑到可扩展性。Servlet 规范提供了两种扩展机制:Filter和Listener。
Filter
Filter 是过滤器,这个接口允许你对请求和响应做一些统一的定制化处理。
Filter 提供了过滤链(Filter Chain)的概念,一个过滤链包括多个 Filter。客户端请求 request 在抵达 Servlet 之前会经过过滤链的所有 Filter,服务器响应 response 从 Servlet 抵达客户端浏览器之前也会经过过滤链的所有 FIlter。
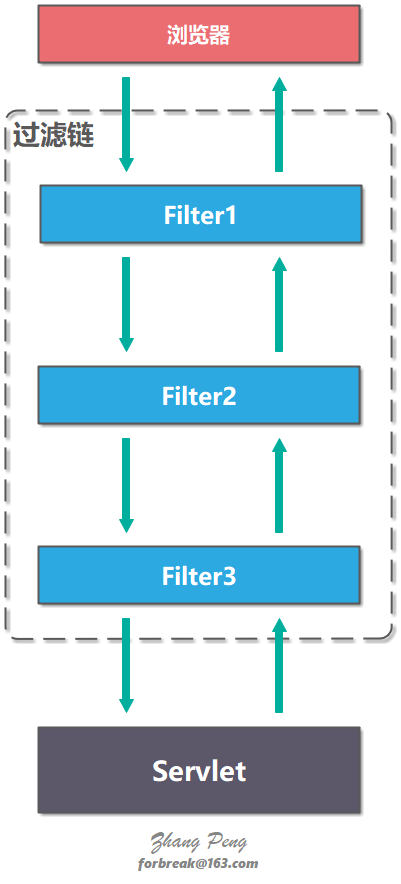
过滤器方法
Filter 接口有三个方法:
init:初始化Filterdestroy:销毁FilterdoFilter:将请求传给下个Filter或Servlet
init 和 destroy 方法只会被调用一次;doFilter 每次有客户端请求都会被调用一次。
1 | public interface Filter { |
过滤器配置
Filter 需要配置在 web.xml 中才能生效。一个 Filter 需要配置 <filter> 与 <filter-mapping> 标签。
<filter>配置 Filter 名称,实现类以及初始化参数。<filter-mapping>配置什么规则下使用该 Filter。<filter>的 filterName 与<filter-mapping>的 filterName 必须匹配。<url-pattern>配置 URL 的规则,可以配置多个,可以使用通配符(*)。<dispatcher>配置到达 Servlet 的方式,有 4 种取值:REQUEST、FORWARD、INCLUDE、ERROR。可以同时配置多个<dispatcher>。如果没有配置任何<dispatcher>,默认为 REQUEST。- REQUEST - 表示仅当直接请求 Servlet 时才生效。
- FORWARD - 表示仅当某 Servlet 通过 FORWARD 到该 Servlet 时才生效。
- INCLUDE - JSP 中可以通过
<jsp:include>请求某 Servlet。仅在这种情况表有效。 - ERROR - JSP 中可以通过
<%@ page errorPage="error.jsp" %>指定错误处理页面。仅在这种情况表有效。
Listener
监听器(Listener)用于监听 web 应用程序中的ServletContext, HttpSession和 ServletRequest等域对象的创建与销毁事件,以及监听这些域对象中的属性发生修改的事件。
使用 Listener 不需要关注该类事件时怎样触发或者怎么调用相应的 Listener,只要记住该类事件触发时一定会调用相应的 Listener,遵循 Servlet 规范的服务器会自动完成相应工作。
监听器的分类
在 Servlet 规范中定义了多种类型的监听器,它们用于监听的事件源分别为ServletContext,HttpSession和ServletRequest这三个域对象
Servlet 规范针对这三个对象上的操作,又把多种类型的监听器划分为三种类型:
- 监听域对象自身的创建和销毁的事件监听器。
- 监听域对象中的属性的增加和删除的事件监听器。
- 监听绑定到 HttpSession 域中的某个对象的状态的事件监听器。
监听对象的创建和销毁
HttpSessionListener
HttpSessionListener 接口用于监听 HttpSession 对象的创建和销毁。
- 创建一个
Session时,激发sessionCreated (HttpSessionEvent se)方法 - 销毁一个
Session时,激发sessionDestroyed (HttpSessionEvent se)方法。
ServletContextListener
ServletContextListener 接口用于监听 ServletContext 对象的创建和销毁事件。
实现了 ServletContextListener 接口的类都可以对 ServletContext 对象的创建和销毁进行监听。
- 当
ServletContext对象被创建时,激发contextInitialized (ServletContextEvent sce)方法。 - 当
ServletContext对象被销毁时,激发contextDestroyed(ServletContextEvent sce)方法。
ServletContext 域对象创建和销毁时机:
- 创建:服务器启动针对每一个 Web 应用创建
ServletContext - 销毁:服务器关闭前先关闭代表每一个 web 应用的
ServletContext
ServletRequestListener
ServletRequestListener 接口用于监听 ServletRequest 对象的创建和销毁。
Request对象被创建时,监听器的requestInitialized(ServletRequestEvent sre)方法将会被调用Request对象被销毁时,监听器的requestDestroyed(ServletRequestEvent sre)方法将会被调用
ServletRequest 域对象创建和销毁时机:
- 创建:用户每一次访问都会创建 request 对象
- 销毁:当前访问结束,request 对象就会销毁
监听对象的属性变化
域对象中属性的变更的事件监听器就是用来监听 ServletContext、HttpSession、HttpServletRequest 这三个对象中的属性变更信息事件的监听器。
这三个监听器接口分别是 ServletContextAttributeListener、HttpSessionAttributeListener 和 ServletRequestAttributeListener,这三个接口中都定义了三个方法来处理被监听对象中的属性的增加,删除和替换的事件,同一个事件在这三个接口中对应的方法名称完全相同,只是接受的参数类型不同。
attributeAdded 方法
当向被监听对象中增加一个属性时,web 容器就调用事件监听器的 attributeAdded 方法进行响应,这个方法接收一个事件类型的参数,监听器可以通过这个参数来获得正在增加属性的域对象和被保存到域中的属性对象
各个域属性监听器中的完整语法定义为:
1 | public void attributeAdded(ServletContextAttributeEvent scae) |
attributeRemoved 方法
当删除被监听对象中的一个属性时,web 容器调用事件监听器的 attributeRemoved 方法进行响应
各个域属性监听器中的完整语法定义为:
1 | public void attributeRemoved(ServletContextAttributeEvent scae) |
attributeReplaced 方法
当监听器的域对象中的某个属性被替换时,web 容器调用事件监听器的 attributeReplaced 方法进行响应
各个域属性监听器中的完整语法定义为:
1 | public void attributeReplaced(ServletContextAttributeEvent scae) |
监听 Session 内的对象
保存在 Session 域中的对象可以有多种状态:
- 绑定(
session.setAttribute("bean",Object))到Session中; - 从
Session域中解除绑定(session.removeAttribute("bean")); - 随
Session对象持久化到一个存储设备中; - 随
Session对象从一个存储设备中恢复。
Servlet 规范中定义了两个特殊的监听器接口 HttpSessionBindingListener 和HttpSessionActivationListener 来帮助 JavaBean 对象了解自己在 Session 域中的这些状态。
实现这两个接口的类不需要 web.xml 文件中进行注册。
HttpSessionBindingListener
HttpSessionBindingListener 接口的 JavaBean 对象可以感知自己被绑定或解绑定到 Session 中的事件。
- 当对象被绑定到
HttpSession对象中时,web 服务器调用该对象的valueBound(HttpSessionBindingEvent event)方法。 - 当对象从
HttpSession对象中解除绑定时,web 服务器调用该对象的valueUnbound(HttpSessionBindingEvent event)方法。
HttpSessionActivationListener
实现了 HttpSessionActivationListener 接口的 JavaBean 对象可以感知自己被活化(反序列化)和钝化(序列化)的事件。
- 当绑定到
HttpSession对象中的 JavaBean 对象将要随HttpSession对象被序列化之前,web 服务器调用该 JavaBean 对象的sessionWillPassivate(HttpSessionEvent event)方法。这样 JavaBean 对象就可以知道自己将要和HttpSession对象一起被序列化到硬盘中. - 当绑定到
HttpSession对象中的 JavaBean 对象将要随HttpSession对象被反序列化之后,web 服务器调用该 JavaBean 对象的sessionDidActive(HttpSessionEvent event)方法。这样 JavaBean 对象就可以知道自己将要和HttpSession对象一起被反序列化回到内存中
Filter 和 Listener
Filter 和 Listener 的本质区别:
- Filter 是干预过程的,它是过程的一部分,是基于过程行为的。
- Listener 是基于状态的,任何行为改变同一个状态,触发的事件是一致的。
示例代码
参考资料
JavaWeb 之 Cookie 和 Session
JavaWeb 之 Cookie 和 Session
Cookie
由于 Http 是一种无状态的协议,服务器单从网络连接上无从知道客户身份。
会话跟踪是 Web 程序中常用的技术,用来跟踪用户的整个会话。常用会话跟踪技术是 Cookie 与 Session。
Cookie 是什么
Cookie 实际上是存储在客户端上的文本信息,并保留了各种跟踪的信息。
Cookie 工作步骤:
- 客户端请求服务器,如果服务器需要记录该用户的状态,就是用 response 向客户端浏览器颁发一个 Cookie。
- 客户端浏览器会把 Cookie 保存下来。
- 当浏览器再请求该网站时,浏览器把该请求的网址连同 Cookie 一同提交给服务器。服务器检查该 Cookie,以此来辨认用户状态。
注:Cookie 功能需要浏览器的支持,如果浏览器不支持 Cookie 或者 Cookie 禁用了,Cookie 功能就会失效。
Java 中把 Cookie 封装成了javax.servlet.http.Cookie类。
Cookie 剖析
Cookies 通常设置在 HTTP 头信息中(虽然 JavaScript 也可以直接在浏览器上设置一个 Cookie)。
设置 Cookie 的 Servlet 会发送如下的头信息:
1 | 200 OK |
正如您所看到的,Set-Cookie 头包含了一个名称值对、一个 GMT 日期、一个路径和一个域。名称和值会被 URL 编码。expires 字段是一个指令,告诉浏览器在给定的时间和日期之后”忘记”该 Cookie。
如果浏览器被配置为存储 Cookies,它将会保留此信息直到到期日期。如果用户的浏览器指向任何匹配该 Cookie 的路径和域的页面,它会重新发送 Cookie 到服务器。浏览器的头信息可能如下所示:
1 | GET / |
Cookie 类中的方法
| 方法 | 功能 |
|---|---|
| public void setDomain(String pattern) | 该方法设置 cookie 适用的域。 |
| public String getDomain() | 该方法获取 cookie 适用的域。 |
| public void setMaxAge(int expiry) | 该方法设置 cookie 过期的时间(以秒为单位)。如果不这样设置,cookie 只会在当前 session 会话中持续有效。 |
| public int getMaxAge() | 该方法返回 cookie 的最大生存周期(以秒为单位),默认情况下,-1 表示 cookie 将持续下去,直到浏览器关闭。 |
| public String getName() | 该方法返回 cookie 的名称。名称在创建后不能改变。 |
| public void setValue(String newValue) | 该方法设置与 cookie 关联的值。 |
| public String getValue() | 该方法获取与 cookie 关联的值。 |
| public void setPath(String uri) | 该方法设置 cookie 适用的路径。如果您不指定路径,与当前页面相同目录下的(包括子目录下的)所有 URL 都会返回 cookie。 |
| public String getPath() | 该方法获取 cookie 适用的路径。 |
| public void setSecure(boolean flag) | 该方法设置布尔值,向浏览器指示,只会在 HTTPS 和 SSL 等安全协议中传输此类 Cookie。 |
| public void setComment(String purpose) | 该方法规定了描述 cookie 目的的注释。该注释在浏览器向用户呈现 cookie 时非常有用。 |
| public String getComment() | 该方法返回了描述 cookie 目的的注释,如果 cookie 没有注释则返回 null。 |
Cookie 的有效期
Cookie的maxAge决定着 Cookie 的有效期,单位为秒。
如果 maxAge 为 0,则表示删除该 Cookie;
如果为负数,表示该 Cookie 仅在本浏览器中以及本窗口打开的子窗口内有效,关闭窗口后该 Cookie 即失效。
Cookie 中提供getMaxAge()和setMaxAge(int expiry)方法来读写maxAge属性。
Cookie 的域名
Cookie 是不可以跨域名的。域名 www.google.com 颁发的 Cookie 不会被提交到域名 www.baidu.com 去。这是由 Cookie 的隐私安全机制决定的。隐私安全机制能够禁止网站非法获取其他网站的 Cookie。
正常情况下,同一个一级域名的两个二级域名之间也不能互相使用 Cookie。如果想让某域名下的子域名也可以使用该 Cookie,需要设置 Cookie 的 domain 参数。
Java 中使用setDomain(Stringdomain)和getDomain()方法来设置、获取 domain。
Cookie 的路径
Path 属性决定允许访问 Cookie 的路径。
Java 中使用setPath(Stringuri)和getPath()方法来设置、获取 path。
Cookie 的安全属性
HTTP 协议不仅是无状态的,而且是不安全的。
使用 HTTP 协议的数据不经过任何加密就直接在网络上传播,有被截获的可能。如果不希望 Cookie 在 HTTP 等非安全协议中传输,可以设置 Cookie 的 secure 属性为 true。浏览器只会在 HTTPS 和 SSL 等安全协议中传输此类 Cookie。
Java 中使用setSecure(booleanflag)和getSecure ()方法来设置、获取 Secure。
Cookie 实例
添加 Cookie
通过 Servlet 添加 Cookies 包括三个步骤:
创建一个 Cookie 对象:您可以调用带有 cookie 名称和 cookie 值的 Cookie 构造函数,cookie 名称和 cookie 值都是字符串。
设置最大生存周期:您可以使用
setMaxAge方法来指定 cookie 能够保持有效的时间(以秒为单位)。发送 Cookie 到 HTTP 响应头:您可以使用
response.addCookie来添加 HTTP 响应头中的 Cookies。
AddCookies.java
1 | import java.io.IOException; |
addCookies.jsp
1 | <%@ page language="java" pageEncoding="UTF-8" %> |
显示 Cookie
要读取 Cookies,您需要通过调用 HttpServletRequest 的 getCookies() 方法创建一个 javax.servlet.http.Cookie 对象的数组。然后循环遍历数组,并使用 getName() 和 getValue() 方法来访问每个 cookie 和关联的值。
ReadCookies.java
1 | import java.io.IOException; |
删除 Cookie
Java 中并没有提供直接删除 Cookie 的方法,如果想要删除一个 Cookie,直接将这个 Cookie 的有效期设为 0 就可以了。步骤如下:
读取一个现有的 cookie,并把它存储在 Cookie 对象中。
使用
setMaxAge()方法设置 cookie 的年龄为零,来删除现有的 cookie。把这个 cookie 添加到响应头。
DeleteCookies.java
1 | import java.io.IOException; |
Session
Session 是什么
不同于 Cookie 保存在客户端浏览器中,Session 保存在服务器上。
如果说 Cookie 机制是通过检查客户身上的“通行证”来确定客户身份的话,那么 Session 机制就是通过检查服务器上的“客户明细表”来确认客户身份。
Session 对应的类为 javax.servlet.http.HttpSession 类。Session 对象是在客户第一次请求服务器时创建的。
Session 类中的方法
javax.servlet.http.HttpSession 类中的方法:
| 方法 | 功能 |
|---|---|
| public Object getAttribute(String name) | 该方法返回在该 session 会话中具有指定名称的对象,如果没有指定名称的对象,则返回 null。 |
| public Enumeration getAttributeNames() | 该方法返回 String 对象的枚举,String 对象包含所有绑定到该 session 会话的对象的名称。 |
| public long getCreationTime() | 该方法返回该 session 会话被创建的时间,自格林尼治标准时间 1970 年 1 月 1 日午夜算起,以毫秒为单位。 |
| public String getId() | 该方法返回一个包含分配给该 session 会话的唯一标识符的字符串。 |
| public long getLastAccessedTime() | 该方法返回客户端最后一次发送与该 session 会话相关的请求的时间自格林尼治标准时间 1970 年 1 月 1 日午夜算起,以毫秒为单位。 |
| public int getMaxInactiveInterval() | 该方法返回 Servlet 容器在客户端访问时保持 session 会话打开的最大时间间隔,以秒为单位。 |
| public void invalidate() | 该方法指示该 session 会话无效,并解除绑定到它上面的任何对象。 |
| public boolean isNew() | 如果客户端还不知道该 session 会话,或者如果客户选择不参入该 session 会话,则该方法返回 true。 |
| public void removeAttribute(String name) | 该方法将从该 session 会话移除指定名称的对象。 |
| public void setAttribute(String name, Object value) | 该方法使用指定的名称绑定一个对象到该 session 会话。 |
| public void setMaxInactiveInterval(int interval) | 该方法在 Servlet 容器指示该 session 会话无效之前,指定客户端请求之间的时间,以秒为单位。 |
Session 的有效期
由于会有越来越多的用户访问服务器,因此 Session 也会越来越多。为防止内存溢出,服务器会把长时间没有活跃的 Session 从内存中删除。
Session 的超时时间为maxInactiveInterval属性,可以通过getMaxInactiveInterval()、setMaxInactiveInterval(longinterval)来读写这个属性。
Tomcat 中 Session 的默认超时时间为 20 分钟。可以修改 web.xml 改变 Session 的默认超时时间。
例:
1 | <session-config> |
Session 对浏览器的要求
HTTP 协议是无状态的,Session 不能依据 HTTP 连接来判断是否为同一客户。因此服务器向客户端浏览器发送一个名为 JESSIONID 的 Cookie,他的值为该 Session 的 id(也就是 HttpSession.getId()的返回值)。Session 依据该 Cookie 来识别是否为同一用户。
该 Cookie 为服务器自动生成的,它的maxAge属性一般为-1,表示仅当前浏览器内有效,并且各浏览器窗口间不共享,关闭浏览器就会失效。
URL 地址重写
URL 地址重写的原理是将该用户 Session 的 id 信息重写到 URL 地址中。服务器能够解析重写后的 URL 获取 Session 的 id。这样即使客户端不支持 Cookie,也可以使用 Session 来记录用户状态。
HttpServletResponse类提供了encodeURL(Stringurl)实现 URL 地址重写。
Session 中禁用 Cookie
在META-INF/context.xml中编辑如下:
1 | <Context path="/SessionNotes" cookies="true"> |
部署后,TOMCAT 便不会自动生成名 JESSIONID 的 Cookie,Session 也不会以 Cookie 为识别标志,而仅仅以重写后的 URL 地址为识别标志了。
Session 实例
Session 跟踪
SessionTrackServlet.java
1 | import java.io.IOException; |
web.xml
1 | <servlet> |
删除 Session 会话数据
当您完成了一个用户的 session 会话数据,您有以下几种选择:
移除一个特定的属性:您可以调用 removeAttribute(String name) 方法来删除与特定的键相关联的值。
删除整个 session 会话:您可以调用 invalidate() 方法来丢弃整个 session 会话。
设置 session 会话过期时间:您可以调用 setMaxInactiveInterval(int interval) 方法来单独设置 session 会话超时。
注销用户:如果使用的是支持 servlet 2.4 的服务器,您可以调用 logout 来注销 Web 服务器的客户端,并把属于所有用户的所有 session 会话设置为无效。
web.xml 配置:如果您使用的是 Tomcat,除了上述方法,您还可以在 web.xml 文件中配置 session 会话超时,如下所示:
1 | <session-config> |
上面实例中的超时时间是以分钟为单位,将覆盖 Tomcat 中默认的 30 分钟超时时间。
在一个 Servlet 中的 getMaxInactiveInterval() 方法会返回 session 会话的超时时间,以秒为单位。所以,如果在 web.xml 中配置 session 会话超时时间为 15 分钟,那么getMaxInactiveInterval() 会返回 900。
Cookie vs Session
存取方式
Cookie 只能保存ASCII字符串,如果需要存取 Unicode 字符或二进制数据,需要进行UTF-8、GBK或BASE64等方式的编码。
Session 可以存取任何类型的数据,甚至是任何 Java 类。可以将 Session 看成是一个 Java 容器类。
隐私安全
Cookie 存于客户端浏览器,一些客户端的程序可能会窥探、复制或修改 Cookie 内容。
Session 存于服务器,对客户端是透明的,不存在敏感信息泄露的危险。
有效期
使用 Cookie 可以保证长时间登录有效,只要设置 Cookie 的maxAge属性为一个很大的数字。
而 Session 虽然理论上也可以通过设置很大的数值来保持长时间登录有效,但是,由于 Session 依赖于名为JESSIONID的 Cookie,而 Cookie JESSIONID的maxAge默认为-1,只要关闭了浏览器该 Session 就会失效,因此,Session 不能实现信息永久有效的效果。使用 URL 地址重写也不能实现。
服务器的开销
由于 Session 是保存在服务器的,每个用户都会产生一个 Session,如果并发访问的用户非常多,会产生很多的 Session,消耗大量的内存。
而 Cookie 由于保存在客户端浏览器上,所以不占用服务器资源。
浏览器的支持
Cookie 需要浏览器支持才能使用。
如果浏览器不支持 Cookie,需要使用 Session 以及 URL 地址重写。
需要注意的事所有的用到 Session 程序的 URL 都要使用response.encodeURL(StringURL) 或response.encodeRediretURL(String URL)进行 URL 地址重写,否则导致 Session 会话跟踪失效。
跨域名
- Cookie 支持跨域名。
- Session 不支持跨域名。
错误处理
错误处理
错误的分类
资源的错误
当我们的代码去请求一些资源时导致的错误,比如打开一个没有权限的文件,写文件时出现的写错误,发送文件到网络端发现网络故障的错误,等等。这一类错误属于程序运行环境的问题。对于这类错误,有的我们可以处理,有的我们则无法处理。比如,内存耗尽、栈溢出或是一些程序运行时关键性资源不能满足等等这些情况,我们只能停止运行,甚至退出整个程序。
程序的错误
比如:空指针、非法参数等。这类是我们自己程序的错误,我们要记录下来,写入日志,最好触发监控系统报警。
用户的错误
比如:Bad Request、Bad Format 等这类由用户不合法输入带来的错误。这类错误基本上是在用户的 API 层上出现的问题。比如,解析一个 XML 或 JSON 文件,或是用户输入的字段不合法之类的。
对于这类问题,我们需要向用户端报错,让用户自己处理修正他们的输入或操作。然后,我们正常执行,但是需要做统计,统计相应的错误率,这样有利于我们改善软件或是侦测是否有恶意的用户请求。
错误返回码和异常捕捉
错误处理一般有两种方式:错误返回码和异常捕捉。
- 对于我们并不期望会发生的事,我们可以使用异常捕捉;
- 对于我们觉得可能会发生的事,使用返回码。
异步编程的错误处理
- 无法使用返回码。因为函数在“被”异步运行中,所谓的返回只是把处理权交给下一条指令,而不是把函数运行完的结果返回。所以,函数返回的语义完全变了,返回码也没有用了。
- 无法使用抛异常的方式。因为除了上述的函数立马返回的原因之外,抛出的异常也在另外一个线程中,不同线程中的栈是完全不一样的,所以主线程的
catch完全看不到另外一个线程中的异常。
callback 错误处理
异步编程中,最常用的错误处理方式就是 callback 方式。在做异步请求的时候,注册几个 OnSuccess()、 OnFailure() 这样的函数,让在另一个线程中运行的异步代码来回调过来。
【示例】JavaScript 异步编程的错误处理
1 | function successCallback(result) { |
但是, 如果我们需要把几个异步函数顺序执行的话(异步程序中,程序执行的顺序是不可预测的、也是不确定的,而有时候,函数被调用的上下文是有相互依赖的,所以,我们希望它们能按一定的顺序处理),就会出现了所谓的 Callback Hell 的问题。如下所示:
1 | doSomething(function(result) { |
而这样层层嵌套中需要注册的错误处理函数也有可能是完全不一样的,而且会导致代码非常混乱,难以阅读和维护。
JavaScript 的 Promise 错误处理
在异步编程的实践里,使用 Promise 模式来处理更为优雅。
1 | doSomething() |
上面代码中的 then() 和 catch() 方法就是 Promise 对象的方法,then()方法可以把各个异步的函数给串联起来,而catch() 方法则是出错的处理。
看到上面的那个级联式的调用方式,这就要我们的 doSomething() 函数返回 Promise 对象,下面是这个函数的相关代码示例:
1 | function doSomething() { |
从上面的代码示例中,我们可以看到,如果成功了,要调用Promise.resolve() 方法,这样 Promise 对象会继续调用下一个 then()。如果出错了就调用 Promise.reject() 方法,这样就会忽略后面的 then() 直到 catch() 方法。
我们可以看到 Promise.reject() 就像是抛异常一样。这个编程模式让我们的代码组织方便了很多。
另外,多说一句,Promise 还可以同时等待两个不同的异步方法。比如下面的代码所展示的方式:
1 | promise1 = doSomething(); |
在 ECMAScript 2017 的标准中,我们可以使用async/await 这两个关键字来取代 Promise 对象,这样可以让我们的代码更易读。
比如下面的代码示例:
1 | async function foo() { |
如果在函数定义之前使用了 async 关键字,就可以在函数内使用 await。 当在 await 某个 Promise 时,函数暂停执行,直至该 Promise 产生结果,并且暂停不会阻塞主线程。 如果 Promise resolve,则会返回值。 如果 Promise reject,则会抛出拒绝的值。
Java 的 Promise 模式
在 JDK 1.8 里也引入了类似 JavaScript 的玩法 —— CompletableFuture。这个类提供了大量的异步编程中 Promise 的各种方式。
链式处理:
1 | CompletableFuture.supplyAsync(this::findReceiver) |
上面的这个链式处理和 JavaScript 中的then()方法很像,其中的supplyAsync() 表示执行一个异步方法,而 thenApply() 表示执行成功后再串联另外一个异步方法,最后是 thenAccept() 来处理最终结果。
下面这个例子是要合并两个异步函数的结果:
1 | String result = CompletableFuture.supplyAsync(() -> { |
接下来,我们再来看一下,Java 这个类相关的异常处理:
1 | CompletableFuture.supplyAsync(Integer::parseInt) // 输入: "ILLEGAL" |
我们要注意到上面代码里的 exceptionally() 方法,这个和 JavaScript Promise 中的 catch() 方法相似。
运行上面的代码,会出现如下输出:
1 | Error: java.lang.NumberFormatException: For input string: "ILLEGAL" |
也可以这样:
1 | CompletableFuture.supplyAsync(Integer::parseInt) // 输入: "ILLEGAL" |
上面代码中,你可以看到,其使用了 handle() 方法来处理最终的结果,其中包含了异步函数中的错误处理。
错误处理的最佳实践
- 统一分类的错误字典。无论你是使用错误码还是异常捕捉,都需要认真并统一地做好错误的分类。最好是在一个地方定义相关的错误。比如,HTTP 的 4XX 表示客户端有问题,5XX 则表示服务端有问题。也就是说,你要建立一个错误字典。
- 同类错误的定义最好是可以扩展的。这一点非常重要,而对于这一点,通过面向对象的继承或是像 Go 语言那样的接口多态可以很好地做到。这样可以方便地重用已有的代码。
- 定义错误的严重程度。比如,Fatal 表示重大错误,Error 表示资源或需求得不到满足,Warning 表示并不一定是个错误但还是需要引起注意,Info 表示不是错误只是一个信息,Debug 表示这是给内部开发人员用于调试程序的。
- 错误日志的输出最好使用错误码,而不是错误信息。打印错误日志的时候,应该使用统一的格式。但最好不要用错误信息,而应使用相应的错误码,错误码不一定是数字,也可以是一个能从错误字典里找到的一个唯一的可以让人读懂的关键字。这样,会非常有利于日志分析软件进行自动化监控,而不是要从错误信息中做语义分析。比如:HTTP 的日志中就会有 HTTP 的返回码,如:
404。但我更推荐使用像PageNotFound这样的标识,这样人和机器都很容易处理。 - 忽略错误最好有日志。不然会给维护带来很大的麻烦。
- 对于同一个地方不停的报错,最好不要都打到日志里。不然这样会导致其它日志被淹没了,也会导致日志文件太大。最好的实践是,打出一个错误以及出现的次数。
- 不要用错误处理逻辑来处理业务逻辑。也就是说,不要使用异常捕捉这样的方式来处理业务逻辑,而是应该用条件判断。如果一个逻辑控制可以用 if - else 清楚地表达,那就不建议使用异常方式处理。异常捕捉是用来处理不期望发生的事情,而错误码则用来处理可能会发生的事。
- 对于同类的错误处理,用一样的模式。比如,对于
null对象的错误,要么都用返回 null,加上条件检查的模式,要么都用抛 NullPointerException 的方式处理。不要混用,这样有助于代码规范。 - 尽可能在错误发生的地方处理错误。因为这样会让调用者变得更简单。
- 向上尽可能地返回原始的错误。如果一定要把错误返回到更高层去处理,那么,应该返回原始的错误,而不是重新发明一个错误。
- 处理错误时,总是要清理已分配的资源。这点非常关键,使用 RAII 技术,或是 try-catch-finally,或是 Go 的 defer 都可以容易地做到。
- 不推荐在循环体里处理错误。这里说的是 try-catch,绝大多数的情况你不需要这样做。最好把整个循环体外放在 try 语句块内,而在外面做 catch。
- 不要把大量的代码都放在一个 try 语句块内。一个 try 语句块内的语句应该是完成一个简单单一的事情。
- 为你的错误定义提供清楚的文档以及每种错误的代码示例。如果你是做 RESTful API 方面的,使用 Swagger 会帮你很容易搞定这个事。
- 对于异步的方式,推荐使用 Promise 模式处理错误。对于这一点,JavaScript 中有很好的实践。
- 对于分布式的系统,推荐使用 APM 相关的软件。尤其是使用 Zipkin 这样的服务调用跟踪的分析来关联错误。
SpringBoot 知识图谱
SpringBoot 知识图谱
- 预警:本文非常长,建议先 mark 后看,也许是最后一次写这么长的文章
- 说明:前面有 4 个小节关于 Spring 的基础知识,分别是:IOC 容器、JavaConfig、事件监听、SpringFactoriesLoader 详解,它们占据了本文的大部分内容,虽然它们之间可能没有太多的联系,但这些知识对于理解 Spring Boot 的核心原理至关重要,如果你对 Spring 框架烂熟于心,完全可以跳过这 4 个小节。正是因为这个系列的文章是由这些看似不相关的知识点组成,因此取名知识清单。
在过去两三年的 Spring 生态圈,最让人兴奋的莫过于 Spring Boot 框架。或许从命名上就能看出这个框架的设计初衷:快速的启动 Spring 应用。因而 Spring Boot 应用本质上就是一个基于 Spring 框架的应用,它是 Spring 对“约定优先于配置”理念的最佳实践产物,它能够帮助开发者更快速高效地构建基于 Spring 生态圈的应用。
那 Spring Boot 有何魔法?自动配置、起步依赖、Actuator、命令行界面(CLI) 是 Spring Boot 最重要的 4 大核心特性,其中 CLI 是 Spring Boot 的可选特性,虽然它功能强大,但也引入了一套不太常规的开发模型,因而这个系列的文章仅关注其它 3 种特性。如文章标题,本文是这个系列的第一部分,将为你打开 Spring Boot 的大门,重点为你剖析其启动流程以及自动配置实现原理。要掌握这部分核心内容,理解一些 Spring 框架的基础知识,将会让你事半功倍。
一、抛砖引玉:探索 Spring IoC 容器
如果有看过SpringApplication.run()方法的源码,Spring Boot 冗长无比的启动流程一定会让你抓狂,透过现象看本质,SpringApplication 只是将一个典型的 Spring 应用的启动流程进行了扩展,因此,透彻理解 Spring 容器是打开 Spring Boot 大门的一把钥匙。
1.1、Spring IoC 容器
可以把 Spring IoC 容器比作一间餐馆,当你来到餐馆,通常会直接招呼服务员:点菜!至于菜的原料是什么?如何用原料把菜做出来?可能你根本就不关心。IoC 容器也是一样,你只需要告诉它需要某个 bean,它就把对应的实例(instance)扔给你,至于这个 bean 是否依赖其他组件,怎样完成它的初始化,根本就不需要你关心。
作为餐馆,想要做出菜肴,得知道菜的原料和菜谱,同样地,IoC 容器想要管理各个业务对象以及它们之间的依赖关系,需要通过某种途径来记录和管理这些信息。BeanDefinition对象就承担了这个责任:容器中的每一个 bean 都会有一个对应的 BeanDefinition 实例,该实例负责保存 bean 对象的所有必要信息,包括 bean 对象的 class 类型、是否是抽象类、构造方法和参数、其它属性等等。当客户端向容器请求相应对象时,容器就会通过这些信息为客户端返回一个完整可用的 bean 实例。
原材料已经准备好(把 BeanDefinition 看着原料),开始做菜吧,等等,你还需要一份菜谱,BeanDefinitionRegistry和BeanFactory就是这份菜谱,BeanDefinitionRegistry 抽象出 bean 的注册逻辑,而 BeanFactory 则抽象出了 bean 的管理逻辑,而各个 BeanFactory 的实现类就具体承担了 bean 的注册以及管理工作。它们之间的关系就如下图:
BeanFactory、BeanDefinitionRegistry 关系图(来自:Spring 揭秘)
DefaultListableBeanFactory作为一个比较通用的 BeanFactory 实现,它同时也实现了 BeanDefinitionRegistry 接口,因此它就承担了 Bean 的注册管理工作。从图中也可以看出,BeanFactory 接口中主要包含 getBean、containBean、getType、getAliases 等管理 bean 的方法,而 BeanDefinitionRegistry 接口则包含 registerBeanDefinition、removeBeanDefinition、getBeanDefinition 等注册管理 BeanDefinition 的方法。
下面通过一段简单的代码来模拟 BeanFactory 底层是如何工作的:
1 | // 默认容器实现 |
这段代码仅为了说明 BeanFactory 底层的大致工作流程,实际情况会更加复杂,比如 bean 之间的依赖关系可能定义在外部配置文件(XML/Properties)中、也可能是注解方式。Spring IoC 容器的整个工作流程大致可以分为两个阶段:
①、容器启动阶段
容器启动时,会通过某种途径加载Configuration MetaData。除了代码方式比较直接外,在大部分情况下,容器需要依赖某些工具类,比如:BeanDefinitionReader,BeanDefinitionReader 会对加载的Configuration MetaData进行解析和分析,并将分析后的信息组装为相应的 BeanDefinition,最后把这些保存了 bean 定义的 BeanDefinition,注册到相应的 BeanDefinitionRegistry,这样容器的启动工作就完成了。这个阶段主要完成一些准备性工作,更侧重于 bean 对象管理信息的收集,当然一些验证性或者辅助性的工作也在这一阶段完成。
来看一个简单的例子吧,过往,所有的 bean 都定义在 XML 配置文件中,下面的代码将模拟 BeanFactory 如何从配置文件中加载 bean 的定义以及依赖关系:
1 | // 通常为BeanDefinitionRegistry的实现类,这里以DeFaultListabeBeanFactory为例 |
②、Bean 的实例化阶段
经过第一阶段,所有 bean 定义都通过 BeanDefinition 的方式注册到 BeanDefinitionRegistry 中,当某个请求通过容器的 getBean 方法请求某个对象,或者因为依赖关系容器需要隐式的调用 getBean 时,就会触发第二阶段的活动:容器会首先检查所请求的对象之前是否已经实例化完成。如果没有,则会根据注册的 BeanDefinition 所提供的信息实例化被请求对象,并为其注入依赖。当该对象装配完毕后,容器会立即将其返回给请求方法使用。
BeanFactory 只是 Spring IoC 容器的一种实现,如果没有特殊指定,它采用采用延迟初始化策略:只有当访问容器中的某个对象时,才对该对象进行初始化和依赖注入操作。而在实际场景下,我们更多的使用另外一种类型的容器:ApplicationContext,它构建在 BeanFactory 之上,属于更高级的容器,除了具有 BeanFactory 的所有能力之外,还提供对事件监听机制以及国际化的支持等。它管理的 bean,在容器启动时全部完成初始化和依赖注入操作。
1.2、Spring 容器扩展机制
IoC 容器负责管理容器中所有 bean 的生命周期,而在 bean 生命周期的不同阶段,Spring 提供了不同的扩展点来改变 bean 的命运。在容器的启动阶段,BeanFactoryPostProcessor允许我们在容器实例化相应对象之前,对注册到容器的 BeanDefinition 所保存的信息做一些额外的操作,比如修改 bean 定义的某些属性或者增加其他信息等。
如果要自定义扩展类,通常需要实现org.springframework.beans.factory.config.BeanFactoryPostProcessor接口,与此同时,因为容器中可能有多个 BeanFactoryPostProcessor,可能还需要实现org.springframework.core.Ordered接口,以保证 BeanFactoryPostProcessor 按照顺序执行。Spring 提供了为数不多的 BeanFactoryPostProcessor 实现,我们以PropertyPlaceholderConfigurer来说明其大致的工作流程。
在 Spring 项目的 XML 配置文件中,经常可以看到许多配置项的值使用占位符,而将占位符所代表的值单独配置到独立的 properties 文件,这样可以将散落在不同 XML 文件中的配置集中管理,而且也方便运维根据不同的环境进行配置不同的值。这个非常实用的功能就是由 PropertyPlaceholderConfigurer 负责实现的。
根据前文,当 BeanFactory 在第一阶段加载完所有配置信息时,BeanFactory 中保存的对象的属性还是以占位符方式存在的,比如${jdbc.mysql.url}。当 PropertyPlaceholderConfigurer 作为 BeanFactoryPostProcessor 被应用时,它会使用 properties 配置文件中的值来替换相应的 BeanDefinition 中占位符所表示的属性值。当需要实例化 bean 时,bean 定义中的属性值就已经被替换成我们配置的值。当然其实现比上面描述的要复杂一些,这里仅说明其大致工作原理,更详细的实现可以参考其源码。
与之相似的,还有BeanPostProcessor,其存在于对象实例化阶段。跟 BeanFactoryPostProcessor 类似,它会处理容器内所有符合条件并且已经实例化后的对象。简单的对比,BeanFactoryPostProcessor 处理 bean 的定义,而 BeanPostProcessor 则处理 bean 完成实例化后的对象。BeanPostProcessor 定义了两个接口:
1 | public interface BeanPostProcessor { |
为了理解这两个方法执行的时机,简单的了解下 bean 的整个生命周期:
postProcessBeforeInitialization()方法与postProcessAfterInitialization()分别对应图中前置处理和后置处理两个步骤将执行的方法。这两个方法中都传入了 bean 对象实例的引用,为扩展容器的对象实例化过程提供了很大便利,在这儿几乎可以对传入的实例执行任何操作。注解、AOP 等功能的实现均大量使用了BeanPostProcessor,比如有一个自定义注解,你完全可以实现 BeanPostProcessor 的接口,在其中判断 bean 对象的脑袋上是否有该注解,如果有,你可以对这个 bean 实例执行任何操作,想想是不是非常的简单?
再来看一个更常见的例子,在 Spring 中经常能够看到各种各样的 Aware 接口,其作用就是在对象实例化完成以后将 Aware 接口定义中规定的依赖注入到当前实例中。比如最常见的ApplicationContextAware接口,实现了这个接口的类都可以获取到一个 ApplicationContext 对象。当容器中每个对象的实例化过程走到 BeanPostProcessor 前置处理这一步时,容器会检测到之前注册到容器的 ApplicationContextAwareProcessor,然后就会调用其 postProcessBeforeInitialization()方法,检查并设置 Aware 相关依赖。看看代码吧,是不是很简单:
1 | // 代码来自:org.springframework.context.support.ApplicationContextAwareProcessor |
最后总结一下,本小节内容和你一起回顾了 Spring 容器的部分核心内容,限于篇幅不能写更多,但理解这部分内容,足以让您轻松理解 Spring Boot 的启动原理,如果在后续的学习过程中遇到一些晦涩难懂的知识,再回过头来看看 Spring 的核心知识,也许有意想不到的效果。也许 Spring Boot 的中文资料很少,但 Spring 的中文资料和书籍有太多太多,总有东西能给你启发。
二、夯实基础:JavaConfig 与常见 Annotation
2.1、JavaConfig
我们知道bean是 Spring IOC 中非常核心的概念,Spring 容器负责 bean 的生命周期的管理。在最初,Spring 使用 XML 配置文件的方式来描述 bean 的定义以及相互间的依赖关系,但随着 Spring 的发展,越来越多的人对这种方式表示不满,因为 Spring 项目的所有业务类均以 bean 的形式配置在 XML 文件中,造成了大量的 XML 文件,使项目变得复杂且难以管理。
后来,基于纯 Java Annotation 依赖注入框架Guice出世,其性能明显优于采用 XML 方式的 Spring,甚至有部分人认为,Guice可以完全取代 Spring(Guice仅是一个轻量级 IOC 框架,取代 Spring 还差的挺远)。正是这样的危机感,促使 Spring 及社区推出并持续完善了JavaConfig子项目,它基于 Java 代码和 Annotation 注解来描述 bean 之间的依赖绑定关系。比如,下面是使用 XML 配置方式来描述 bean 的定义:
1 | <bean id="bookService" class="cn.moondev.service.BookServiceImpl"></bean> |
而基于 JavaConfig 的配置形式是这样的:
1 |
|
如果两个 bean 之间有依赖关系的话,在 XML 配置中应该是这样:
1 | <bean id="bookService" class="cn.moondev.service.BookServiceImpl"> |
而在 JavaConfig 中则是这样:
1 |
|
你可能注意到这个示例中,有两个 bean 都依赖于 dependencyService,也就是说当初始化 bookService 时会调用dependencyService(),在初始化 otherService 时也会调用dependencyService(),那么问题来了?这时候 IOC 容器中是有一个 dependencyService 实例还是两个?这个问题留着大家思考吧,这里不再赘述。
2.2、@ComponentScan
@ComponentScan注解对应 XML 配置形式中的``元素,表示启用组件扫描,Spring 会自动扫描所有通过注解配置的 bean,然后将其注册到 IOC 容器中。我们可以通过basePackages等属性来指定@ComponentScan自动扫描的范围,如果不指定,默认从声明@ComponentScan所在类的package进行扫描。正因为如此,SpringBoot 的启动类都默认在src/main/java下。
2.3、@Import
@Import注解用于导入配置类,举个简单的例子:
1 | @Configuration |
现在有另外一个配置类,比如:MoonUserConfiguration,这个配置类中有一个 bean 依赖于MoonBookConfiguration中的 bookService,如何将这两个 bean 组合在一起?借助@Import即可:
1 | @Configuration |
需要注意的是,在 4.2 之前,@Import注解只支持导入配置类,但是在 4.2 之后,它支持导入普通类,并将这个类作为一个 bean 的定义注册到 IOC 容器中。
2.4、@Conditional
@Conditional注解表示在满足某种条件后才初始化一个 bean 或者启用某些配置。它一般用在由@Component、@Service、@Configuration等注解标识的类上面,或者由@Bean标记的方法上。如果一个@Configuration类标记了@Conditional,则该类中所有标识了@Bean的方法和@Import注解导入的相关类将遵从这些条件。
在 Spring 里可以很方便的编写你自己的条件类,所要做的就是实现Condition接口,并覆盖它的matches()方法。举个例子,下面的简单条件类表示只有在Classpath里存在JdbcTemplate类时才生效:
1 | public class JdbcTemplateCondition implements Condition { |
当你用 Java 来声明 bean 的时候,可以使用这个自定义条件类:
1 | @Conditional(JdbcTemplateCondition.class) |
这个例子中只有当JdbcTemplateCondition类的条件成立时才会创建 MyService 这个 bean。也就是说 MyService 这 bean 的创建条件是classpath里面包含JdbcTemplate,否则这个 bean 的声明就会被忽略掉。
Spring Boot定义了很多有趣的条件,并把他们运用到了配置类上,这些配置类构成了Spring Boot的自动配置的基础。Spring Boot运用条件化配置的方法是:定义多个特殊的条件化注解,并将它们用到配置类上。下面列出了Spring Boot提供的部分条件化注解:
| 条件化注解 | 配置生效条件 |
|---|---|
| @ConditionalOnBean | 配置了某个特定 bean |
| @ConditionalOnMissingBean | 没有配置特定的 bean |
| @ConditionalOnClass | Classpath 里有指定的类 |
| @ConditionalOnMissingClass | Classpath 里没有指定的类 |
| @ConditionalOnExpression | 给定的 Spring Expression Language 表达式计算结果为 true |
| @ConditionalOnJava | Java 的版本匹配特定指或者一个范围值 |
| @ConditionalOnProperty | 指定的配置属性要有一个明确的值 |
| @ConditionalOnResource | Classpath 里有指定的资源 |
| @ConditionalOnWebApplication | 这是一个 Web 应用程序 |
| @ConditionalOnNotWebApplication | 这不是一个 Web 应用程序 |
2.5、@ConfigurationProperties 与@EnableConfigurationProperties
当某些属性的值需要配置的时候,我们一般会在application.properties文件中新建配置项,然后在 bean 中使用@Value注解来获取配置的值,比如下面配置数据源的代码。
1 | // jdbc config |
使用@Value注解注入的属性通常都比较简单,如果同一个配置在多个地方使用,也存在不方便维护的问题(考虑下,如果有几十个地方在使用某个配置,而现在你想改下名字,你改怎么做?)。对于更为复杂的配置,Spring Boot 提供了更优雅的实现方式,那就是@ConfigurationProperties注解。我们可以通过下面的方式来改写上面的代码:
1 |
|
@ConfigurationProperties对于更为复杂的配置,处理起来也是得心应手,比如有如下配置文件:
1 | #App |
可以定义如下配置类来接收这些属性
1 |
|
@EnableConfigurationProperties注解表示对@ConfigurationProperties的内嵌支持,默认会将对应 Properties Class 作为 bean 注入的 IOC 容器中,即在相应的 Properties 类上不用加@Component注解。
三、削铁如泥:SpringFactoriesLoader 详解
JVM 提供了 3 种类加载器:BootstrapClassLoader、ExtClassLoader、AppClassLoader分别加载 Java 核心类库、扩展类库以及应用的类路径(CLASSPATH)下的类库。JVM 通过双亲委派模型进行类的加载,我们也可以通过继承java.lang.classloader实现自己的类加载器。
何为双亲委派模型?当一个类加载器收到类加载任务时,会先交给自己的父加载器去完成,因此最终加载任务都会传递到最顶层的 BootstrapClassLoader,只有当父加载器无法完成加载任务时,才会尝试自己来加载。
采用双亲委派模型的一个好处是保证使用不同类加载器最终得到的都是同一个对象,这样就可以保证 Java 核心库的类型安全,比如,加载位于 rt.jar 包中的java.lang.Object类,不管是哪个加载器加载这个类,最终都是委托给顶层的 BootstrapClassLoader 来加载的,这样就可以保证任何的类加载器最终得到的都是同样一个 Object 对象。查看 ClassLoader 的源码,对双亲委派模型会有更直观的认识:
1 | protected Class<?> loadClass(String name, boolean resolve) { |
但双亲委派模型并不能解决所有的类加载器问题,比如,Java 提供了很多服务提供者接口(Service Provider Interface,SPI),允许第三方为这些接口提供实现。常见的 SPI 有 JDBC、JNDI、JAXP 等,这些 SPI 的接口由核心类库提供,却由第三方实现,这样就存在一个问题:SPI 的接口是 Java 核心库的一部分,是由 BootstrapClassLoader 加载的;SPI 实现的 Java 类一般是由 AppClassLoader 来加载的。BootstrapClassLoader 是无法找到 SPI 的实现类的,因为它只加载 Java 的核心库。它也不能代理给 AppClassLoader,因为它是最顶层的类加载器。也就是说,双亲委派模型并不能解决这个问题。
线程上下文类加载器(ContextClassLoader)正好解决了这个问题。从名称上看,可能会误解为它是一种新的类加载器,实际上,它仅仅是 Thread 类的一个变量而已,可以通过setContextClassLoader(ClassLoader cl)和getContextClassLoader()来设置和获取该对象。如果不做任何的设置,Java 应用的线程的上下文类加载器默认就是 AppClassLoader。在核心类库使用 SPI 接口时,传递的类加载器使用线程上下文类加载器,就可以成功的加载到 SPI 实现的类。线程上下文类加载器在很多 SPI 的实现中都会用到。但在 JDBC 中,你可能会看到一种更直接的实现方式,比如,JDBC 驱动管理java.sql.Driver中的loadInitialDrivers()方法中,你可以直接看到 JDK 是如何加载驱动的:
1 | for (String aDriver : driversList) { |
其实讲解线程上下文类加载器,最主要是让大家在看到Thread.currentThread().getClassLoader()和Thread.currentThread().getContextClassLoader()时不会一脸懵逼,这两者除了在许多底层框架中取得的 ClassLoader 可能会有所不同外,其他大多数业务场景下都是一样的,大家只要知道它是为了解决什么问题而存在的即可。
类加载器除了加载 class 外,还有一个非常重要功能,就是加载资源,它可以从 jar 包中读取任何资源文件,比如,ClassLoader.getResources(String name)方法就是用于读取 jar 包中的资源文件,其代码如下:
1 | public Enumeration<URL> getResources(String name) throws IOException { |
是不是觉得有点眼熟,不错,它的逻辑其实跟类加载的逻辑是一样的,首先判断父类加载器是否为空,不为空则委托父类加载器执行资源查找任务,直到 BootstrapClassLoader,最后才轮到自己查找。而不同的类加载器负责扫描不同路径下的 jar 包,就如同加载 class 一样,最后会扫描所有的 jar 包,找到符合条件的资源文件。
类加载器的findResources(name)方法会遍历其负责加载的所有 jar 包,找到 jar 包中名称为 name 的资源文件,这里的资源可以是任何文件,甚至是.class 文件,比如下面的示例,用于查找 Array.class 文件:
1 | // 寻找Array.class文件 |
运行后可以得到如下结果:
1 | $JAVA_HOME/jre/lib/rt.jar!/java/sql/Array.class |
根据资源文件的 URL,可以构造相应的文件来读取资源内容。
看到这里,你可能会感到挺奇怪的,你不是要详解SpringFactoriesLoader吗?上来讲了一堆 ClassLoader 是几个意思?看下它的源码你就知道了:
1 | public static final String FACTORIES_RESOURCE_LOCATION = "META-INF/spring.factories"; |
有了前面关于 ClassLoader 的知识,再来理解这段代码,是不是感觉豁然开朗:从CLASSPATH下的每个 Jar 包中搜寻所有META-INF/spring.factories配置文件,然后将解析 properties 文件,找到指定名称的配置后返回。需要注意的是,其实这里不仅仅是会去 ClassPath 路径下查找,会扫描所有路径下的 Jar 包,只不过这个文件只会在 Classpath 下的 jar 包中。来简单看下spring.factories文件的内容吧:
1 | // 来自 org.springframework.boot.autoconfigure下的META-INF/spring.factories |
执行loadFactoryNames(EnableAutoConfiguration.class, classLoader)后,得到对应的一组@Configuration类,
我们就可以通过反射实例化这些类然后注入到 IOC 容器中,最后容器里就有了一系列标注了@Configuration的 JavaConfig 形式的配置类。
这就是SpringFactoriesLoader,它本质上属于 Spring 框架私有的一种扩展方案,类似于 SPI,Spring Boot 在 Spring 基础上的很多核心功能都是基于此,希望大家可以理解。
四、另一件武器:Spring 容器的事件监听机制
过去,事件监听机制多用于图形界面编程,比如:点击按钮、在文本框输入内容等操作被称为事件,而当事件触发时,应用程序作出一定的响应则表示应用监听了这个事件,而在服务器端,事件的监听机制更多的用于异步通知以及监控和异常处理。Java 提供了实现事件监听机制的两个基础类:自定义事件类型扩展自java.util.EventObject、事件的监听器扩展自java.util.EventListener。来看一个简单的实例:简单的监控一个方法的耗时。
首先定义事件类型,通常的做法是扩展 EventObject,随着事件的发生,相应的状态通常都封装在此类中:
1 | public class MethodMonitorEvent extends EventObject { |
事件发布之后,相应的监听器即可对该类型的事件进行处理,我们可以在方法开始执行之前发布一个 begin 事件,在方法执行结束之后发布一个 end 事件,相应地,事件监听器需要提供方法对这两种情况下接收到的事件进行处理:
1 | // 1、定义事件监听接口 |
事件监听器接口针对不同的事件发布实际提供相应的处理方法定义,最重要的是,其方法只接收 MethodMonitorEvent 参数,说明这个监听器类只负责监听器对应的事件并进行处理。有了事件和监听器,剩下的就是发布事件,然后让相应的监听器监听并处理。通常情况,我们会有一个事件发布者,它本身作为事件源,在合适的时机,将相应的事件发布给对应的事件监听器:
1 | public class MethodMonitorEventPublisher { |
对于事件发布者(事件源)通常需要关注两点:
- 在合适的时机发布事件。此例中的 methodMonitor()方法是事件发布的源头,其在方法执行之前和结束之后两个时间点发布 MethodMonitorEvent 事件,每个时间点发布的事件都会传给相应的监听器进行处理。在具体实现时需要注意的是,事件发布是顺序执行,为了不影响处理性能,事件监听器的处理逻辑应尽量简单。
- 事件监听器的管理。publisher 类中提供了事件监听器的注册与移除方法,这样客户端可以根据实际情况决定是否需要注册新的监听器或者移除某个监听器。如果这里没有提供 remove 方法,那么注册的监听器示例将一直被 MethodMonitorEventPublisher 引用,即使已经废弃不用了,也依然在发布者的监听器列表中,这会导致隐性的内存泄漏。
Spring 容器内的事件监听机制
Spring 的 ApplicationContext 容器内部中的所有事件类型均继承自org.springframework.context.ApplicationEvent,容器中的所有监听器都实现org.springframework.context.ApplicationListener接口,并且以 bean 的形式注册在容器中。一旦在容器内发布 ApplicationEvent 及其子类型的事件,注册到容器的 ApplicationListener 就会对这些事件进行处理。
你应该已经猜到是怎么回事了。
ApplicationEvent 继承自 EventObject,Spring 提供了一些默认的实现,比如:ContextClosedEvent表示容器在即将关闭时发布的事件类型,ContextRefreshedEvent表示容器在初始化或者刷新的时候发布的事件类型……
容器内部使用 ApplicationListener 作为事件监听器接口定义,它继承自 EventListener。ApplicationContext 容器在启动时,会自动识别并加载 EventListener 类型的 bean,一旦容器内有事件发布,将通知这些注册到容器的 EventListener。
ApplicationContext 接口继承了 ApplicationEventPublisher 接口,该接口提供了void publishEvent(ApplicationEvent event)方法定义,不难看出,ApplicationContext 容器担当的就是事件发布者的角色。如果有兴趣可以查看AbstractApplicationContext.publishEvent(ApplicationEvent event)方法的源码:ApplicationContext 将事件的发布以及监听器的管理工作委托给ApplicationEventMulticaster接口的实现类。在容器启动时,会检查容器内是否存在名为 applicationEventMulticaster 的 ApplicationEventMulticaster 对象实例。如果有就使用其提供的实现,没有就默认初始化一个 SimpleApplicationEventMulticaster 作为实现。
最后,如果我们业务需要在容器内部发布事件,只需要为其注入 ApplicationEventPublisher 依赖即可:实现 ApplicationEventPublisherAware 接口或者 ApplicationContextAware 接口(Aware 接口相关内容请回顾上文)。
五、出神入化:揭秘自动配置原理
典型的 Spring Boot 应用的启动类一般均位于src/main/java根路径下,比如MoonApplication类:
1 | @SpringBootApplication |
其中@SpringBootApplication开启组件扫描和自动配置,而SpringApplication.run则负责启动引导应用程序。@SpringBootApplication是一个复合Annotation,它将三个有用的注解组合在一起:
1 | @Target(ElementType.TYPE) |
@SpringBootConfiguration就是@Configuration,它是 Spring 框架的注解,标明该类是一个JavaConfig配置类。而@ComponentScan启用组件扫描,前文已经详细讲解过,这里着重关注@EnableAutoConfiguration。
@EnableAutoConfiguration注解表示开启 Spring Boot 自动配置功能,Spring Boot 会根据应用的依赖、自定义的 bean、classpath 下有没有某个类 等等因素来猜测你需要的 bean,然后注册到 IOC 容器中。那@EnableAutoConfiguration是如何推算出你的需求?首先看下它的定义:
1 | @Target(ElementType.TYPE) |
你的关注点应该在@Import(EnableAutoConfigurationImportSelector.class)上了,前文说过,@Import注解用于导入类,并将这个类作为一个 bean 的定义注册到容器中,这里它将把EnableAutoConfigurationImportSelector作为 bean 注入到容器中,而这个类会将所有符合条件的@Configuration 配置都加载到容器中,看看它的代码:
1 | public String[] selectImports(AnnotationMetadata annotationMetadata) { |
这个类会扫描所有的 jar 包,将所有符合条件的@Configuration 配置类注入的容器中,何为符合条件,看看META-INF/spring.factories的文件内容:
1 | // 来自 org.springframework.boot.autoconfigure下的META-INF/spring.factories |
以DataSourceAutoConfiguration为例,看看 Spring Boot 是如何自动配置的:
1 | @Configuration |
分别说一说:
@ConditionalOnClass({ DataSource.class, EmbeddedDatabaseType.class }):当 Classpath 中存在 DataSource 或者 EmbeddedDatabaseType 类时才启用这个配置,否则这个配置将被忽略。@EnableConfigurationProperties(DataSourceProperties.class):将 DataSource 的默认配置类注入到 IOC 容器中,DataSourceproperties 定义为:
1 | // 提供对datasource配置信息的支持,所有的配置前缀为:spring.datasource |
@Import({ Registrar.class, DataSourcePoolMetadataProvidersConfiguration.class }):导入其他额外的配置,就以DataSourcePoolMetadataProvidersConfiguration为例吧。
1 | @Configuration |
DataSourcePoolMetadataProvidersConfiguration 是数据库连接池提供者的一个配置类,即 Classpath 中存在org.apache.tomcat.jdbc.pool.DataSource.class,则使用 tomcat-jdbc 连接池,如果 Classpath 中存在HikariDataSource.class则使用 Hikari 连接池。
这里仅描述了 DataSourceAutoConfiguration 的冰山一角,但足以说明 Spring Boot 如何利用条件话配置来实现自动配置的。回顾一下,@EnableAutoConfiguration中导入了 EnableAutoConfigurationImportSelector 类,而这个类的selectImports()通过 SpringFactoriesLoader 得到了大量的配置类,而每一个配置类则根据条件化配置来做出决策,以实现自动配置。
整个流程很清晰,但漏了一个大问题:EnableAutoConfigurationImportSelector.selectImports()是何时执行的?其实这个方法会在容器启动过程中执行:AbstractApplicationContext.refresh(),更多的细节在下一小节中说明。
六、启动引导:Spring Boot 应用启动的秘密
6.1 SpringApplication 初始化
SpringBoot 整个启动流程分为两个步骤:初始化一个 SpringApplication 对象、执行该对象的 run 方法。看下 SpringApplication 的初始化流程,SpringApplication 的构造方法中调用 initialize(Object[] sources)方法,其代码如下:
1 | private void initialize(Object[] sources) { |
初始化流程中最重要的就是通过 SpringFactoriesLoader 找到spring.factories文件中配置的ApplicationContextInitializer和ApplicationListener两个接口的实现类名称,以便后期构造相应的实例。ApplicationContextInitializer的主要目的是在ConfigurableApplicationContext做 refresh 之前,对 ConfigurableApplicationContext 实例做进一步的设置或处理。ConfigurableApplicationContext 继承自 ApplicationContext,其主要提供了对 ApplicationContext 进行设置的能力。
实现一个 ApplicationContextInitializer 非常简单,因为它只有一个方法,但大多数情况下我们没有必要自定义一个 ApplicationContextInitializer,即便是 Spring Boot 框架,它默认也只是注册了两个实现,毕竟 Spring 的容器已经非常成熟和稳定,你没有必要来改变它。
而ApplicationListener的目的就没什么好说的了,它是 Spring 框架对 Java 事件监听机制的一种框架实现,具体内容在前文 Spring 事件监听机制这个小节有详细讲解。这里主要说说,如果你想为 Spring Boot 应用添加监听器,该如何实现?
Spring Boot 提供两种方式来添加自定义监听器:
- 通过
SpringApplication.addListeners(ApplicationListener... listeners)或者SpringApplication.setListeners(Collection> listeners)两个方法来添加一个或者多个自定义监听器 - 既然 SpringApplication 的初始化流程中已经从
spring.factories中获取到ApplicationListener的实现类,那么我们直接在自己的 jar 包的META-INF/spring.factories文件中新增配置即可:
1 | org.springframework.context.ApplicationListener=\ |
关于 SpringApplication 的初始化,我们就说这么多。
6.2 Spring Boot 启动流程
Spring Boot 应用的整个启动流程都封装在 SpringApplication.run 方法中,其整个流程真的是太长太长了,但本质上就是在 Spring 容器启动的基础上做了大量的扩展,按照这个思路来看看源码:
1 | public ConfigurableApplicationContext run(String... args) { |
① 通过 SpringFactoriesLoader 查找并加载所有的SpringApplicationRunListeners,通过调用 starting()方法通知所有的 SpringApplicationRunListeners:应用开始启动了。SpringApplicationRunListeners 其本质上就是一个事件发布者,它在 SpringBoot 应用启动的不同时间点发布不同应用事件类型(ApplicationEvent),如果有哪些事件监听者(ApplicationListener)对这些事件感兴趣,则可以接收并且处理。还记得初始化流程中,SpringApplication 加载了一系列 ApplicationListener 吗?这个启动流程中没有发现有发布事件的代码,其实都已经在 SpringApplicationRunListeners 这儿实现了。
简单的分析一下其实现流程,首先看下 SpringApplicationRunListener 的源码:
1 | public interface SpringApplicationRunListener { |
SpringApplicationRunListener 只有一个实现类:EventPublishingRunListener。① 处的代码只会获取到一个 EventPublishingRunListener 的实例,我们来看看 starting()方法的内容:
1 | public void starting() { |
顺着这个逻辑,你可以在 ② 处的prepareEnvironment()方法的源码中找到listeners.environmentPrepared(environment);即 SpringApplicationRunListener 接口的第二个方法,那不出你所料,environmentPrepared()又发布了另外一个事件ApplicationEnvironmentPreparedEvent。接下来会发生什么,就不用我多说了吧。
② 创建并配置当前应用将要使用的Environment,Environment 用于描述应用程序当前的运行环境,其抽象了两个方面的内容:配置文件(profile)和属性(properties),开发经验丰富的同学对这两个东西一定不会陌生:不同的环境(eg:生产环境、预发布环境)可以使用不同的配置文件,而属性则可以从配置文件、环境变量、命令行参数等来源获取。因此,当 Environment 准备好后,在整个应用的任何时候,都可以从 Environment 中获取资源。
总结起来,② 处的两句代码,主要完成以下几件事:
- 判断 Environment 是否存在,不存在就创建(如果是 web 项目就创建
StandardServletEnvironment,否则创建StandardEnvironment) - 配置 Environment:配置 profile 以及 properties
- 调用 SpringApplicationRunListener 的
environmentPrepared()方法,通知事件监听者:应用的 Environment 已经准备好
③、SpringBoot 应用在启动时会输出这样的东西:
1 | . ____ _ __ _ _ |
如果想把这个东西改成自己的涂鸦,你可以研究以下 Banner 的实现,这个任务就留给你们吧。
④、根据是否是 web 项目,来创建不同的 ApplicationContext 容器。
⑤、创建一系列FailureAnalyzer,创建流程依然是通过 SpringFactoriesLoader 获取到所有实现 FailureAnalyzer 接口的 class,然后在创建对应的实例。FailureAnalyzer 用于分析故障并提供相关诊断信息。
⑥、初始化 ApplicationContext,主要完成以下工作:
- 将准备好的 Environment 设置给 ApplicationContext
- 遍历调用所有的 ApplicationContextInitializer 的
initialize()方法来对已经创建好的 ApplicationContext 进行进一步的处理 - 调用 SpringApplicationRunListener 的
contextPrepared()方法,通知所有的监听者:ApplicationContext 已经准备完毕 - 将所有的 bean 加载到容器中
- 调用 SpringApplicationRunListener 的
contextLoaded()方法,通知所有的监听者:ApplicationContext 已经装载完毕
⑦、调用 ApplicationContext 的refresh()方法,完成 IoC 容器可用的最后一道工序。从名字上理解为刷新容器,那何为刷新?就是插手容器的启动,联系一下第一小节的内容。那如何刷新呢?且看下面代码:
1 | // 摘自refresh()方法中一句代码 |
看看这个方法的实现:
1 | protected void invokeBeanFactoryPostProcessors(ConfigurableListableBeanFactory beanFactory) { |
获取到所有的BeanFactoryPostProcessor来对容器做一些额外的操作。BeanFactoryPostProcessor 允许我们在容器实例化相应对象之前,对注册到容器的 BeanDefinition 所保存的信息做一些额外的操作。这里的 getBeanFactoryPostProcessors()方法可以获取到 3 个 Processor:
1 | ConfigurationWarningsApplicationContextInitializer$ConfigurationWarningsPostProcessor |
不是有那么多 BeanFactoryPostProcessor 的实现类,为什么这儿只有这 3 个?因为在初始化流程获取到的各种 ApplicationContextInitializer 和 ApplicationListener 中,只有上文 3 个做了类似于如下操作:
1 | public void initialize(ConfigurableApplicationContext context) { |
然后你就可以进入到PostProcessorRegistrationDelegate.invokeBeanFactoryPostProcessors()方法了,这个方法除了会遍历上面的 3 个 BeanFactoryPostProcessor 处理外,还会获取类型为BeanDefinitionRegistryPostProcessor的 bean:org.springframework.context.annotation.internalConfigurationAnnotationProcessor,对应的 Class 为ConfigurationClassPostProcessor。ConfigurationClassPostProcessor用于解析处理各种注解,包括:@Configuration、@ComponentScan、@Import、@PropertySource、@ImportResource、@Bean。当处理@import注解的时候,就会调用自动配置这一小节中的EnableAutoConfigurationImportSelector.selectImports()来完成自动配置功能。其他的这里不再多讲,如果你有兴趣,可以查阅参考资料 6。
⑧、查找当前 context 中是否注册有 CommandLineRunner 和 ApplicationRunner,如果有则遍历执行它们。
⑨、执行所有 SpringApplicationRunListener 的 finished()方法。
这就是 Spring Boot 的整个启动流程,其核心就是在 Spring 容器初始化并启动的基础上加入各种扩展点,这些扩展点包括:ApplicationContextInitializer、ApplicationListener 以及各种 BeanFactoryPostProcessor 等等。你对整个流程的细节不必太过关注,甚至没弄明白也没有关系,你只要理解这些扩展点是在何时如何工作的,能让它们为你所用即可。
整个启动流程确实非常复杂,可以查询参考资料中的部分章节和内容,对照着源码,多看看,我想最终你都能弄清楚的。言而总之,Spring 才是核心,理解清楚 Spring 容器的启动流程,那 Spring Boot 启动流程就不在话下了。
参考资料
[1]王福强 著;springboot 揭秘:快速构建微服务体系; 机械工业出版社, 2016
[2]王福强 著;spring 揭秘; 人民邮件出版社, 2009
[3]craig walls 著;丁雪丰 译;spring boot 实战;中国工信出版集团 人民邮电出版社,2016
[4]深入探讨 java 类加载器 : www.ibm.com/developerwo…
[5]spring boot 实战:自动配置原理分析 : blog.csdn.net/liaokailin/…
[6]spring boot实战:spring boot bean加载源码分析: blog.csdn.net/liaokailin/…
SpringBoot 基本原理
SpringBoot 基本原理
SpringBoot 为我们做的自动配置,确实方便快捷,但一直搞不明白它的内部启动原理,这次就来一步步解开 SpringBoot 的神秘面纱,让它不再神秘。

1 |
|
从上面代码可以看出,Annotation 定义(@SpringBootApplication)和类定义(SpringApplication.run)最为耀眼,所以要揭开 SpringBoot 的神秘面纱,我们要从这两位开始就可以了。
SpringBootApplication 背后的秘密
1 | // 注解的适用范围,其中TYPE用于描述类、接口(包括包注解类型)或enum声明 |
虽然定义使用了多个 Annotation 进行了原信息标注,但实际上重要的只有三个 Annotation:
@Configuration(@SpringBootConfiguration 点开查看发现里面还是应用了@Configuration)
@EnableAutoConfiguration
@ComponentScan
所以,如果我们使用如下的 SpringBoot 启动类,整个 SpringBoot 应用依然可以与之前的启动类功能对等:
1 |
|
每次写这 3 个比较累,所以写一个@SpringBootApplication 方便点。接下来分别介绍这 3 个 Annotation。
@Configuration
这里的@Configuration 对我们来说不陌生,它就是 JavaConfig 形式的 Spring Ioc 容器的配置类使用的那个@Configuration,SpringBoot 社区推荐使用基于 JavaConfig 的配置形式,所以,这里的启动类标注了@Configuration 之后,本身其实也是一个 IoC 容器的配置类。
举几个简单例子回顾下,XML 跟 config 配置方式的区别:
表达形式层面
基于 XML 配置的方式是这样:
1 |
|
而基于 JavaConfig 的配置方式是这样:
1 |
|
任何一个标注了@Configuration 的 Java 类定义都是一个 JavaConfig 配置类。
注册 bean 定义层面
基于 XML 的配置形式是这样:
1 | <bean id="mockService" class="..MockServiceImpl"> |
而基于 JavaConfig 的配置形式是这样的:
1 |
|
任何一个标注了@Bean 的方法,其返回值将作为一个 bean 定义注册到 Spring 的 IoC 容器,方法名将默认成该 bean 定义的 id。
表达依赖注入关系层面
为了表达 bean 与 bean 之间的依赖关系,在 XML 形式中一般是这样:
1 | <bean id="mockService" class="..MockServiceImpl"> |
而基于 JavaConfig 的配置形式是这样的:
1 |
|
如果一个 bean 的定义依赖其他 bean,则直接调用对应的 JavaConfig 类中依赖 bean 的创建方法就可以了。
@ComponentScan
@ComponentScan 这个注解在 Spring 中很重要,它对应 XML 配置中的元素,@ComponentScan 的功能其实就是自动扫描并加载符合条件的组件(比如@Component 和@Repository 等)或者 bean 定义,最终将这些 bean 定义加载到 IoC 容器中。
我们可以通过 basePackages 等属性来细粒度的定制@ComponentScan 自动扫描的范围,如果不指定,则默认 Spring 框架实现会从声明@ComponentScan 所在类的 package 进行扫描。
注:所以 SpringBoot 的启动类最好是放在 root package 下,因为默认不指定 basePackages。
@EnableAutoConfiguration
个人感觉**@EnableAutoConfiguration 这个 Annotation 最为重要**,所以放在最后来解读,大家是否还记得 Spring 框架提供的各种名字为@Enable 开头的 Annotation 定义?比如@EnableScheduling、@EnableCaching、@EnableMBeanExport 等,@EnableAutoConfiguration 的理念和做事方式其实一脉相承,简单概括一下就是,借助@Import 的支持,收集和注册特定场景相关的 bean 定义。
@EnableScheduling是通过@Import 将 Spring 调度框架相关的 bean 定义都加载到 IoC 容器。
@EnableMBeanExport是通过@Import 将 JMX 相关的 bean 定义加载到 IoC 容器。
而**@EnableAutoConfiguration**也是借助@Import 的帮助,将所有符合自动配置条件的 bean 定义加载到 IoC 容器,仅此而已!
@EnableAutoConfiguration 作为一个复合 Annotation,其自身定义关键信息如下:
1 |
|
两个比较重要的注解:
@AutoConfigurationPackage:自动配置包
@Import: 导入自动配置的组件
AutoConfigurationPackage 注解:
1 | static class Registrar implements ImportBeanDefinitionRegistrar, DeterminableImports { |
它其实是注册了一个 Bean 的定义。
new PackageImport(metadata).getPackageName(),它其实返回了当前主程序类的 同级以及子级 的包组件。

以上图为例,DemoApplication 是和 demo 包同级,但是 demo2 这个类是 DemoApplication 的父级,和 example 包同级
也就是说,DemoApplication 启动加载的 Bean 中,并不会加载 demo2,这也就是为什么,我们要把 DemoApplication 放在项目的最高级中。
Import(AutoConfigurationImportSelector.class)注解:

可以从图中看出 AutoConfigurationImportSelector 继承了 DeferredImportSelector 继承了 ImportSelector
ImportSelector 有一个方法为:selectImports。
1 |
|
可以看到第九行,它其实是去加载 public static final String FACTORIES_RESOURCE_LOCATION = “META-INF/spring.factories”;外部文件。这个外部文件,有很多自动配置的类。如下:

image
其中,最关键的要属**@Import(EnableAutoConfigurationImportSelector.class),借助EnableAutoConfigurationImportSelector,@EnableAutoConfiguration可以帮助 SpringBoot 应用将所有符合条件的@Configuration**配置都加载到当前 SpringBoot 创建并使用的 IoC 容器。就像一只“八爪鱼”一样。

自动配置幕后英雄:SpringFactoriesLoader 详解
借助于 Spring 框架原有的一个工具类:SpringFactoriesLoader 的支持,@EnableAutoConfiguration 可以智能的自动配置功效才得以大功告成!
SpringFactoriesLoader 属于 Spring 框架私有的一种扩展方案,其主要功能就是从指定的配置文件 META-INF/spring.factories 加载配置。
1 | public abstract class SpringFactoriesLoader { |
配合**@EnableAutoConfiguration使用的话,它更多是提供一种配置查找的功能支持,即根据@EnableAutoConfiguration 的完整类名 org.springframework.boot.autoconfigure.EnableAutoConfiguration 作为查找的 Key,获取对应的一组@Configuration**类
上图就是从 SpringBoot 的 autoconfigure 依赖包中的 META-INF/spring.factories 配置文件中摘录的一段内容,可以很好地说明问题。
所以,@EnableAutoConfiguration 自动配置的魔法骑士就变成了:从 classpath 中搜寻所有的 META-INF/spring.factories 配置文件,并将其中 org.springframework.boot.autoconfigure.EnableutoConfiguration 对应的配置项通过反射(Java Refletion)实例化为对应的标注了@Configuration 的 JavaConfig 形式的 IoC 容器配置类,然后汇总为一个并加载到 IoC 容器。
