Java 容器之 List

Java 容器之 List

ListCollection 的子接口,其中可以保存各个重复的内容。

List 简介

List 是一个接口,它继承于 Collection 的接口。它代表着有序的队列。

AbstractList 是一个抽象类,它继承于 AbstractCollectionAbstractList 实现了 List 接口中除 size()get(int location) 之外的函数。

AbstractSequentialList 是一个抽象类,它继承于 AbstractListAbstractSequentialList 实现了“链表中,根据 index 索引值操作链表的全部函数”。

ArrayList 和 LinkedList

ArrayListLinkedListList 最常用的实现。

  • ArrayList 基于动态数组实现,存在容量限制,当元素数超过最大容量时,会自动扩容;LinkedList 基于双向链表实现,不存在容量限制。
  • ArrayList 随机访问速度较快,随机插入、删除速度较慢;LinkedList 随机插入、删除速度较快,随机访问速度较慢。
  • ArrayListLinkedList 都不是线程安全的。

Vector 和 Stack

VectorStack 的设计目标是作为线程安全的 List 实现,替代 ArrayList

  • Vector - VectorArrayList 类似,也实现了 List 接口。但是, Vector 中的主要方法都是 synchronized 方法,即通过互斥同步方式保证操作的线程安全。
  • Stack - Stack 也是一个同步容器,它的方法也用 synchronized 进行了同步,它实际上是继承于 Vector 类。

ArrayList

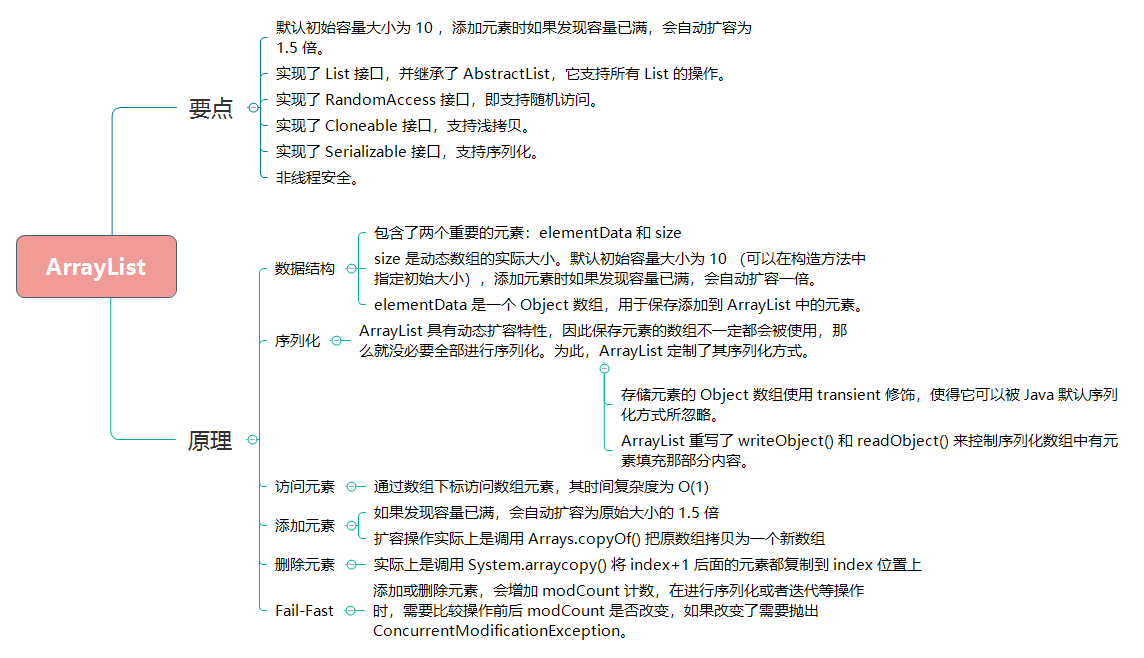
ArrayList 从数据结构角度来看,可以视为支持动态扩容的线性表。
img

ArrayList 要点

ArrayList 是一个数组队列,相当于动态数组。**ArrayList 默认初始容量大小为 10 ,添加元素时,如果发现容量已满,会自动扩容为原始大小的 1.5 倍**。因此,应该尽量在初始化 ArrayList 时,为其指定合适的初始化容量大小,减少扩容操作产生的性能开销。

ArrayList 定义:

1
2
public class ArrayList<E> extends AbstractList<E>
implements List<E>, RandomAccess, Cloneable, java.io.Serializable

从 ArrayList 的定义,不难看出 ArrayList 的一些基本特性:

  • ArrayList 实现了 List 接口,并继承了 AbstractList,它支持所有 List 的操作。
  • ArrayList 实现了 RandomAccess 接口,支持随机访问RandomAccess 是一个标志接口,它意味着“只要实现该接口的 List 类,都支持快速随机访问”。在 ArrayList 中,我们即可以通过元素的序号快速获取元素对象;这就是快速随机访问。
  • ArrayList 实现了 Cloneable 接口,默认为浅拷贝
  • ArrayList 实现了 Serializable 接口,支持序列化,能通过序列化方式传输。
  • ArrayList非线程安全的。

ArrayList 原理

ArrayList 的数据结构

ArrayList 包含了两个重要的元素:elementDatasize

1
2
3
4
5
6
// 默认初始化容量
private static final int DEFAULT_CAPACITY = 10;
// 对象数组
transient Object[] elementData;
// 数组长度
private int size;
  • size - 是动态数组的实际大小。
  • elementData - 是一个 Object 数组,用于保存添加到 ArrayList 中的元素。

ArrayList 的序列化

ArrayList 具有动态扩容特性,因此保存元素的数组不一定都会被使用,那么就没必要全部进行序列化。为此,ArrayList 定制了其序列化方式。具体做法是:

  • 存储元素的 Object 数组(即 elementData)使用 transient 修饰,使得它可以被 Java 序列化所忽略。
  • ArrayList 重写了 writeObject()readObject() 来控制序列化数组中有元素填充那部分内容。

:bulb: 不了解 Java 序列化方式,可以参考:Java 序列化

ArrayList 构造方法

ArrayList 类实现了三个构造函数:

  • 第一个是默认构造方法,ArrayList 会创建一个空数组;
  • 第二个是创建 ArrayList 对象时,传入一个初始化值;
  • 第三个是传入一个集合类型进行初始化。

当 ArrayList 新增元素时,如果所存储的元素已经超过其当前容量,它会计算容量后再进行动态扩容。数组的动态扩容会导致整个数组进行一次内存复制。因此,初始化 ArrayList 时,指定数组初始大小,有助于减少数组的扩容次数,从而提高系统性能

1
2
3
4
5
6
7
8
9
10
11
12
13
14
15
16
17
public ArrayList() {
// 创建一个空数组
this.elementData = DEFAULTCAPACITY_EMPTY_ELEMENTDATA;
}

public ArrayList(int initialCapacity) {
if (initialCapacity > 0) {
// 根据初始化值创建数组大小
this.elementData = new Object[initialCapacity];
} else if (initialCapacity == 0) {
// 初始化值为 0 时,创建一个空数组
this.elementData = EMPTY_ELEMENTDATA;
} else {
throw new IllegalArgumentException("Illegal Capacity: "+
initialCapacity);
}
}

ArrayList 访问元素

ArrayList 访问元素的实现主要基于以下关键性源码:

1
2
3
4
5
6
7
8
9
// 获取第 index 个元素
public E get(int index) {
rangeCheck(index);
return elementData(index);
}

E elementData(int index) {
return (E) elementData[index];
}

实现非常简单,其实就是**通过数组下标访问数组元素,其时间复杂度为 O(1)**,所以很快。

ArrayList 添加元素

ArrayList 添加元素有两种方法:一种是添加元素到数组末尾,另外一种是添加元素到任意位置。

1
2
3
4
5
6
7
8
9
10
11
12
13
14
15
16
17
// 添加元素到数组末尾
public boolean add(E e) {
ensureCapacityInternal(size + 1); // Increments modCount!!
elementData[size++] = e;
return true;
}

// 添加元素到任意位置
public void add(int index, E element) {
rangeCheckForAdd(index);

ensureCapacityInternal(size + 1); // Increments modCount!!
System.arraycopy(elementData, index, elementData, index + 1,
size - index);
elementData[index] = element;
size++;
}

两种添加元素方法的不同点是:

  • 添加元素到任意位置,会导致在该位置后的所有元素都需要重新排列
  • 而添加元素到数组末尾,在没有发生扩容的前提下,是不会有元素复制排序过程的。

两种添加元素方法的共同点是:添加元素时,会先检查容量大小,如果发现容量不足,会自动扩容为原始大小的 1.5 倍

ArrayList 添加元素的实现主要基于以下关键性源码:

1
2
3
4
5
6
7
8
9
10
11
12
13
14
15
16
17
18
19
20
21
22
23
24
25
26
27
private void ensureCapacityInternal(int minCapacity) {
if (elementData == DEFAULTCAPACITY_EMPTY_ELEMENTDATA) {
minCapacity = Math.max(DEFAULT_CAPACITY, minCapacity);
}

ensureExplicitCapacity(minCapacity);
}

private void ensureExplicitCapacity(int minCapacity) {
modCount++;

// overflow-conscious code
if (minCapacity - elementData.length > 0)
grow(minCapacity);
}

private void grow(int minCapacity) {
// overflow-conscious code
int oldCapacity = elementData.length;
int newCapacity = oldCapacity + (oldCapacity >> 1);
if (newCapacity - minCapacity < 0)
newCapacity = minCapacity;
if (newCapacity - MAX_ARRAY_SIZE > 0)
newCapacity = hugeCapacity(minCapacity);
// minCapacity is usually close to size, so this is a win:
elementData = Arrays.copyOf(elementData, newCapacity);
}

ArrayList 执行添加元素动作(add 方法)时,调用 ensureCapacityInternal 方法来保证容量足够。

  • 如果容量足够时,将数据作为数组中 size+1 位置上的元素写入,并将 size 自增 1。
  • 如果容量不够时,需要使用 grow 方法进行扩容数组,新容量的大小为 oldCapacity + (oldCapacity >> 1),也就是旧容量的 1.5 倍。扩容操作实际上是调用 Arrays.copyOf() 把原数组拷贝为一个新数组,因此最好在创建 ArrayList 对象时就指定大概的容量大小,减少扩容操作的次数。

ArrayList 删除元素

ArrayList 的删除方法和添加元素到任意位置方法有些相似。

ArrayList 在每一次有效的删除操作后,都要进行数组的重组,并且删除的元素位置越靠前,数组重组的开销就越大。具体来说,ArrayList 会**调用 System.arraycopy()index+1 后面的元素都复制到 index 位置上。

1
2
3
4
5
6
7
8
9
10
11
12
13
public E remove(int index) {
rangeCheck(index);

modCount++;
E oldValue = elementData(index);

int numMoved = size - index - 1;
if (numMoved > 0)
System.arraycopy(elementData, index+1, elementData, index, numMoved);
elementData[--size] = null; // clear to let GC do its work

return oldValue;
}

ArrayList 的 Fail-Fast

ArrayList 使用 modCount 来记录结构发生变化的次数。结构发生变化是指添加或者删除至少一个元素的所有操作,或者是调整内部数组的大小,仅仅只是设置元素的值不算结构发生变化。

在进行序列化或者迭代等操作时,需要比较操作前后 modCount 是否改变,如果发生改变,ArrayList 会抛出 ConcurrentModificationException

1
2
3
4
5
6
7
8
9
10
11
12
13
14
15
16
17
18
private void writeObject(java.io.ObjectOutputStream s)
throws java.io.IOException{
// Write out element count, and any hidden stuff
int expectedModCount = modCount;
s.defaultWriteObject();

// Write out size as capacity for behavioural compatibility with clone()
s.writeInt(size);

// Write out all elements in the proper order.
for (int i=0; i<size; i++) {
s.writeObject(elementData[i]);
}

if (modCount != expectedModCount) {
throw new ConcurrentModificationException();
}
}

LinkedList

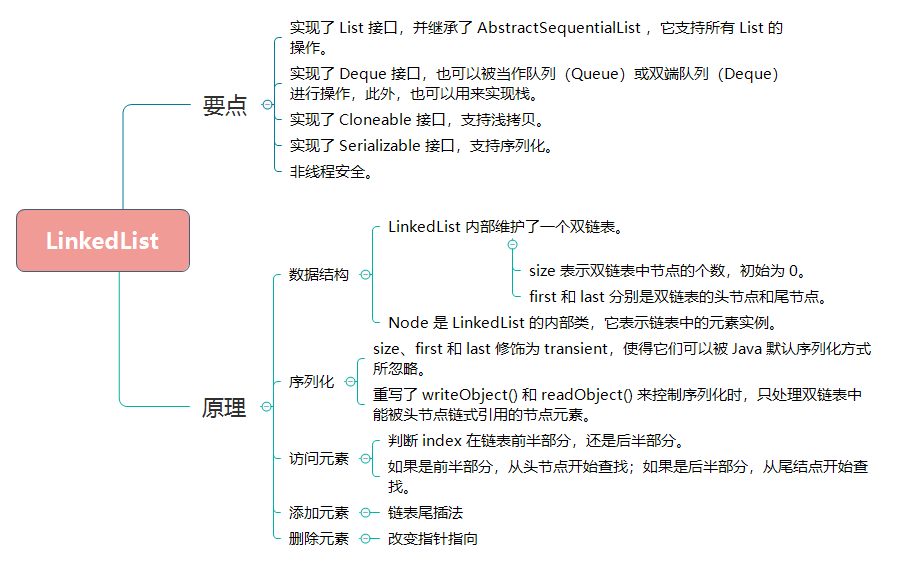
LinkedList 从数据结构角度来看,可以视为双链表。
img

LinkedList 要点

LinkedList 基于双链表结构实现。由于是双链表,所以顺序访问会非常高效,而随机访问效率比较低。

LinkedList 定义:

1
2
3
public class LinkedList<E>
extends AbstractSequentialList<E>
implements List<E>, Deque<E>, Cloneable, java.io.Serializable

LinkedList 的定义,可以得出 LinkedList 的一些基本特性:

  • LinkedList 实现了 List 接口,并继承了 AbstractSequentialList ,它支持所有 List 的操作。
  • LinkedList 实现了 Deque 接口,也可以被当作队列(Queue)或双端队列(Deque)进行操作,此外,也可以用来实现栈。
  • LinkedList 实现了 Cloneable 接口,默认为浅拷贝
  • LinkedList 实现了 Serializable 接口,支持序列化
  • LinkedList非线程安全的。

LinkedList 原理

LinkedList 的数据结构

LinkedList 内部维护了一个双链表

LinkedList 通过 Node 类型的头尾指针(firstlast)来访问数据。

1
2
3
4
5
6
// 链表长度
transient int size = 0;
// 链表头节点
transient Node<E> first;
// 链表尾节点
transient Node<E> last;
  • size - 表示双链表中节点的个数,初始为 0
  • firstlast - 分别是双链表的头节点和尾节点

NodeLinkedList 的内部类,它表示链表中的元素实例。Node 中包含三个元素:

  • prev 是该节点的上一个节点;
  • next 是该节点的下一个节点;
  • item 是该节点所包含的值。
1
2
3
4
5
6
private static class Node<E> {
E item;
Node<E> next;
Node<E> prev;
...
}

LinkedList 的序列化

LinkedListArrayList 一样也定制了自身的序列化方式。具体做法是:

  • size (双链表容量大小)、firstlast (双链表的头尾节点)修饰为 transient,使得它们可以被 Java 序列化所忽略。
  • 重写了 writeObject()readObject() 来控制序列化时,只处理双链表中能被头节点链式引用的节点元素。

LinkedList 访问元素

LinkedList 访问元素的实现主要基于以下关键性源码:

1
2
3
4
5
6
7
8
9
10
11
12
13
14
15
16
17
18
19
20
public E get(int index) {
checkElementIndex(index);
return node(index).item;
}

Node<E> node(int index) {
// assert isElementIndex(index);

if (index < (size >> 1)) {
Node<E> x = first;
for (int i = 0; i < index; i++)
x = x.next;
return x;
} else {
Node<E> x = last;
for (int i = size - 1; i > index; i--)
x = x.prev;
return x;
}
}

获取 LinkedList 第 index 个元素的算法是:

  • 判断 index 在链表前半部分,还是后半部分。
  • 如果是前半部分,从头节点开始查找;如果是后半部分,从尾结点开始查找。

LinkedList 这种访问元素的性能是 O(N) 级别的(极端情况下,扫描 N/2 个元素);相比于 ArrayListO(1),显然要慢不少。

推荐使用迭代器遍历 LinkedList ,不要使用传统的 for 循环。注:foreach 语法会被编译器转换成迭代器遍历,但是它的遍历过程中不允许修改 List 长度,即不能进行增删操作。

LinkedList 添加元素

LinkedList 有多种添加元素方法:

  • add(E e):默认添加元素方法(插入尾部)
  • add(int index, E element):添加元素到任意位置
  • addFirst(E e):在头部添加元素
  • addLast(E e):在尾部添加元素
1
2
3
4
5
6
7
8
9
10
11
12
13
14
15
16
17
18
19
20
21
public boolean add(E e) {
linkLast(e);
return true;
}

public void add(int index, E element) {
checkPositionIndex(index);

if (index == size)
linkLast(element);
else
linkBefore(element, node(index));
}

public void addFirst(E e) {
linkFirst(e);
}

public void addLast(E e) {
linkLast(e);
}

LinkedList 添加元素的实现主要基于以下关键性源码:

1
2
3
4
5
6
7
8
9
10
11
12
13
14
15
16
17
18
19
20
21
22
23
24
25
26
27
28
29
30
31
32
33
34
35
36
private void linkFirst(E e) {
final Node<E> f = first;
final Node<E> newNode = new Node<>(null, e, f);
first = newNode;
if (f == null)
last = newNode;
else
f.prev = newNode;
size++;
modCount++;
}

void linkLast(E e) {
final Node<E> l = last;
final Node<E> newNode = new Node<>(l, e, null);
last = newNode;
if (l == null)
first = newNode;
else
l.next = newNode;
size++;
modCount++;
}

void linkBefore(E e, Node<E> succ) {
// assert succ != null;
final Node<E> pred = succ.prev;
final Node<E> newNode = new Node<>(pred, e, succ);
succ.prev = newNode;
if (pred == null)
first = newNode;
else
pred.next = newNode;
size++;
modCount++;
}

算法如下:

  • 将新添加的数据包装为 Node
  • 如果往头部添加元素,将头指针 first 指向新的 Node,之前的 first 对象的 prev 指向新的 Node
  • 如果是向尾部添加元素,则将尾指针 last 指向新的 Node,之前的 last 对象的 next 指向新的 Node

LinkedList 删除元素

LinkedList 删除元素的实现主要基于以下关键性源码:

1
2
3
4
5
6
7
8
9
10
11
12
13
14
15
16
17
18
19
20
21
22
23
24
25
26
27
28
29
30
31
32
33
34
35
36
37
38
39
40
41
42
43
44
45
46
public boolean remove(Object o) {
if (o == null) {
// 遍历找到要删除的元素节点
for (Node<E> x = first; x != null; x = x.next) {
if (x.item == null) {
unlink(x);
return true;
}
}
} else {
// 遍历找到要删除的元素节点
for (Node<E> x = first; x != null; x = x.next) {
if (o.equals(x.item)) {
unlink(x);
return true;
}
}
}
return false;
}

E unlink(Node<E> x) {
// assert x != null;
final E element = x.item;
final Node<E> next = x.next;
final Node<E> prev = x.prev;

if (prev == null) {
first = next;
} else {
prev.next = next;
x.prev = null;
}

if (next == null) {
last = prev;
} else {
next.prev = prev;
x.next = null;
}

x.item = null;
size--;
modCount++;
return element;
}

算法说明:

  • 遍历找到要删除的元素节点,然后调用 unlink 方法删除节点;
  • unlink 删除节点的方法:
    • 如果当前节点有前驱节点,则让前驱节点指向当前节点的下一个节点;否则,让双链表头指针指向下一个节点。
    • 如果当前节点有后继节点,则让后继节点指向当前节点的前一个节点;否则,让双链表尾指针指向上一个节点。

List 常见问题

Arrays.asList 问题点

在业务开发中,我们常常会把原始的数组转换为 List 类数据结构,来继续展开各种 Stream 操作。通常,我们会使用 Arrays.asList 方法可以把数组一键转换为 List

【示例】Arrays.asList 转换基本类型数组

1
2
3
int[] arr = { 1, 2, 3 };
List list = Arrays.asList(arr);
log.info("list:{} size:{} class:{}", list, list.size(), list.get(0).getClass());

【输出】

1
11:26:33.214 [main] INFO io.github.dunwu.javacore.container.list.AsList示例 - list:[[I@ae45eb6] size:1 class:class [I

数组元素个数为 3,但转换后的列表个数为 1。

由此可知, Arrays.asList 第一个问题点:不能直接使用 Arrays.asList 来转换基本类型数组

其原因是:Arrays.asList 方法传入的是一个泛型 T 类型可变参数,最终 int 数组整体作为了一个对象成为了泛型类型 T:

1
2
3
public static <T> List<T> asList(T... a) {
return new ArrayList<>(a);
}

直接遍历这样的 List 必然会出现 Bug,修复方式有两种,如果使用 Java8 以上版本可以使用 Arrays.stream 方法来转换,否则可以把 int 数组声明为包装类型 Integer 数组:

【示例】转换整型数组为 List 的正确方式

1
2
3
4
5
6
7
int[] arr1 = { 1, 2, 3 };
List list1 = Arrays.stream(arr1).boxed().collect(Collectors.toList());
log.info("list:{} size:{} class:{}", list1, list1.size(), list1.get(0).getClass());

Integer[] arr2 = { 1, 2, 3 };
List list2 = Arrays.asList(arr2);
log.info("list:{} size:{} class:{}", list2, list2.size(), list2.get(0).getClass());

【示例】Arrays.asList 转换引用类型数组

1
2
3
4
5
6
7
8
9
String[] arr = { "1", "2", "3" };
List list = Arrays.asList(arr);
arr[1] = "4";
try {
list.add("5");
} catch (Exception ex) {
ex.printStackTrace();
}
log.info("arr:{} list:{}", Arrays.toString(arr), list);

抛出 java.lang.UnsupportedOperationException

抛出异常的原因在于 Arrays.asList 第二个问题点:**Arrays.asList 返回的 List 不支持增删操作**。Arrays.asList 返回的 List 并不是我们期望的 java.util.ArrayList,而是 Arrays 的内部类 ArrayList

查看源码,我们可以发现 Arrays.asList 返回的 ArrayList 继承了 AbstractList,但是并没有覆写 addremove 方法。

1
2
3
4
5
6
7
8
9
10
11
12
13
14
15
16
17
18
19
20
21
22
23
24
25
26
27
28
29
30
private static class ArrayList<E> extends AbstractList<E>
implements RandomAccess, java.io.Serializable
{
private static final long serialVersionUID = -2764017481108945198L;
private final E[] a;

ArrayList(E[] array) {
a = Objects.requireNonNull(array);
}

// ...

@Override
public E set(int index, E element) {
E oldValue = a[index];
a[index] = element;
return oldValue;
}

}

public abstract class AbstractList<E> extends AbstractCollection<E> implements List<E> {
public void add(int index, E element) {
throw new UnsupportedOperationException();
}

public E remove(int index) {
throw new UnsupportedOperationException();
}
}

Arrays.asList 第三个问题点:**对原始数组的修改会影响到我们获得的那个 List**。ArrayList 其实是直接使用了原始的数组。

解决方法很简单,重新 new 一个 ArrayList 初始化 Arrays.asList 返回的 List 即可:

1
2
3
4
5
6
7
8
9
String[] arr = { "1", "2", "3" };
List list = new ArrayList(Arrays.asList(arr));
arr[1] = "4";
try {
list.add("5");
} catch (Exception ex) {
ex.printStackTrace();
}
log.info("arr:{} list:{}", Arrays.toString(arr), list);

List.subList 问题点

List.subList 直接引用了原始的 List,也可以认为是共享“存储”,而且对原始 List 直接进行结构性修改会导致 SubList 出现异常。

1
2
3
4
5
6
7
8
private static List<List<Integer>> data = new ArrayList<>();

private static void oom() {
for (int i = 0; i < 1000; i++) {
List<Integer> rawList = IntStream.rangeClosed(1, 100000).boxed().collect(Collectors.toList());
data.add(rawList.subList(0, 1));
}
}

出现 OOM 的原因是,循环中的 1000 个具有 10 万个元素的 List 始终得不到回收,因为它始终被 subList 方法返回的 List 强引用。

解决方法是:

1
2
3
4
5
6
private static void oomfix() {
for (int i = 0; i < 1000; i++) {
List<Integer> rawList = IntStream.rangeClosed(1, 100000).boxed().collect(Collectors.toList());
data.add(new ArrayList<>(rawList.subList(0, 1)));
}
}

【示例】子 List 强引用原始的 List

1
2
3
4
5
6
7
8
9
10
11
12
13
private static void wrong() {
List<Integer> list = IntStream.rangeClosed(1, 10).boxed().collect(Collectors.toList());
List<Integer> subList = list.subList(1, 4);
System.out.println(subList);
subList.remove(1);
System.out.println(list);
list.add(0);
try {
subList.forEach(System.out::println);
} catch (Exception ex) {
ex.printStackTrace();
}
}

抛出 java.util.ConcurrentModificationException

解决方法:

一种是,不直接使用 subList 方法返回的 SubList,而是重新使用 new ArrayList,在构造方法传入 SubList,来构建一个独立的 ArrayList;

另一种是,对于 Java 8 使用 Stream 的 skip 和 limit API 来跳过流中的元素,以及限制流中元素的个数,同样可以达到 SubList 切片的目的。

1
2
3
4
//方式一:
List<Integer> subList = new ArrayList<>(list.subList(1, 4));
//方式二:
List<Integer> subList = list.stream().skip(1).limit(3).collect(Collectors.toList());

参考资料