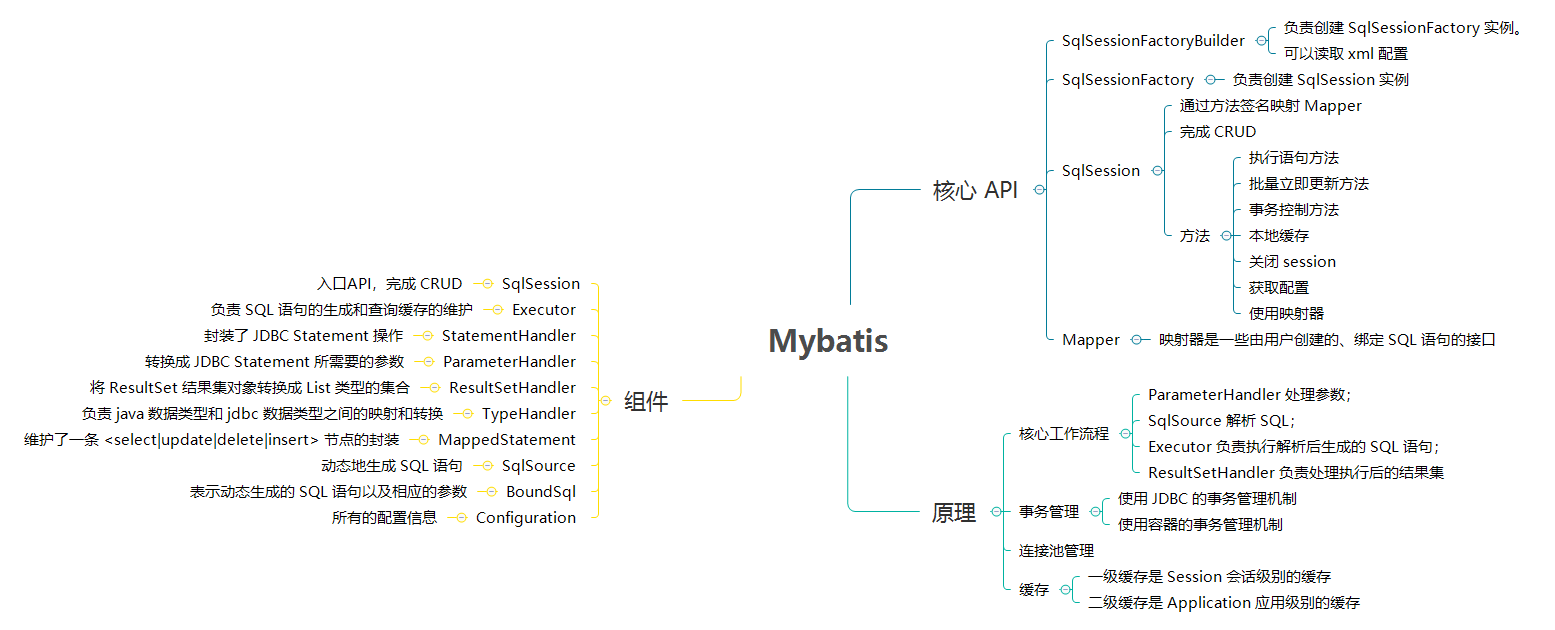
MyBatis 快速入门
MyBatis 的前身就是 iBatis ,是一个作用在数据持久层的对象关系映射(Object Relational Mapping,简称 ORM)框架。

Mybatis 简介

什么是 MyBatis
MyBatis 是一款持久层框架,它支持定制化 SQL、存储过程以及高级映射。MyBatis 避免了几乎所有的 JDBC 代码和手动设置参数以及获取结果集。MyBatis 可以使用简单的 XML 或注解来配置和映射原生类型、接口和 Java 的 POJO(Plain Old Java Objects,普通老式 Java 对象)为数据库中的记录。
MyBatis vs. Hibernate
MyBatis 和 Hibernate 都是 Java 世界中比较流行的 ORM 框架。我们应该了解其各自的优势,根据项目的需要去抉择在开发中使用哪个框架。
Mybatis 优势
- MyBatis 可以进行更为细致的 SQL 优化,可以减少查询字段。
- MyBatis 容易掌握,而 Hibernate 门槛较高。
Hibernate 优势
- Hibernate 的 DAO 层开发比 MyBatis 简单,Mybatis 需要维护 SQL 和结果映射。
- Hibernate 对对象的维护和缓存要比 MyBatis 好,对增删改查的对象的维护要方便。
- Hibernate 数据库移植性很好,MyBatis 的数据库移植性不好,不同的数据库需要写不同 SQL。
- Hibernate 有更好的二级缓存机制,可以使用第三方缓存。MyBatis 本身提供的缓存机制不佳。
快速入门
这里,我将以一个入门级的示例来演示 Mybatis 是如何工作的。
注:本文后面章节中的原理、源码部分也将基于这个示例来进行讲解。
数据库准备
在本示例中,需要针对一张用户表进行 CRUD 操作。其数据模型如下:
1
2
3
4
5
6
7
8
9
10
11
12
13
| CREATE TABLE IF NOT EXISTS user (
id BIGINT(10) UNSIGNED NOT NULL AUTO_INCREMENT COMMENT 'Id',
name VARCHAR(10) NOT NULL DEFAULT '' COMMENT '用户名',
age INT(3) NOT NULL DEFAULT 0 COMMENT '年龄',
address VARCHAR(32) NOT NULL DEFAULT '' COMMENT '地址',
email VARCHAR(32) NOT NULL DEFAULT '' COMMENT '邮件',
PRIMARY KEY (id)
) COMMENT = '用户表';
INSERT INTO user (name, age, address, email)
VALUES ('张三', 18, '北京', 'xxx@163.com');
INSERT INTO user (name, age, address, email)
VALUES ('李四', 19, '上海', 'xxx@163.com');
|
添加 Mybatis
如果使用 Maven 来构建项目,则需将下面的依赖代码置于 pom.xml 文件中:
1
2
3
4
5
| <dependency>
<groupId>org.mybatis</groupId>
<artifactId>mybatis</artifactId>
<version>x.x.x</version>
</dependency>
|
Mybatis 配置
XML 配置文件中包含了对 MyBatis 系统的核心设置,包括获取数据库连接实例的数据源(DataSource)以及决定事务作用域和控制方式的事务管理器(TransactionManager)。
本示例中只是给出最简化的配置。
【示例】mybatis-config.xml 文件
1
2
3
4
5
6
7
8
9
10
11
12
13
14
15
16
17
18
19
20
| <?xml version="1.0" encoding="utf-8"?>
<!DOCTYPE configuration PUBLIC "-//mybatis.org//DTD Config 3.0//EN"
"http://mybatis.org/dtd/mybatis-3-config.dtd">
<configuration>
<environments default="development">
<environment id="development">
<transactionManager type="JDBC" />
<dataSource type="POOLED">
<property name="driver" value="com.mysql.cj.jdbc.Driver" />
<property name="url"
value="jdbc:mysql://127.0.0.1:3306/spring_tutorial?serverTimezone=UTC" />
<property name="username" value="root" />
<property name="password" value="root" />
</dataSource>
</environment>
</environments>
<mappers>
<mapper resource="mybatis/mapper/UserMapper.xml" />
</mappers>
</configuration>
|
说明:上面的配置文件中仅仅指定了数据源连接方式和 User 表的映射配置文件。
Mapper
Mapper.xml
个人理解,Mapper.xml 文件可以看做是 Mybatis 的 JDBC SQL 模板。
【示例】UserMapper.xml 文件
下面是一个通过 Mybatis Generator 自动生成的完整的 Mapper 文件。
1
2
3
4
5
6
7
8
9
10
11
12
13
14
15
16
17
18
19
20
21
22
23
24
25
26
27
28
29
30
31
32
33
34
35
36
37
38
| <?xml version="1.0" encoding="UTF-8"?>
<!DOCTYPE mapper PUBLIC "-//mybatis.org//DTD Mapper 3.0//EN" "http://mybatis.org/dtd/mybatis-3-mapper.dtd">
<mapper namespace="io.github.dunwu.spring.orm.mapper.UserMapper">
<resultMap id="BaseResultMap" type="io.github.dunwu.spring.orm.entity.User">
<id column="id" jdbcType="BIGINT" property="id" />
<result column="name" jdbcType="VARCHAR" property="name" />
<result column="age" jdbcType="INTEGER" property="age" />
<result column="address" jdbcType="VARCHAR" property="address" />
<result column="email" jdbcType="VARCHAR" property="email" />
</resultMap>
<delete id="deleteByPrimaryKey" parameterType="java.lang.Long">
delete from user
where id = #{id,jdbcType=BIGINT}
</delete>
<insert id="insert" parameterType="io.github.dunwu.spring.orm.entity.User">
insert into user (id, name, age,
address, email)
values (#{id,jdbcType=BIGINT}, #{name,jdbcType=VARCHAR}, #{age,jdbcType=INTEGER},
#{address,jdbcType=VARCHAR}, #{email,jdbcType=VARCHAR})
</insert>
<update id="updateByPrimaryKey" parameterType="io.github.dunwu.spring.orm.entity.User">
update user
set name = #{name,jdbcType=VARCHAR},
age = #{age,jdbcType=INTEGER},
address = #{address,jdbcType=VARCHAR},
email = #{email,jdbcType=VARCHAR}
where id = #{id,jdbcType=BIGINT}
</update>
<select id="selectByPrimaryKey" parameterType="java.lang.Long" resultMap="BaseResultMap">
select id, name, age, address, email
from user
where id = #{id,jdbcType=BIGINT}
</select>
<select id="selectAll" resultMap="BaseResultMap">
select id, name, age, address, email
from user
</select>
</mapper>
|
Mapper.java
Mapper.java 文件是 Mapper.xml 对应的 Java 对象。
【示例】UserMapper.java 文件
1
2
3
4
5
6
7
8
9
10
11
12
13
| public interface UserMapper {
int deleteByPrimaryKey(Long id);
int insert(User record);
User selectByPrimaryKey(Long id);
List<User> selectAll();
int updateByPrimaryKey(User record);
}
|
对比 UserMapper.java 和 UserMapper.xml 文件,不难发现:
UserMapper.java 中的方法和 UserMapper.xml 的 CRUD 语句元素( <insert>、<delete>、<update>、<select>)存在一一对应关系。
在 Mybatis 中,正是通过方法的全限定名,将二者绑定在一起。
数据实体.java
【示例】User.java 文件
1
2
3
4
5
6
7
8
9
10
11
12
| public class User {
private Long id;
private String name;
private Integer age;
private String address;
private String email;
}
|
<insert>、<delete>、<update>、<select> 的 parameterType 属性以及 <resultMap> 的 type 属性都可能会绑定到数据实体。这样就可以把 JDBC 操作的输入输出和 JavaBean 结合起来,更加方便、易于理解。
测试程序
【示例】MybatisDemo.java 文件
1
2
3
4
5
6
7
8
9
10
11
12
13
14
15
16
17
18
19
20
21
22
| public class MybatisDemo {
public static void main(String[] args) throws Exception {
InputStream inputStream = Resources.getResourceAsStream("mybatis/mybatis-config.xml");
SqlSessionFactoryBuilder builder = new SqlSessionFactoryBuilder();
SqlSessionFactory factory = builder.build(inputStream);
SqlSession sqlSession = factory.openSession();
Long params = 1L;
List<User> list = sqlSession.selectList("io.github.dunwu.spring.orm.mapper.UserMapper.selectByPrimaryKey", params);
for (User user : list) {
System.out.println("user name: " + user.getName());
}
}
}
|
说明:
SqlSession 接口是 Mybatis API 核心中的核心,它代表了 Mybatis 和数据库的一次完整会话。
- Mybatis 会解析配置,并根据配置创建
SqlSession 。
- 然后,Mybatis 将 Mapper 映射为
SqlSession,然后传递参数,执行 SQL 语句并获取结果。
Mybatis xml 配置
配置的详细内容请参考:“ Mybatis 官方文档之配置 ” 。
MyBatis 的配置文件包含了会深深影响 MyBatis 行为的设置和属性信息。主要配置项有以下:
Mybatis xml 映射器
SQL XML 映射文件详细内容请参考:“ Mybatis 官方文档之 XML 映射文件 ”。
XML 映射文件只有几个顶级元素:
cache – 对给定命名空间的缓存配置。cache-ref – 对其他命名空间缓存配置的引用。resultMap – 是最复杂也是最强大的元素,用来描述如何从数据库结果集中来加载对象。parameterMap – 已被废弃!老式风格的参数映射。更好的办法是使用内联参数,此元素可能在将来被移除。文档中不会介绍此元素。sql – 可被其他语句引用的可重用语句块。insert – 映射插入语句update – 映射更新语句delete – 映射删除语句select – 映射查询语句
Mybatis 扩展
Mybatis 类型处理器
MyBatis 在设置预处理语句(PreparedStatement)中的参数或从结果集中取出一个值时, 都会用类型处理器将获取到的值以合适的方式转换成 Java 类型。下表描述了一些默认的类型处理器。
从 3.4.5 开始,MyBatis 默认支持 JSR-310(日期和时间 API) 。
你可以重写已有的类型处理器或创建你自己的类型处理器来处理不支持的或非标准的类型。 具体做法为:实现 org.apache.ibatis.type.TypeHandler 接口, 或继承一个很便利的类 org.apache.ibatis.type.BaseTypeHandler, 并且可以(可选地)将它映射到一个 JDBC 类型。比如:
1
2
3
4
5
6
7
8
9
10
11
12
13
14
15
16
17
18
19
20
21
22
23
24
|
@MappedJdbcTypes(JdbcType.VARCHAR)
public class ExampleTypeHandler extends BaseTypeHandler<String> {
@Override
public void setNonNullParameter(PreparedStatement ps, int i, String parameter, JdbcType jdbcType) throws SQLException {
ps.setString(i, parameter);
}
@Override
public String getNullableResult(ResultSet rs, String columnName) throws SQLException {
return rs.getString(columnName);
}
@Override
public String getNullableResult(ResultSet rs, int columnIndex) throws SQLException {
return rs.getString(columnIndex);
}
@Override
public String getNullableResult(CallableStatement cs, int columnIndex) throws SQLException {
return cs.getString(columnIndex);
}
}
|
1
2
3
4
|
<typeHandlers>
<typeHandler handler="org.mybatis.example.ExampleTypeHandler"/>
</typeHandlers>
|
使用上述的类型处理器将会覆盖已有的处理 Java String 类型的属性以及 VARCHAR 类型的参数和结果的类型处理器。 要注意 MyBatis 不会通过检测数据库元信息来决定使用哪种类型,所以你必须在参数和结果映射中指明字段是 VARCHAR 类型, 以使其能够绑定到正确的类型处理器上。这是因为 MyBatis 直到语句被执行时才清楚数据类型。
Mybatis 插件
MyBatis 允许你在映射语句执行过程中的某一点进行拦截调用。默认情况下,MyBatis 允许使用插件来拦截的方法调用包括:
- Executor (update, query, flushStatements, commit, rollback, getTransaction, close, isClosed)
- ParameterHandler (getParameterObject, setParameters)
- ResultSetHandler (handleResultSets, handleOutputParameters)
- StatementHandler (prepare, parameterize, batch, update, query)
这些类中方法的细节可以通过查看每个方法的签名来发现,或者直接查看 MyBatis 发行包中的源代码。 如果你想做的不仅仅是监控方法的调用,那么你最好相当了解要重写的方法的行为。 因为在试图修改或重写已有方法的行为时,很可能会破坏 MyBatis 的核心模块。 这些都是更底层的类和方法,所以使用插件的时候要特别当心。
通过 MyBatis 提供的强大机制,使用插件是非常简单的,只需实现 Interceptor 接口,并指定想要拦截的方法签名即可。
1
2
3
4
5
6
7
8
9
10
11
12
13
14
15
16
17
|
@Intercepts({@Signature(
type= Executor.class,
method = "update",
args = {MappedStatement.class,Object.class})})
public class ExamplePlugin implements Interceptor {
private Properties properties = new Properties();
public Object intercept(Invocation invocation) throws Throwable {
Object returnObject = invocation.proceed();
return returnObject;
}
public void setProperties(Properties properties) {
this.properties = properties;
}
}
|
1
2
3
4
5
6
|
<plugins>
<plugin interceptor="org.mybatis.example.ExamplePlugin">
<property name="someProperty" value="100"/>
</plugin>
</plugins>
|
上面的插件将会拦截在 Executor 实例中所有的 “update” 方法调用, 这里的 Executor 是负责执行底层映射语句的内部对象。
参考资料

