
 Java 并发之分工工具
# Java 并发之分工工具
# 简介
Java 并发编程中,分工工具是处理复杂并行任务的核心利器。当单个任务过于庞大或具有复杂的依赖关系时,我们需要将其拆分为多个子任务并行执行,最后汇总结果。Java 提供了多种分工工具来应对不同场景:ForkJoinPool 面向分治递归任务,CompletableFuture 面向异步编排与聚合,CompletionService 面向批量并行任务的结果收集。
对于简单的并行任务,你可以通过"线程池 + Future"的方案来解决;如果任务之间有聚合关系,无论是 AND 聚合还是 OR 聚合,都可以通过 CompletableFuture 来解决;而批量的并行任务,则可以通过 CompletionService 来解决。
# ForkJoinPool
ForkJoinPool 是 Java 7 引入的一种线程池,专为分治任务(Divide-and-Conquer) 设计,核心思想是将大任务拆分为多个小任务(Fork),并行执行后合并结果(Join)。它在处理可分解的复杂任务时效率显著,尤其适合计算密集型场景。
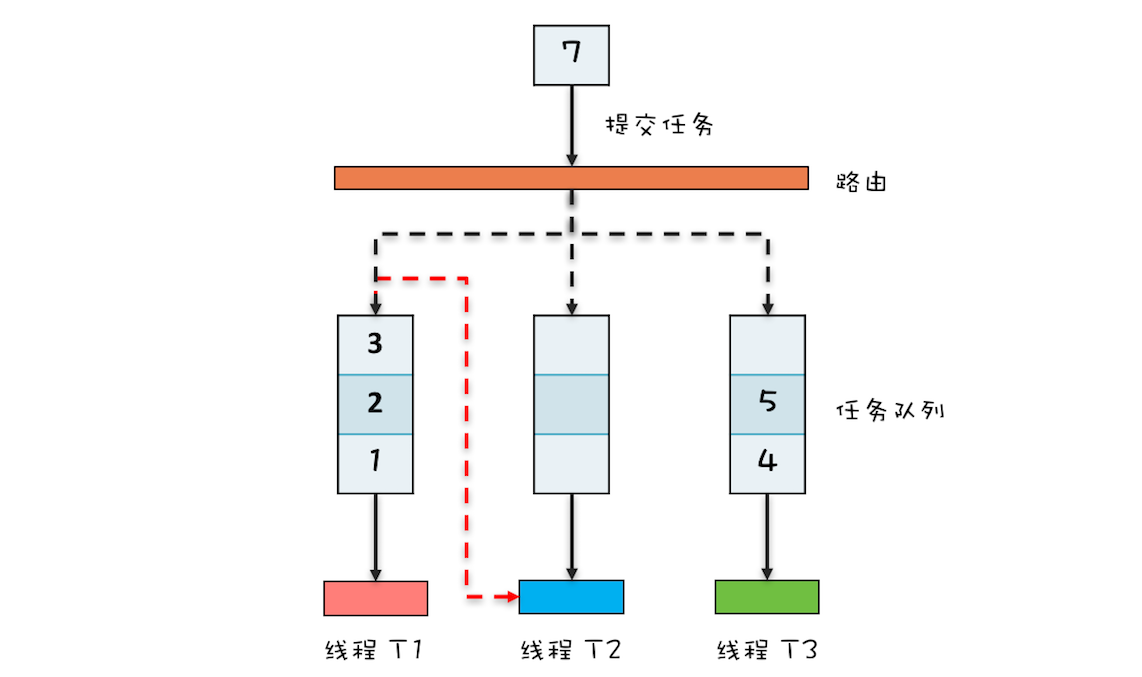
ForkJoinPool 通过工作窃取机制高效处理分治任务,适合递归并行计算,核心是本地队列+LIFO 处理+FIFO 窃取。
# ForkJoinPool 特性
关键特性
- 工作窃取算法:空闲线程从繁忙线程的任务队列中 "窃取" 任务执行,减少线程竞争,提高 CPU 利用率。
- 分治递归:适合处理可递归拆分的计算密集型任务
- 并行处理:默认并行度为 CPU 核心数,可自定义;提供公共池(
commonPool)供全局使用,减少资源消耗。 - 任务拆分:大任务自动拆分为小任务,直到达到阈值
与普通线程池对比
| 特性 | ForkJoinPool | ThreadPoolExecutor |
|---|---|---|
| 任务类型 | 分治任务(递归拆分) | 独立任务 |
| 任务调度 | 任务窃取(本地队列+窃取) | 全局队列(可能竞争) |
| 适用场景 | CPU 密集型并行计算 | IO 密集型或短任务 |
# ForkJoinPool 原理
- 双端队列:每个工作线程(
ForkJoinWorkerThread)维护自己的任务队列 - 任务调度:
- 拆分(fork):调用
fork()将子任务加入当前线程队列。 - 合并(join):调用
join()等待任务完成,必要时帮助执行任务。 - 窃取(stealing):若线程无任务,从其他线程队列尾部窃取任务(FIFO,减少竞争)。
- 拆分(fork):调用
# ForkJoinPool 用法
- 定义任务:
ForkJoinTask是所有ForkJoin任务的父类。- 继承
RecursiveTask<T>(有返回值)或RecursiveAction(无返回值)。 - 重写
compute()方法:若任务小于阈值则直接计算,否则分解为子任务。
- 继承
- 任务调度:
ForkJoinPool是线程池的核心实现类。- 用
fork()异步提交子任务到线程池。 - 用
join()阻塞等待子任务结果并合并。 - 通过
invoke()(同步执行)或submit()(异步执行)提交根任务。
- 用
# ForkJoinPool 示例
::: tabs
@tab 计算斐波那契数列
public static void main(String[] args) {
    long number = 10;
    ForkJoinPool pool = new ForkJoinPool();
    FibonacciTask task = new FibonacciTask(number);
    long result = pool.invoke(task);
    System.out.println("斐波那契数列第 " + number + " 项:" + result);
}

public static class FibonacciTask extends RecursiveTask<Long> {
    private final long N;

    public FibonacciTask(long n) {
        this.N = n;
    }

    @Override
    protected Long compute() {
        if (N <= 1) {
            return N;
        }

        // Fork:分解任务
        FibonacciTask f1 = new FibonacciTask(N - 1);
        FibonacciTask f2 = new FibonacciTask(N - 2);

        // 异步执行第一个任务
        f1.fork();

        // 同步执行第二个任务并获取结果
        long result2 = f2.compute();

        // Join:合并结果
        long result1 = f1.join();

        return result1 + result2;
    }
}
@tab 数组求和
public static void main(String[] args) {
    // 创建一个随机数组
    int[] array = new int[10000];
    for (int i = 0; i < array.length; i++) {
        array[i] = i + 1;
    }

    // 使用 ForkJoinPool 计算
    ForkJoinPool pool = new ForkJoinPool();
    ArraySum task = new ArraySum(array);
    int result = pool.invoke(task);
    System.out.println("数组总和:" + result);

    // 验证结果
    int expected = Arrays.stream(array).sum();
    System.out.println("验证结果:" + expected);
    System.out.println("结果是否正确:" + (result == expected));
}

public static class ArraySum extends RecursiveTask<Integer> {
    private static final int THRESHOLD = 1000; // 阈值,小于此值时直接计算
    private final int[] array;
    private final int start;
    private final int end;

    public ArraySum(int[] array) {
        this(array, 0, array.length);
    }

    private ArraySum(int[] array, int start, int end) {
        this.array = array;
        this.start = start;
        this.end = end;
    }

    @Override
    protected Integer compute() {
        int length = end - start;

        // 如果任务足够小,直接计算
        if (length <= THRESHOLD) {
            int sum = 0;
            for (int i = start; i < end; i++) {
                sum += array[i];
            }
            return sum;
        }

        // 否则分解任务
        int mid = start + (end - start) / 2;

        ArraySum leftTask = new ArraySum(array, start, mid);
        ArraySum rightTask = new ArraySum(array, mid, end);

        // 执行子任务
        leftTask.fork();
        int rightResult = rightTask.compute();
        int leftResult = leftTask.join();

        // 合并结果
        return leftResult + rightResult;
    }
}
@tab 模拟 MapReduce 统计单词数量
static void main(String[] args) {
    String[] fc = { "hello world",
        "hello me",
        "hello fork",
        "hello join",
        "fork join in world" };
    //创建 ForkJoin 线程池
    ForkJoinPool fjp = new ForkJoinPool(3);
    //创建任务
    MR mr = new MR(fc, 0, fc.length);
    //启动任务
    Map<String, Long> result = fjp.invoke(mr);
    //输出结果
    result.forEach((k, v) -> System.out.println(k + ":" + v));
}

//MR 模拟类
static class MR extends RecursiveTask<Map<String, Long>> {

    private String[] fc;
    private int start, end;

    //构造函数
    MR(String[] fc, int fr, int to) {
        this.fc = fc;
        this.start = fr;
        this.end = to;
    }

    @Override
    protected Map<String, Long> compute() {
        if (end - start == 1) {
            return calc(fc[start]);
        } else {
            int mid = (start + end) / 2;
            MR mr1 = new MR(fc, start, mid);
            mr1.fork();
            MR mr2 = new MR(fc, mid, end);
            //计算子任务,并返回合并的结果
            return merge(mr2.compute(),
                mr1.join());
        }
    }

    //合并结果
    private Map<String, Long> merge(Map<String, Long> r1, Map<String, Long> r2) {
        Map<String, Long> result = new HashMap<>();
        result.putAll(r1);
        //合并结果
        r2.forEach((k, v) -> {
            Long c = result.get(k);
            if (c != null) { result.put(k, c + v); } else { result.put(k, v); }
        });
        return result;
    }

    //统计单词数量
    private Map<String, Long> calc(String line) {
        Map<String, Long> result = new HashMap<>();
        //分割单词
        String[] words = line.split("\\s+");
        //统计单词数量
        for (String w : words) {
            Long v = result.get(w);
            if (v != null) { result.put(w, v + 1); } else { result.put(w, 1L); }
        }
        return result;
    }
}
:::
# FutureTask
FutureTask 有两个构造函数:
FutureTask(Callable<V> callable);
FutureTask(Runnable runnable, V result);
FutureTask 实现了 Runnable 和 Future 接口。由于实现了 Runnable 接口,所以可以将 FutureTask 对象作为任务提交给 ThreadPoolExecutor 去执行,也可以直接被 Thread 执行;又因为实现了 Future 接口,所以也能用来获得任务的执行结果。
下面,通过一组示例来展示 FutureTask 如何分别交给线程池、线程执行。
::: tabs#创建 FutureTask 示例
@tab FutureTask 交给线程池执行
【示例】FutureTask 交给线程池执行
public class FutureTaskDemo {

    public static void main(String[] args) throws ExecutionException, InterruptedException {
        // 创建 FutureTask
        Task task = new Task();
        FutureTask<String> f1 = new FutureTask<>(task);
        FutureTask<String> f2 = new FutureTask<>(task);

        // 创建线程池
        ExecutorService executor = Executors.newCachedThreadPool();
        executor.submit(f1);
        executor.submit(f2);
        System.out.println(f1.get());
        System.out.println(f2.get());
        executor.shutdown();
    }

    static class Task implements Callable<String> {

        @Override
        public String call() {
            return Thread.currentThread().getName() + " 执行成功!";
        }

    }

}
// 输出
// pool-1-thread-1 执行成功!
// pool-1-thread-2 执行成功!
@tab FutureTask 交给线程执行
【示例】FutureTask 交给线程执行
public class FutureTaskDemo2 {

    public static void main(String[] args) throws InterruptedException, ExecutionException {

        // 创建 FutureTask
        Task task = new Task();
        FutureTask<String> f1 = new FutureTask<>(task);
        FutureTask<String> f2 = new FutureTask<>(task);

        // 创建线程
        new Thread(f1).start();
        new Thread(f2).start();
        System.out.println(f1.get());
        System.out.println(f2.get());
    }

    static class Task implements Callable<String> {

        @Override
        public String call() {
            return Thread.currentThread().getName() + " 执行成功!";
        }

    }

}
// 输出
// Thread-0 执行成功!
// Thread-1 执行成功!
@tab 用 FutureTask 完成并行计算
【示例】用 FutureTask 完成并行计算
public class FutureTaskDemo3 {

    public static void main(String[] args) throws InterruptedException, ExecutionException {

        // 创建一个线程池来执行任务
        ExecutorService executor = Executors.newFixedThreadPool(2);

        // 创建两个 Callable 对象
        Callable<Integer> t1 = () -> {
            int result = 0;
            for (int i = 1; i <= 100; i++) {
                result += i;
            }
            return result;
        };
        Callable<Integer> t2 = () -> {
            int result = 0;
            for (int i = 101; i <= 200; i++) {
                result += i;
            }
            return result;
        };

        // 创建两个 FutureTask 对象
        FutureTask<Integer> f1 = new FutureTask<>(t1);
        FutureTask<Integer> f2 = new FutureTask<>(t2);

        // 提交任务到线程池执行
        executor.execute(f1);
        executor.execute(f2);

        // 获取任务的结果
        Integer value1 = f1.get();
        Integer value2 = f2.get();
        System.out.println("total = " + value1 + value2);

        // 关闭线程池
        executor.shutdown();
    }

}
:::
# CompletableFuture
JDK8 提供了 CompletableFuture 来支持异步编程。
# CompletableFuture 特性
- 链式调用:通过
thenApply()、thenAccept()、thenCompose()等方法实现任务流水线 - 组合操作:提供
allOf()(等待所有任务完成)、anyOf()(等待任一任务完成)等方法,支持复杂任务依赖管理 - 异常处理:通过
exceptionally()、handle()等方法统一处理异步任务中的异常,无需 try-catch 嵌套 - 线程池灵活配置:默认使用
ForkJoinPool.commonPool(),也可指定自定义线程池,控制任务执行线程
# CompletableFuture 原理
CompletableFuture 通过状态机管理任务生命周期,回调列表实现链式依赖,线程池调度异步执行,最终实现高效的非阻塞异步编程。
其核心是将任务、依赖关系、线程调度解耦,通过 CAS 和 volatile 保证线程安全,同时避免回调嵌套问题。
# 状态管理
- 内部维护任务状态(
enum类型):NEW(初始)、COMPLETING(完成中)、NORMAL(正常完成)、EXCEPTIONAL(异常完成)、CANCELLED(取消)等。 - 通过
volatile变量result存储计算结果或异常,确保线程间可见性。 - 状态转换通过 CAS 操作保证原子性,例如任务完成时从
NEW转为NORMAL并设置结果。
# 回调链触发机制
- 回调注册:
thenApply/thenAccept等方法会创建新的CompletableFuture(依赖原任务),并将回调函数(如Function/Consumer)注册到原任务的回调列表中。 - 触发时机:当原任务完成(状态变为
NORMAL或EXCEPTIONAL),会遍历回调列表,在当前线程或指定线程池中执行回调:- 若原任务由线程池线程完成,回调默认由该线程继续执行(避免线程切换开销)。
- 若通过
thenApplyAsync等带Async的方法,回调会提交到新的线程池执行。
- 链式传递:回调执行结果会作为新
CompletableFuture的结果,继续触发后续回调,形成流水线。
# 任务执行与线程调度
- 异步任务提交:
supplyAsync/runAsync会将任务包装为AsyncSupply/AsyncRun(实现Runnable),提交到指定线程池(默认ForkJoinPool.commonPool())。 - 线程池执行:线程池工作线程执行任务,完成后调用
complete()或completeExceptionally()更新状态并触发回调。
# 多任务协同(allOf/anyOf)
allOf:内部维护计数器,记录未完成的依赖任务数。每个依赖任务完成时计数器减 1,当计数器为 0 时,allOf返回的CompletableFuture完成。anyOf:监听所有依赖任务,当第一个任务完成(正常或异常),anyOf返回的CompletableFuture立即以该结果完成。
# CompletableFuture 用法
# 创建 CompletableFuture
常见的创建 CompletableFuture 对象的方法如下:
- 通过
new关键字 - 静态工厂方法:
runAsync()、supplyAsync()runAsync(Runnable):无返回值的异步任务supplyAsync(Supplier<T>):有返回值的异步任务
::: tabs
@tab new CompletableFuture 示例
CompletableFuture<RpcResponse<Object>> resultFuture = new CompletableFuture<>();
@tab CompletableFuture 静态工厂方法示例
// 无返回值的异步任务
CompletableFuture<Void> future1 = CompletableFuture.runAsync(() -> {
    System.out.println("异步执行");
});

// 有返回值的异步任务
CompletableFuture<String> future2 = CompletableFuture.supplyAsync(() -> {
    return "计算结果";
});

// 指定自定义线程池
ExecutorService executor = Executors.newFixedThreadPool(4);
CompletableFuture<String> future3 = CompletableFuture.supplyAsync(() -> {
    return "使用自定义线程池";
}, executor);
:::
默认情况下 CompletableFuture 会使用公共的 ForkJoinPool 线程池,这个线程池默认创建的线程数是 CPU 的核数(也可以通过 JVM option: -Djava.util.concurrent.ForkJoinPool.common.parallelism 来设置 ForkJoinPool 线程池的线程数)。如果所有 CompletableFuture 共享一个线程池,那么一旦有任务执行一些很慢的 I/O 操作,就会导致线程池中所有线程都阻塞在 I/O 操作上,从而造成线程饥饿,进而影响整个系统的性能。所以,强烈建议你要根据不同的业务类型创建不同的线程池,以避免互相干扰。
# CompletableFuture 结果转换
| 方法 | 作用描述 |
|---|---|
thenApply | 同步转换结果 |
thenApplyAsync | 异步转换结果 |
thenAccept | 同步消费结果 |
thenAcceptAsync | 异步消费结果 |
thenRun | 同步执行无参数操作 |
thenRunAsync | 异步执行无参数操作 |
CompletableFuture 结果转换用法
CompletableFuture<String> future = CompletableFuture.supplyAsync(() -> "hello")
    .thenApply(s -> s + " world")        // 同步转换
    .thenApply(String::toUpperCase)      // 继续转换
    .thenApply(s -> s + "!");

System.out.println(future.get()); // 输出:HELLO WORLD!
# CompletableFuture 组合
| 方法 | 作用描述 |
|---|---|
thenCompose | 链式组合(扁平化) |
thenCombine | 合并两个独立任务结果 |
thenAcceptBoth | 合并两个结果并消费 |
runAfterBoth | 两个任务都完成后执行操作 |
CompletableFuture 组合用法
// thenCompose - 链式组合
CompletableFuture<String> future = getUserInfo(userId).thenCompose(user -> getOrderHistory(user));

// thenCombine - 合并两个独立任务结果
CompletableFuture<String> future1 = CompletableFuture.supplyAsync(() -> "Hello");
CompletableFuture<String> future2 = CompletableFuture.supplyAsync(() -> "World");
CompletableFuture<String> combined = future1.thenCombine(future2, (s1, s2) -> s1 + " " + s2);
# CompletableFuture 多任务组合
| 方法 | 作用描述 |
|---|---|
allOf | 所有任务完成后执行 |
anyOf | 任意任务完成后执行 |
CompletableFuture 多任务组合用法
CompletableFuture<String> task1 = CompletableFuture.supplyAsync(() -> "结果 1");
CompletableFuture<String> task2 = CompletableFuture.supplyAsync(() -> "结果 2");
CompletableFuture<String> task3 = CompletableFuture.supplyAsync(() -> "结果 3");

// 所有任务完成后执行
CompletableFuture<Void> all = CompletableFuture.allOf(task1, task2, task3);

// 任意一个任务完成后执行
CompletableFuture<Object> any = CompletableFuture.anyOf(task1, task2, task3);
# CompletableFuture 结果处理
| 方法 | 作用描述 |
|---|---|
whenComplete | 完成时回调(含异常) |
handle | 处理结果和异常,返回新值 |
exceptionally | 异常恢复处理 |
CompletableFuture 结果处理用法
CompletableFuture<String> future = CompletableFuture.supplyAsync(() -> {
        if (true) throw new RuntimeException("出错啦");
        return "成功";
    })
    .exceptionally(ex -> "异常处理:" + ex.getMessage())  // 异常恢复
    .handle((result, ex) -> {                           // 结果和异常统一处理
        if (ex != null) {
            return "处理异常:" + ex.getMessage();
        }
        return "结果:" + result;
    });
# CompletableFuture 完成控制
| 方法 | 作用描述 |
|---|---|
complete | 手动完成并设置结果 |
completeExceptionally | 手动异常完成 |
cancel | 取消任务 |
CompletableFuture 完成控制用法
::: tabs
@tab 快速失败
CompletableFuture<String> future = new CompletableFuture<>();
// 条件不满足立即取消
if (someCondition) {
    future.complete("成功");
} else {
    future.cancel(false);
}
@tab 超时失败
CompletableFuture<String> task = CompletableFuture.supplyAsync(() -> {
    try { Thread.sleep(5000); return "成功"; }
    catch (InterruptedException e) { return "失败"; }
});

// 简单超时机制
CompletableFuture.runAsync(() -> {
    try { Thread.sleep(2000); task.cancel(true); }
    catch (InterruptedException e) {}
});

System.out.println(task.isCancelled()); // 2 秒后输出:true
:::
# CompletableFuture 获取结果
| 方法 | 作用描述 |
|---|---|
get | 同步阻塞获取结果 |
join | 同步获取结果(不检查异常) |
getNow | 立即获取,未完成返回默认值 |
isDone | 任务是否完成 |
isCompletedExceptionally | 是否异常完成 |
isCancelled | 是否已取消 |
CompletableFuture 获取结果用法
::: tabs
@tab get 和 join 相同点
CompletableFuture<String> future = new CompletableFuture<>();
// 条件不满足立即取消
if (someCondition) {
    future.complete("成功");
} else {
    future.cancel(false);
}
@tab get 和 join 不同点
CompletableFuture<String> task = CompletableFuture.supplyAsync(() -> {
    try { Thread.sleep(5000); return "成功"; }
    catch (InterruptedException e) { return "失败"; }
});

// 简单超时机制
CompletableFuture.runAsync(() -> {
    try { Thread.sleep(2000); task.cancel(true); }
    catch (InterruptedException e) {}
});

System.out.println(task.isCancelled()); // 2 秒后输出:true
:::
# CompletableFuture 示例
::: tabs
@tab 并行调用多个服务
// 模拟多个微服务调用
CompletableFuture<String> userService = CompletableFuture.supplyAsync(() -> "用户信息");
CompletableFuture<String> orderService = CompletableFuture.supplyAsync(() -> "订单信息");
CompletableFuture<String> productService = CompletableFuture.supplyAsync(() -> "商品信息");

// 并行执行,等待所有完成
CompletableFuture<Void> all = CompletableFuture.allOf(userService, orderService, productService);
all.thenRun(() -> {
    String user = userService.join();
    String order = orderService.join();
    String product = productService.join();
    System.out.println("聚合结果:" + user + ", " + order + ", " + product);
}).join();
// 【输出】聚合结果:用户信息,订单信息,商品信息
@tab 并行批处理
List<Integer> data = Arrays.asList(1, 2, 3, 4, 5);

// 并行处理每个数据
List<CompletableFuture<String>> futures =
    data.stream()
        .map(item -> CompletableFuture.supplyAsync(() -> {
            // 模拟数据处理
            // System.out.println(Thread.currentThread().getName() + " 处理:" + item);
            return "处理结果:" + item;
        }))
        .collect(Collectors.toList());

// 等待所有处理完成
CompletableFuture<Void> allDone = CompletableFuture.allOf(futures.toArray(new CompletableFuture[0]));

List<String> results = allDone.thenApply(v ->
    futures.stream()
           .map(CompletableFuture::join)
           .collect(Collectors.toList())
).join();

System.out.println("批量处理结果:" + results);
// 【输出】批量处理结果:[处理结果:1, 处理结果:2, 处理结果:3, 处理结果:4, 处理结果:5]
@tab 链式调用,模拟下单流程
String res = CompletableFuture.supplyAsync(() -> {
    System.out.println("1. 创建订单");
    return "订单 ID:1";
}).thenApplyAsync(orderId -> {
    System.out.println("2. 扣减库存 " + orderId);
    return orderId + " 库存已扣";
}).thenApplyAsync(result -> {
    System.out.println("3. 生成物流单 " + result);
    return result + " 物流单已生成";
}).thenApplyAsync(result -> {
    System.out.println("4. 发送通知 " + result);
    return result + " 通知已发送";
}).join();
System.out.println("最终结果:" + res);
// 【输出】
// 1. 创建订单
// 2. 扣减库存 订单 ID:1
// 3. 生成物流单 订单 ID:1 库存已扣
// 4. 发送通知 订单 ID:1 库存已扣 物流单已生成
// 最终结果:订单 ID:1 库存已扣 物流单已生成 通知已发送
:::
# CompletionStage
CompletionStage 接口可以清晰地描述任务之间的时序关系,如串行关系、并行关系、汇聚关系等。
# 串行关系
CompletionStage 接口里面描述串行关系,主要是 thenApply、thenAccept、thenRun 和 thenCompose 这四个系列的接口。
thenApply 系列函数里参数 fn 的类型是接口 Function<T, R>,这个接口里与 CompletionStage 相关的方法是 R apply(T t),这个方法既能接收参数也支持返回值,所以 thenApply 系列方法返回的是CompletionStage<R>。
thenAccept 系列方法里参数 consumer 的类型是接口 Consumer<T>,这个接口里与 CompletionStage 相关的方法是 void accept(T t),这个方法虽然支持参数,但却不支持回值,所以 thenAccept 系列方法返回的是CompletionStage<Void>。
thenRun 系列方法里 action 的参数是 Runnable,所以 action 既不能接收参数也不支持返回值,所以 thenRun 系列方法返回的也是 CompletionStage<Void>。
这些方法里面 Async 代表的是异步执行 fn、consumer 或者 action。其中,需要你注意的是 thenCompose 系列方法,这个系列的方法会新创建出一个子流程,最终结果和 thenApply 系列是相同的。
CompletionStage<R> thenApply(fn);
CompletionStage<R> thenApplyAsync(fn);
CompletionStage<Void> thenAccept(consumer);
CompletionStage<Void> thenAcceptAsync(consumer);
CompletionStage<Void> thenRun(action);
CompletionStage<Void> thenRunAsync(action);
CompletionStage<R> thenCompose(fn);
CompletionStage<R> thenComposeAsync(fn);
# 描述 AND 汇聚关系
CompletionStage 接口里面描述 AND 汇聚关系,主要是 thenCombine、thenAcceptBoth 和 runAfterBoth 系列的接口,这些接口的区别也是源自 fn、consumer、action 这三个核心参数不同。
CompletionStage<R> thenCombine(other, fn);
CompletionStage<R> thenCombineAsync(other, fn);
CompletionStage<Void> thenAcceptBoth(other, consumer);
CompletionStage<Void> thenAcceptBothAsync(other, consumer);
CompletionStage<Void> runAfterBoth(other, action);
CompletionStage<Void> runAfterBothAsync(other, action);
# 描述 OR 汇聚关系
CompletionStage 接口里面描述 OR 汇聚关系,主要是 applyToEither、acceptEither 和 runAfterEither 系列的接口,这些接口的区别也是源自 fn、consumer、action 这三个核心参数不同。
CompletionStage applyToEither(other, fn);
CompletionStage applyToEitherAsync(other, fn);
CompletionStage acceptEither(other, consumer);
CompletionStage acceptEitherAsync(other, consumer);
CompletionStage runAfterEither(other, action);
CompletionStage runAfterEitherAsync(other, action);
下面的示例代码展示了如何使用 applyToEither() 方法来描述一个 OR 汇聚关系。
CompletableFuture<String> f1 = CompletableFuture.supplyAsync(() -> {
    int t = getRandom(5, 10);
    sleep(t, TimeUnit.SECONDS);
    return String.valueOf(t);
});

CompletableFuture<String> f2 = CompletableFuture.supplyAsync(() -> {
    int t = getRandom(5, 10);
    sleep(t, TimeUnit.SECONDS);
    return String.valueOf(t);
});

CompletableFuture<String> f3 = f1.applyToEither(f2, s -> s);
System.out.println(f3.join());
# 异常处理
虽然上面我们提到的 fn、consumer、action 它们的核心方法都不允许抛出可检查异常,但是却无法限制它们抛出运行时异常,例如下面的代码,执行 7/0 就会出现除零错误这个运行时异常。非异步编程里面,我们可以使用 try {} catch {} 来捕获并处理异常,那在异步编程里面,异常该如何处理呢?
CompletableFuture<Integer> f = CompletableFuture.supplyAsync(() -> (7 / 0))
                                                 .thenApply(r -> r * 10);
System.out.println(f.join());
CompletionStage 接口给我们提供的方案非常简单,比 try {} catch {} 还要简单,下面是相关的方法,使用这些方法进行异常处理和串行操作是一样的,都支持链式编程方式。
CompletionStage exceptionally(fn);
CompletionStage<R> whenComplete(consumer);
CompletionStage<R> whenCompleteAsync(consumer);
CompletionStage<R> handle(fn);
CompletionStage<R> handleAsync(fn);
下面的示例代码展示了如何使用 exceptionally() 方法来处理异常,exceptionally() 的使用非常类似于 try {} catch {} 中的 catch {},但是由于支持链式编程方式,所以相对更简单。既然有 try {} catch {},那就一定还有 try {} catch {},whenComplete() 和 handle() 系列方法就类似于 try {} catch {} 中的 finally {},无论是否发生异常都会执行 whenComplete() 中的回调函数 consumer 和 handle() 中的回调函数 fn。whenComplete() 和 handle() 的区别在于 whenComplete() 不支持返回结果,而 handle() 是支持返回结果的。
CompletableFuture<Integer> f = CompletableFuture.supplyAsync(() -> 7 / 0)
                                                .thenApply(r -> r * 10)
                                                .exceptionally(e -> 0);
System.out.println(f.join());
# CompletionService
CompletionService 接口的实现类是 ExecutorCompletionService,这个实现类的构造方法有两个,分别是:
ExecutorCompletionService(Executor executor);ExecutorCompletionService(Executor executor, BlockingQueue<Future<V>> completionQueue)。
这两个构造方法都需要传入一个线程池,如果不指定 completionQueue,那么默认会使用无界的 LinkedBlockingQueue。任务执行结果的 Future 对象就是加入到 completionQueue 中。
下面的示例代码完整地展示了如何利用 CompletionService 来实现高性能的询价系统。其中,我们没有指定 completionQueue,因此默认使用无界的 LinkedBlockingQueue。之后通过 CompletionService 接口提供的 submit() 方法提交了三个询价操作,这三个询价操作将会被 CompletionService 异步执行。最后,我们通过 CompletionService 接口提供的 take() 方法获取一个 Future 对象(前面我们提到过,加入到阻塞队列中的是任务执行结果的 Future 对象),调用 Future 对象的 get() 方法就能返回询价操作的执行结果了。
// 创建线程池
ExecutorService executor = Executors.newFixedThreadPool(3);
// 创建 CompletionService
CompletionService<Integer> cs = new ExecutorCompletionService<>(executor);
// 异步向电商 S1 询价
cs.submit(()->getPriceByS1());
// 异步向电商 S2 询价
cs.submit(()->getPriceByS2());
// 异步向电商 S3 询价
cs.submit(()->getPriceByS3());
// 将询价结果异步保存到数据库
for (int i=0; i<3; i++) {
  Integer r = cs.take().get();
  executor.execute(()->save(r));
}
CompletionService 接口提供的方法有 5 个,这 5 个方法的方法签名如下所示。
其中,submit() 相关的方法有两个。一个方法参数是Callable<V> task,前面利用 CompletionService 实现询价系统的示例代码中,我们提交任务就是用的它。另外一个方法有两个参数,分别是Runnable task和V result,这个方法类似于 ThreadPoolExecutor 的 <T> Future<T> submit(Runnable task, T result) ,这个方法在 《23 | Future:如何用多线程实现最优的“烧水泡茶”程序?》 (opens new window) 中我们已详细介绍过,这里不再赘述。
CompletionService 接口其余的 3 个方法,都是和阻塞队列相关的,take()、poll() 都是从阻塞队列中获取并移除一个元素;它们的区别在于如果阻塞队列是空的,那么调用 take() 方法的线程会被阻塞,而 poll() 方法会返回 null 值。 poll(long timeout, TimeUnit unit) 方法支持以超时的方式获取并移除阻塞队列头部的一个元素,如果等待了 timeout unit 时间,阻塞队列还是空的,那么该方法会返回 null 值。
Future<V> submit(Callable<V> task);
Future<V> submit(Runnable task, V result);
Future<V> take() throws InterruptedException;
Future<V> poll();
Future<V> poll(long timeout, TimeUnit unit) throws InterruptedException;
当需要批量提交异步任务的时候建议你使用 CompletionService。CompletionService 将线程池 Executor 和阻塞队列 BlockingQueue 的功能融合在了一起,能够让批量异步任务的管理更简单。除此之外,CompletionService 能够让异步任务的执行结果有序化,先执行完的先进入阻塞队列,利用这个特性,你可以轻松实现后续处理的有序性,避免无谓的等待,同时还可以快速实现诸如 Forking Cluster 这样的需求。
CompletionService 的实现类 ExecutorCompletionService,需要你自己创建线程池,虽看上去有些啰嗦,但好处是你可以让多个 ExecutorCompletionService 的线程池隔离,这种隔离性能避免几个特别耗时的任务拖垮整个应用的风险。
# 典型应用场景
# 场景一:大数据量递归计算(ForkJoinPool)
计算 1 到 1 亿的和,使用 ForkJoinPool 将任务递归拆分:
public class SumTask extends RecursiveTask<Long> {
    private static final int THRESHOLD = 10000;
    private final long[] array;
    private final int lo, hi;

    public SumTask(long[] array, int lo, int hi) {
        this.array = array; this.lo = lo; this.hi = hi;
    }

    @Override
    protected Long compute() {
        if (hi - lo <= THRESHOLD) {
            long sum = 0;
            for (int i = lo; i < hi; i++) sum += array[i];
            return sum;
        }
        int mid = (lo + hi) >>> 1;
        SumTask left = new SumTask(array, lo, mid);
        SumTask right = new SumTask(array, mid, hi);
        left.fork(); // 异步执行左半部分
        long rightResult = right.compute(); // 当前线程执行右半部分
        long leftResult = left.join(); // 等待左半部分结果
        return leftResult + rightResult;
    }
}

ForkJoinPool pool = new ForkJoinPool();
long result = pool.invoke(new SumTask(array, 0, array.length));
# 场景二:多接口异步编排(CompletableFuture)
电商商品详情页需要同时调用商品、库存、评价、推荐等多个微服务接口,使用 CompletableFuture 并行调用并聚合:
CompletableFuture<ProductInfo> productFuture = CompletableFuture.supplyAsync(
    () -> productService.getProduct(id), executor);
CompletableFuture<StockInfo> stockFuture = CompletableFuture.supplyAsync(
    () -> stockService.getStock(id), executor);
CompletableFuture<List<Review>> reviewFuture = CompletableFuture.supplyAsync(
    () -> reviewService.getReviews(id), executor);

// AND 聚合:等所有结果就绪
CompletableFuture<Void> allFutures = CompletableFuture.allOf(
    productFuture, stockFuture, reviewFuture);
allFutures.thenRun(() -> {
    ProductDetail detail = new ProductDetail(
        productFuture.join(), stockFuture.join(), reviewFuture.join());
    render(detail);
});
# 场景三:批量任务快速失败(CompletionService)
实现 Forking Cluster 模式——向多个服务节点并行发送请求,取最先返回的成功结果:
ExecutorService executor = Executors.newFixedThreadPool(nodes.size());
CompletionService<Response> cs = new ExecutorCompletionService<>(executor);

for (Node node : nodes) {
    cs.submit(() -> node.sendRequest(request));
}

for (int i = 0; i < nodes.size(); i++) {
    Future<Response> future = cs.take(); // 先完成的先返回
    Response response = future.get();
    if (response.isSuccess()) {
        return response; // 快速返回第一个成功结果
    }
}
# 最佳实践
- 合理设置 ForkJoinPool 阈值 - 拆分粒度太细会导致任务调度开销大于计算开销,一般建议每个子任务工作量在 100~10000 个计算操作之间
- CompletableFuture 务必指定线程池 - 默认的
ForkJoinPool.commonPool()线程数少且全局共享,高并发场景下容易成为瓶颈,生产环境应传入自定义线程池 - 避免 CompletableFuture 中的阻塞调用 - 在
supplyAsync中调用阻塞 IO 会导致线程被占住,应使用thenCompose链式组合或响应式方案 - CompletionService 的线程池隔离 - 不同业务场景使用不同的
ExecutorCompletionService实例和独立线程池,防止慢任务拖垮全局 - ForkJoinPool 中使用
fork()+compute()组合 - 一个子任务用fork()异步执行,另一个用compute()同步执行,可最大化利用当前线程
# 常见问题
Q1:ForkJoinPool 和普通 ThreadPoolExecutor 有什么区别?
ForkJoinPool 专为可分解的递归任务设计,采用工作窃取(Work-Stealing)算法,空闲线程会从其他线程的任务队列中偷取任务,CPU 利用率更高。ThreadPoolExecutor 更适合处理大量独立的短期任务。
Q2:CompletableFuture.allOf() 和 anyOf() 分别适用什么场景?
allOf() 适用于需要等所有子任务都完成后才能继续的场景(如聚合多个数据源);anyOf() 适用于只需要一个成功结果即可的场景(如竞速查询、容灾切换)。
Q3:CompletionService 相比直接用 Executor + Future 列表有什么优势?
直接使用 Future 列表,只能按提交顺序 get() 结果,如果第一个任务最慢,后续任务即使完成也必须等待。CompletionService 内部使用 BlockingQueue,先完成的任务先进队,实现"谁先完成谁先处理",减少无谓等待。