 Spring IoC
# Spring IoC
# IoC 简介
# IoC 是什么
IoC 即控制反转(Inversion of Control,缩写为 IoC)。IoC 又称为依赖倒置原则(设计模式六大原则之一),它的要点在于:程序要依赖于抽象接口,不要依赖于具体实现。它的作用就是用于降低代码间的耦合度。
IoC 的实现方式有两种:
- 依赖注入(Dependency Injection,简称 DI):不通过
new()的方式在类内部创建依赖类对象,而是将依赖的类对象在外部创建好之后,通过构造函数、函数参数等方式传递(或注入)给类使用。 - 依赖查找(Dependency Lookup):容器中的受控对象通过容器的 API 来查找自己所依赖的资源和协作对象。
理解 Ioc 的关键是要明确两个要点:
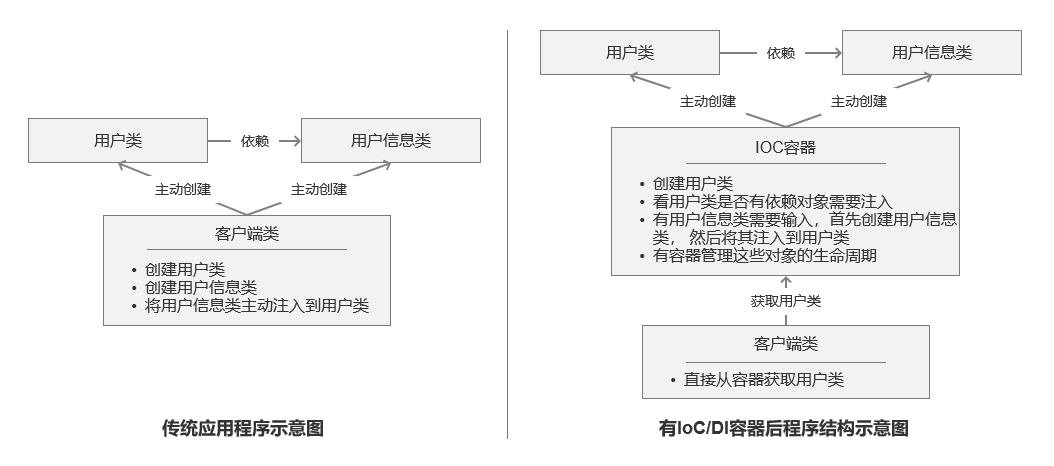
- 谁控制谁,控制什么:传统 Java SE 程序设计,我们直接在对象内部通过 new 进行创建对象,是程序主动去创建依赖对象;而 IoC 是有专门一个容器来创建这些对象,即由 Ioc 容器来控制对象的创建;谁控制谁?当然是 IoC 容器控制了对象;控制什么?那就是主要控制了外部资源获取(不只是对象包括比如文件等)。
- 为何是反转,哪些方面反转了:有反转就有正转,传统应用程序是由我们自己在对象中主动控制去直接获取依赖对象,也就是正转;而反转则是由容器来帮忙创建及注入依赖对象;为何是反转?因为由容器帮我们查找及注入依赖对象,对象只是被动的接受依赖对象,所以是反转;哪些方面反转了?依赖对象的获取被反转了。

# IoC 能做什么
IoC 不是一种技术,而是编程思想,一个重要的面向对象编程的法则,它能指导我们如何设计出松耦合、更优良的程序。传统应用程序都是由我们在类内部主动创建依赖对象,从而导致类与类之间高耦合,难于测试;有了 IoC 容器后,把创建和查找依赖对象的控制权交给了容器,由容器进行注入组合对象,所以对象与对象之间是松散耦合,这样也方便测试,利于功能复用,更重要的是使得程序的整个体系结构变得非常灵活。
其实 IoC 对编程带来的最大改变不是从代码上,而是从思想上,发生了“主从换位”的变化。应用程序原本是老大,要获取什么资源都是主动出击,但是在 IoC/DI 思想中,应用程序就变成被动的了,被动的等待 IoC 容器来创建并注入它所需要的资源了。
IoC 很好的体现了面向对象设计法则之一—— 好莱坞法则:“别找我们,我们找你”;即由 IoC 容器帮对象找相应的依赖对象并注入,而不是由对象主动去找。
# IoC 和 DI
其实它们是同一个概念的不同角度描述,由于控制反转概念比较含糊(可能只是理解为容器控制对象这一个层面,很难让人想到谁来维护对象关系),所以 2004 年大师级人物 Martin Fowler 又给出了一个新的名字:“依赖注入”,相对 IoC 而言,“依赖注入”明确描述了“被注入对象依赖 IoC 容器配置依赖对象”。
注:如果想要更加深入的了解 IoC 和 DI,请参考大师级人物 Martin Fowler 的一篇经典文章 Inversion of Control Containers and the Dependency Injection pattern (opens new window) 。
# IoC 容器
IoC 容器就是具有依赖注入功能的容器。IoC 容器负责实例化、定位、配置应用程序中的对象及建立这些对象间的依赖。应用程序无需直接在代码中 new 相关的对象,应用程序由 IoC 容器进行组装。在 Spring 中 BeanFactory 是 IoC 容器的实际代表者。
Spring IoC 容器如何知道哪些是它管理的对象呢?这就需要配置文件,Spring IoC 容器通过读取配置文件中的配置元数据,通过元数据对应用中的各个对象进行实例化及装配。一般使用基于 xml 配置文件进行配置元数据,而且 Spring 与配置文件完全解耦的,可以使用其他任何可能的方式进行配置元数据,比如注解、基于 java 文件的、基于属性文件的配置都可以。
# Bean
JavaBean 是一种 JAVA 语言写成的可重用组件。为写成 JavaBean,类必须是具体的和公共的,并且具有无参数的构造器。JavaBean 对外部通过提供 getter / setter 方法来访问其成员。
由 IoC 容器管理的那些组成你应用程序的对象我们就叫它 Bean。Bean 就是由 Spring 容器初始化、装配及管理的对象,除此之外,bean 就与应用程序中的其他对象没有什么区别了。那 IoC 怎样确定如何实例化 Bean、管理 Bean 之间的依赖关系以及管理 Bean 呢?这就需要配置元数据,在 Spring 中由 BeanDefinition 代表,后边会详细介绍,配置元数据指定如何实例化 Bean、如何组装 Bean 等。
# Spring IoC
Spring IoC 容器中的对象仅通过构造函数参数、工厂方法的参数或在对象实例被构造或从工厂方法返回后设置的属性来定义它们的依赖关系(即与它们一起工作的其他对象)。然后容器在创建 bean 时注入这些依赖项。这个过程基本上是 bean 本身通过使用类的直接构造或诸如服务定位器模式之类的机制来控制其依赖关系的实例化或位置的逆过程(因此称为控制反转)。
org.springframework.beans 和 org.springframework.context 是 IoC 容器的基础。
# IoC 容器
在 Spring 中,有两种 IoC 容器:BeanFactory 和 ApplicationContext。
BeanFactory:BeanFactory是 Spring 基础 IoC 容器。BeanFactory提供了 Spring 容器的配置框架和基本功能。ApplicationContext:ApplicationContext是具备应用特性的BeanFactory的子接口。它还扩展了其他一些接口,以支持更丰富的功能,如:国际化、访问资源、事件机制、更方便的支持 AOP、在 web 应用中指定应用层上下文等。
实际开发中,更推荐使用 ApplicationContext 作为 IoC 容器,因为它的功能远多于 BeanFactory。
org.springframework.context.ApplicationContext 接口代表 Spring IoC 容器,负责实例化、配置和组装 bean。容器通过读取配置元数据来获取关于要实例化、配置和组装哪些对象的指令。配置元数据以 XML、Java 注释或 Java 代码表示。它允许您表达组成应用程序的对象以及这些对象之间丰富的相互依赖关系。
Spring 提供了 ApplicationContext 接口的几个实现,例如:
- ClassPathXmlApplicationContext (opens new window):
ApplicationContext的实现,从 classpath 获取配置信息。
BeanFactory beanFactory = new ClassPathXmlApplicationContext("classpath.xml");
- FileSystemXmlApplicationContext (opens new window):
ApplicationContext的实现,从文件系统获取配置信息。
BeanFactory beanFactory = new FileSystemXmlApplicationContext("fileSystemConfig.xml");
在大多数应用场景中,不需要显式通过用户代码来实例化 Spring IoC 容器的一个或多个实例。
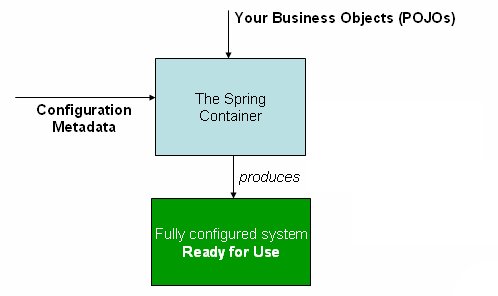
下图显示了 Spring IoC 容器的工作步骤

使用 IoC 容器可分为三步骤:
- 配置元数据:需要配置一些元数据来告诉 Spring,你希望容器如何工作,具体来说,就是如何去初始化、配置、管理 JavaBean 对象。
- 实例化容器:由 IoC 容器解析配置的元数据。IoC 容器的 Bean Reader 读取并解析配置文件,根据定义生成 BeanDefinition 配置元数据对象,IoC 容器根据
BeanDefinition进行实例化、配置及组装 Bean。 - 使用容器:由客户端实例化容器,获取需要的 Bean。
# 配置元数据
**元数据(Metadata)**又称中介数据、中继数据,为描述数据的数据(data about data),主要是描述数据属性(property)的信息。
配置元数据的方式:
- 基于 xml 配置:Spring 的传统配置方式。通常是在顶级元素
<beans>中通过<bean>元素配置元数据。这种方式的缺点是:如果 JavaBean 过多,则产生的配置文件足以让你眼花缭乱。 - 基于注解配置 (opens new window):Spring 2.5 引入了对基于注解的配置元数据的支持。可以大大简化你的配置。
- 基于 Java 配置 (opens new window):从 Spring 3.0 开始,Spring 支持使用 Java 代码来配置元数据。通常是在
@Configuration修饰的类中通过@Bean指定实例化 Bean 的方法。更多详情,可以参阅@Configuration(opens new window)、@Bean(opens new window)、@Import(opens new window) 和@DependsOn(opens new window) 注释。
这些 bean 定义对应于构成应用程序的实际对象。例如:定义服务层对象、数据访问对象 (DAO)、表示对象(如 Struts Action 实例)、基础设施对象(如 Hibernate SessionFactories、JMS 队列等)。通常,不会在容器中配置细粒度的域对象,因为创建和加载域对象通常是 DAO 和业务逻辑的责任。但是,可以使用 Spring 与 AspectJ 的集成来配置在 IoC 容器控制之外创建的对象。
以下示例显示了基于 XML 的配置元数据的基本结构:
<?xml version="1.0" encoding="UTF-8"?>
<beans xmlns="http://www.springframework.org/schema/beans"
    xmlns:xsi="http://www.w3.org/2001/XMLSchema-instance"
    xsi:schemaLocation="http://www.springframework.org/schema/beans
        https://www.springframework.org/schema/beans/spring-beans.xsd">

    <!--id 属性用于唯一标识单个 bean 定义-->
    <!--class 属性用于指明 bean 类型的完全限定名-->
    <bean id="..." class="...">
        <!-- 这里配置 Bean 的属性 -->
    </bean>

    <bean id="..." class="...">
        <!-- 这里配置 Bean 的属性 -->
    </bean>

    <!-- 更多的 Bean 定义 -->

</beans>
# 实例化容器
可以通过为 ApplicationContext 的构造函数指定外部资源路径,来加载配置元数据。
ApplicationContext context = new ClassPathXmlApplicationContext("services.xml", "daos.xml");
以下示例显示了服务层对象 (services.xml) 配置文件:
<?xml version="1.0" encoding="UTF-8"?>
<beans xmlns="http://www.springframework.org/schema/beans"
    xmlns:xsi="http://www.w3.org/2001/XMLSchema-instance"
    xsi:schemaLocation="http://www.springframework.org/schema/beans
        https://www.springframework.org/schema/beans/spring-beans.xsd">

    <!-- services -->

    <bean id="petStore" class="org.springframework.samples.jpetstore.services.PetStoreServiceImpl">
        <property name="accountDao" ref="accountDao"/>
        <property name="itemDao" ref="itemDao"/>
        <!-- additional collaborators and configuration for this bean go here -->
    </bean>

    <!-- more bean definitions for services go here -->

</beans>
以下示例显示了数据访问对象 (daos.xml) 配置文件:
<?xml version="1.0" encoding="UTF-8"?>
<beans xmlns="http://www.springframework.org/schema/beans"
    xmlns:xsi="http://www.w3.org/2001/XMLSchema-instance"
    xsi:schemaLocation="http://www.springframework.org/schema/beans
        https://www.springframework.org/schema/beans/spring-beans.xsd">

    <bean id="accountDao"
        class="org.springframework.samples.jpetstore.dao.jpa.JpaAccountDao">
        <!-- additional collaborators and configuration for this bean go here -->
    </bean>

    <bean id="itemDao" class="org.springframework.samples.jpetstore.dao.jpa.JpaItemDao">
        <!-- additional collaborators and configuration for this bean go here -->
    </bean>

    <!-- more bean definitions for data access objects go here -->

</beans>
上面的示例中,服务层由 PetStoreServiceImpl 类和类型为 JpaAccountDao 和 JpaItemDao 的两个数据访问对象(基于 JPA 对象关系映射标准)组成。 property name 元素指的是 JavaBean 属性的名称,ref 元素指的是另一个 bean 定义的名称。 id 和 ref 元素之间的这种联系表达了协作对象之间的依赖关系。
Spring 支持通过多个 xml 文件来定义 Bean,每个单独的 XML 配置文件都代表架构中的一个逻辑层或模块。可以使用 ApplicationContext 构造函数从所有这些 XML 片段加载 bean 定义。或者,使用 <import/> 元素从另一个或多个文件加载 bean 定义。如下所示:
<beans>
    <import resource="services.xml"/>
    <import resource="resources/messageSource.xml"/>
    <import resource="/resources/themeSource.xml"/>

    <bean id="bean1" class="..."/>
    <bean id="bean2" class="..."/>
</beans>
在上面的示例中,外部 bean 定义从三个文件加载:services.xml、messageSource.xml 和 themeSource.xml。services.xml 文件必须和当前 xml 文件位于同一目录或类路径位置;而 messageSource.xml 和 themeSource.xml 必须位于当前文件所在目录的子目录 resources 下。/resources 的 / 会被忽略。但是,鉴于这些路径是相对的,最好不要使用 /。根据 Spring Schema,被导入文件的内容,包括顶级 <beans/> 元素,必须是有效的 XML bean 定义。
注意:
可以,但不推荐使用相对
“../”路径来引用父目录中的文件。这样做会创建对当前应用程序之外的文件的依赖。特别是,不建议将此引用用于classpath:URL(例如,classpath:../services.xml),其中运行时解析过程会选择“最近的”类路径根,然后查看其父目录。类路径配置更改可能会导致选择不同的、不正确的目录。可以使用完全限定的资源位置而不是相对路径:例如,
file:C:/config/services.xml或classpath:/config/services.xml。建议为此类绝对路径保留一定的间接性 — 例如,通过“${...}”占位符来引用运行时指定 的 JVM 参数。
命名空间本身提供了导入指令功能。 Spring 提供的一系列 XML 命名空间中提供了除了普通 bean 定义之外的更多配置特性 — 例如,context 和 util 命名空间。
# 使用容器
ApplicationContext 能够维护不同 bean 及其依赖项的注册表。通过使用方法 T getBean(String name, Class T requiredType),可以检索并获取 bean 的实例。
ApplicationContext 允许读取 bean 定义并访问它们,如以下示例所示:
// create and configure beans
ApplicationContext context = new ClassPathXmlApplicationContext("services.xml", "daos.xml");

// retrieve configured instance
PetStoreService service = context.getBean("petStore", PetStoreService.class);

// use configured instance
List<String> userList = service.getUsernameList();
最灵活的变体是 GenericApplicationContext 结合阅读器委托 — 例如,结合 XML 文件的 XmlBeanDefinitionReader,如下例所示:
GenericApplicationContext context = new GenericApplicationContext();
new XmlBeanDefinitionReader(context).loadBeanDefinitions("services.xml", "daos.xml");
context.refresh();
可以在同一个 ApplicationContext 上混合和匹配此类读取器委托,从不同的配置源读取 bean 定义。
然后,可以使用 getBean 检索 bean 的实例。 ApplicationContext 接口还有一些其他方法用于检索 bean,但理想情况下,应用程序代码不应该使用它们。实际上,应用程序代码根本不应该调用 getBean() 方法,因此根本不依赖 Spring API。例如,Spring 与 Web 框架的集成为各种 Web 框架组件(例如控制器和 JSF 管理的 bean)提供了依赖注入,让您可以通过元数据(例如自动装配注释)声明对特定 bean 的依赖。
# IoC 依赖来源
自定义 Bean
容器内建 Bean 对象
容器内建依赖
# IoC 配置元数据
IoC 容器的配置有三种方式:
- 基于 xml 配置
- 基于 properties 配置
- 基于注解配置
- 基于 Java 配置
作为 Spring 传统的配置方式,xml 配置方式一般为大家所熟知。
如果厌倦了 xml 配置,Spring 也提供了注解配置方式或 Java 配置方式来简化配置。
本文,将对 Java 配置 IoC 容器做详细的介绍。
# Xml 配置
<?xml version="1.0" encoding="UTF-8"?>
<beans xmlns="http://www.springframework.org/schema/beans"
       xmlns:xsi="http://www.w3.org/2001/XMLSchema-instance"
       xsi:schemaLocation="http://www.springframework.org/schema/beans
         http://www.springframework.org/schema/beans/spring-beans.xsd">
  <import resource="resource1.xml" />
  <bean id="bean1" class=""></bean>
  <bean id="bean2" class=""></bean>
  <bean name="bean2" class=""></bean>

  <alias alias="bean3" name="bean2"/>
  <import resource="resource2.xml" />
</beans>
标签说明:
<beans>是 Spring 配置文件的根节点。<bean>用来定义一个 JavaBean。id属性是它的标识,在文件中必须唯一;class属性是它关联的类。<alias>用来定义 Bean 的别名。<import>用来导入其他配置文件的 Bean 定义。这是为了加载多个配置文件,当然也可以把这些配置文件构造为一个数组(new String[] {“config1.xml”, config2.xml})传给ApplicationContext实现类进行加载多个配置文件,那一个更适合由用户决定;这两种方式都是通过调用 Bean Definition Reader 读取 Bean 定义,内部实现没有任何区别。<import>标签可以放在<beans>下的任何位置,没有顺序关系。
# 实例化容器
实例化容器的过程: 定位资源(XML 配置文件) 读取配置信息(Resource) 转化为 Spring 可识别的数据形式(BeanDefinition)
ApplicationContext context =
      new ClassPathXmlApplicationContext(new String[] {"services.xml", "daos.xml"});
组合 xml 配置文件 配置的 Bean 功能各不相同,都放在一个 xml 文件中,不便管理。 Java 设计模式讲究职责单一原则。配置其实也是如此,功能不同的 JavaBean 应该被组织在不同的 xml 文件中。然后使用 import 标签把它们统一导入。
<import resource="classpath:spring/applicationContext.xml"/>
<import resource="/WEB-INF/spring/service.xml"/>
# 使用容器
使用容器的方式就是通过getBean获取 IoC 容器中的 JavaBean。
Spring 也有其他方法去获得 JavaBean,但是 Spring 并不推荐其他方式。
// create and configure beans
ApplicationContext context =
new ClassPathXmlApplicationContext(new String[] {"services.xml", "daos.xml"});
// retrieve configured instance
PetStoreService service = context.getBean("petStore", PetStoreService.class);
// use configured instance
List<String> userList = service.getUsernameList();
# 注解配置
Spring2.5 引入了注解。 于是,一个问题产生了:使用注解方式注入 JavaBean 是不是一定完爆 xml 方式? 未必。正所谓,仁者见仁智者见智。任何事物都有其优缺点,看你如何取舍。来看看注解的优缺点: 优点:大大减少了配置,并且可以使配置更加精细——类,方法,字段都可以用注解去标记。 缺点:使用注解,不可避免产生了侵入式编程,也产生了一些问题。
你需要将注解加入你的源码并编译它;
注解往往比较分散,不易管控。
注:spring 中,先进行注解注入,然后才是 xml 注入,因此如果注入的目标相同,后者会覆盖前者。
# 启动注解
Spring 默认是不启用注解的。如果想使用注解,需要先在 xml 中启动注解。 启动方式:在 xml 中加入一个标签,很简单吧。
<context:annotation-config/>
注:
<context:annotation-config/>只会检索定义它的上下文。什么意思呢?就是说,如果你 为 DispatcherServlet 指定了一个WebApplicationContext,那么它只在 controller 中查找@Autowired注解,而不会检查其它的路径。
# @Required
@Required 注解只能用于修饰 bean 属性的 setter 方法。受影响的 bean 属性必须在配置时被填充在 xml 配置文件中,否则容器将抛出BeanInitializationException。
public class AnnotationRequired {
    private String name;
    private String sex;

    public String getName() {
        return name;
    }

    /**
     * @Required 注解用于bean属性的setter方法并且它指示,受影响的bean属性必须在配置时被填充在xml配置文件中,
     *           否则容器将抛出BeanInitializationException。
     */
    @Required
    public void setName(String name) {
        this.name = name;
    }

    public String getSex() {
        return sex;
    }

    public void setSex(String sex) {
        this.sex = sex;
    }
}
# @Autowired
@Autowired注解可用于修饰属性、setter 方法、构造方法。
@Autowired 注入过程
- 元信息解析
- 依赖查找
- 依赖注入(字段、方法)
注:
@Autowired注解也可用于修饰构造方法,但如果类中只有默认构造方法,则没有必要。如果有多个构造器,至少应该修饰一个,来告诉容器哪一个必须使用。
可以使用 JSR330 的注解@Inject来替代@Autowired。
范例
public class AnnotationAutowired {
    private static final Logger log = LoggerFactory.getLogger(AnnotationRequired.class);

    @Autowired
    private Apple fieldA;

    private Banana fieldB;

    private Orange fieldC;

    public Apple getFieldA() {
        return fieldA;
    }

    public void setFieldA(Apple fieldA) {
        this.fieldA = fieldA;
    }

    public Banana getFieldB() {
        return fieldB;
    }

    @Autowired
    public void setFieldB(Banana fieldB) {
        this.fieldB = fieldB;
    }

    public Orange getFieldC() {
        return fieldC;
    }

    public void setFieldC(Orange fieldC) {
        this.fieldC = fieldC;
    }

    public AnnotationAutowired() {}

    @Autowired
    public AnnotationAutowired(Orange fieldC) {
        this.fieldC = fieldC;
    }

    public static void main(String[] args) throws Exception {
        AbstractApplicationContext ctx =
                        new ClassPathXmlApplicationContext("spring/spring-annotation.xml");

        AnnotationAutowired annotationAutowired =
                        (AnnotationAutowired) ctx.getBean("annotationAutowired");
        log.debug("fieldA: {}, fieldB:{}, fieldC:{}", annotationAutowired.getFieldA().getName(),
                        annotationAutowired.getFieldB().getName(),
                        annotationAutowired.getFieldC().getName());
        ctx.close();
    }
}
xml 中的配置
<!-- 测试@Autowired -->
<bean id="apple" class="org.zp.notes.spring.beans.annotation.sample.Apple"/>
<bean id="potato" class="org.zp.notes.spring.beans.annotation.sample.Banana"/>
<bean id="tomato" class="org.zp.notes.spring.beans.annotation.sample.Orange"/>
<bean id="annotationAutowired" class="org.zp.notes.spring.beans.annotation.sample.AnnotationAutowired"/>
# @Qualifier
在@Autowired注解中,提到了如果发现有多个候选的 bean 都符合修饰类型,Spring 就会抓瞎了。
那么,如何解决这个问题。
可以通过@Qualifier指定 bean 名称来锁定真正需要的那个 bean。
范例
public class AnnotationQualifier {
    private static final Logger log = LoggerFactory.getLogger(AnnotationQualifier.class);

    @Autowired
    @Qualifier("dog") /** 去除这行,会报异常 */
    Animal dog;

    Animal cat;

    public Animal getDog() {
        return dog;
    }

    public void setDog(Animal dog) {
        this.dog = dog;
    }

    public Animal getCat() {
        return cat;
    }

    @Autowired
    public void setCat(@Qualifier("cat") Animal cat) {
        this.cat = cat;
    }

    public static void main(String[] args) throws Exception {
        AbstractApplicationContext ctx =
                new ClassPathXmlApplicationContext("spring/spring-annotation.xml");

        AnnotationQualifier annotationQualifier =
                (AnnotationQualifier) ctx.getBean("annotationQualifier");

        log.debug("Dog name: {}", annotationQualifier.getDog().getName());
        log.debug("Cat name: {}", annotationQualifier.getCat().getName());
        ctx.close();
    }
}

abstract class Animal {
    public String getName() {
        return null;
    }
}

class Dog extends Animal {
    public String getName() {
        return "狗";
    }
}

class Cat extends Animal {
    public String getName() {
        return "猫";
    }
}
xml 中的配置
<!-- 测试@Qualifier -->
<bean id="dog" class="org.zp.notes.spring.beans.annotation.sample.Dog"/>
<bean id="cat" class="org.zp.notes.spring.beans.annotation.sample.Cat"/>
<bean id="annotationQualifier" class="org.zp.notes.spring.beans.annotation.sample.AnnotationQualifier"/>
# @Resource
Spring 支持 JSP250 规定的注解@Resource。这个注解根据指定的名称来注入 bean。
如果没有为@Resource指定名称,它会像@Autowired一样按照类型去寻找匹配。
在 Spring 中,由CommonAnnotationBeanPostProcessor来处理@Resource注解。
范例
public class AnnotationResource {
    private static final Logger log = LoggerFactory.getLogger(AnnotationResource.class);

    @Resource(name = "flower")
    Plant flower;

    @Resource(name = "tree")
    Plant tree;

    public Plant getFlower() {
        return flower;
    }

    public void setFlower(Plant flower) {
        this.flower = flower;
    }

    public Plant getTree() {
        return tree;
    }

    public void setTree(Plant tree) {
        this.tree = tree;
    }

    public static void main(String[] args) throws Exception {
        AbstractApplicationContext ctx =
                        new ClassPathXmlApplicationContext("spring/spring-annotation.xml");

        AnnotationResource annotationResource =
                        (AnnotationResource) ctx.getBean("annotationResource");
        log.debug("type: {}, name: {}", annotationResource.getFlower().getClass(), annotationResource.getFlower().getName());
        log.debug("type: {}, name: {}", annotationResource.getTree().getClass(), annotationResource.getTree().getName());
        ctx.close();
    }
}
xml 的配置
<!-- 测试@Resource -->
<bean id="flower" class="org.zp.notes.spring.beans.annotation.sample.Flower"/>
<bean id="tree" class="org.zp.notes.spring.beans.annotation.sample.Tree"/>
<bean id="annotationResource" class="org.zp.notes.spring.beans.annotation.sample.AnnotationResource"/>
# @PostConstruct 和 @PreDestroy
@PostConstruct 和 @PreDestroy 是 JSR 250 规定的用于生命周期的注解。
从其名号就可以看出,一个是在构造之后调用的方法,一个是销毁之前调用的方法。
public class AnnotationPostConstructAndPreDestroy {
    private static final Logger log = LoggerFactory.getLogger(AnnotationPostConstructAndPreDestroy.class);

    @PostConstruct
    public void init() {
        log.debug("call @PostConstruct method");
    }

    @PreDestroy
    public void destroy() {
        log.debug("call @PreDestroy method");
    }
}
# @Inject
从 Spring3.0 开始,Spring 支持 JSR 330 标准注解(依赖注入)。
注:如果要使用 JSR 330 注解,需要使用外部 jar 包。
若你使用 maven 管理 jar 包,只需要添加依赖到 pom.xml 即可:
<dependency>
  <groupId>javax.inject</groupId>
  <artifactId>javax.inject</artifactId>
  <version>1</version>
</dependency>
@Inject 和 @Autowired 一样,可以修饰属性、setter 方法、构造方法。
范例
public class AnnotationInject {
    private static final Logger log = LoggerFactory.getLogger(AnnotationInject.class);
    @Inject
    Apple fieldA;

    Banana fieldB;

    Orange fieldC;

    public Apple getFieldA() {
        return fieldA;
    }

    public void setFieldA(Apple fieldA) {
        this.fieldA = fieldA;
    }

    public Banana getFieldB() {
        return fieldB;
    }

    @Inject
    public void setFieldB(Banana fieldB) {
        this.fieldB = fieldB;
    }

    public Orange getFieldC() {
        return fieldC;
    }

    public AnnotationInject() {}

    @Inject
    public AnnotationInject(Orange fieldC) {
        this.fieldC = fieldC;
    }

    public static void main(String[] args) throws Exception {
        AbstractApplicationContext ctx =
                        new ClassPathXmlApplicationContext("spring/spring-annotation.xml");
        AnnotationInject annotationInject = (AnnotationInject) ctx.getBean("annotationInject");

        log.debug("type: {}, name: {}", annotationInject.getFieldA().getClass(),
                        annotationInject.getFieldA().getName());

        log.debug("type: {}, name: {}", annotationInject.getFieldB().getClass(),
                        annotationInject.getFieldB().getName());

        log.debug("type: {}, name: {}", annotationInject.getFieldC().getClass(),
                        annotationInject.getFieldC().getName());

        ctx.close();
    }
}
# Java 配置
基于 Java 配置 Spring IoC 容器,实际上是Spring 允许用户定义一个类,在这个类中去管理 IoC 容器的配置。
为了让 Spring 识别这个定义类为一个 Spring 配置类,需要用到两个注解:@Configuration和@Bean。
如果你熟悉 Spring 的 xml 配置方式,你可以将@Configuration等价于<beans>标签;将@Bean等价于<bean>标签。
# @Bean
@Bean 的修饰目标只能是方法或注解。
@Bean 只能定义在 @Configuration 或 @Component 注解修饰的类中。
# 声明一个 bean
此外,@Configuration 类允许在同一个类中通过@Bean 定义内部 bean 依赖。
声明一个 bean,只需要在 bean 属性的 set 方法上标注@Bean 即可。
@Configuration
public class AnnotationConfiguration {
    private static final Logger log = LoggerFactory.getLogger(JavaComponentScan.class);

    @Bean
    public Job getPolice() {
        return new Police();
    }

    public static void main(String[] args) {
        AnnotationConfigApplicationContext ctx = new AnnotationConfigApplicationContext(AnnotationConfiguration.class);
        ctx.scan("org.zp.notes.spring.beans");
        ctx.refresh();
        Job job = (Job) ctx.getBean("police");
        log.debug("job: {}, work: {}", job.getClass(), job.work());
    }
}

public interface Job {
    String work();
}

@Component("police")
public class Police implements Job {
    @Override
    public String work() {
        return "抓罪犯";
    }
}
这等价于配置
<beans>
	<bean id="police" class="org.zp.notes.spring.ioc.sample.job.Police"/>
</beans>
@Bean 注解用来表明一个方法实例化、配置合初始化一个被 Spring IoC 容器管理的新对象。
如果你熟悉 Spring 的 xml 配置,你可以将@Bean 视为等价于<beans>标签。
@Bean 注解可以用于任何的 Spring @Component bean,然而,通常被用于@Configuration bean。
# @Configuration
@Configuration 是一个类级别的注解,用来标记被修饰类的对象是一个BeanDefinition。
@Configuration 声明 bean 是通过被 @Bean 修饰的公共方法。此外,@Configuration 允许在同一个类中通过 @Bean 定义内部 bean 依赖。
@Configuration
public class AppConfig {
    @Bean
    public MyService myService() {
        return new MyServiceImpl();
    }
}
这等价于配置
<beans>
	<bean id="myService" class="com.acme.services.MyServiceImpl"/>
</beans>
用 AnnotationConfigApplicationContext 实例化 IoC 容器。
# 依赖解决过程
容器执行 bean 依赖解析如下:
ApplicationContext使用配置元数据创建和初始化 Bean。配置元数据可以由 XML、Java 代码或注解指定。- 对于每个 bean,其依赖关系以属性、构造函数参数或静态工厂方法的参数的形式表示。这些依赖项在实际创建 bean 时提供给 bean。
- 每个属性或构造函数参数都是要设置的值的实际定义,或者是对容器中另一个 bean 的引用。
- 作为值的每个属性或构造函数参数都从其指定格式转换为该属性或构造函数参数的实际类型。默认情况下,Spring 可以将以字符串格式提供的值转换为所有内置类型,例如 int、long、String、boolean 等。
Spring 容器在创建容器时验证每个 bean 的配置。但是,在实际创建 bean 之前,不会设置 bean 属性本身。在创建容器时会创建 singleton 型的实例并设置为默认的 Bean。否则,只有在请求时才会创建 bean。
需注意:构造器注入,可能会导致无法解决循环依赖问题。
例如:A 类通过构造器注入需要 B 类的实例,B 类通过构造器注入需要 A 类的实例。Spring IoC 容器会在运行时检测到此循环引用,并抛出 BeanCurrentlyInCreationException。
一种解决方案是使用 setter 方法注入替代构造器注入。
另一种解决方案是:bean A 和 bean B 之间的循环依赖关系,强制其中一个 bean 在完全初始化之前注入另一个 bean(典型的先有鸡还是先有蛋的场景)。
Spring 会在容器加载时检测配置问题,例如引用不存在的 bean 或循环依赖。在实际创建 bean 时,Spring 会尽可能晚地设置属性并解析依赖关系。这意味着,如果在创建该对象或其依赖项之一时出现问题,则正确加载的 Spring 容器稍后可以在您请求对象时生成异常 — 例如,bean 由于丢失或无效而引发异常。某些配置问题的这种潜在的延迟可见性是默认情况下 ApplicationContext 实现预实例化单例 bean 的原因。以在实际需要之前创建这些 bean 的一些前期时间和内存为代价,您会在创建 ApplicationContext 时发现配置问题,而不是稍后。您仍然可以覆盖此默认行为,以便单例 bean 延迟初始化,而不是急切地预先实例化。
# 最佳实践
# singleton 的 Bean 如何注入 prototype 的 Bean
Spring 创建的 Bean 默认是单例的,但当 Bean 遇到继承的时候,可能会忽略这一点。
假设有一个 SayService 抽象类,其中维护了一个类型是 ArrayList 的字段 data,用于保存方法处理的中间数据。每次调用 say 方法都会往 data 加入新数据,可以认为 SayService 是有状态,如果 SayService 是单例的话必然会 OOM。
/**
 * SayService 是有状态,如果 SayService 是单例的话必然会 OOM
 */
@Slf4j
public abstract class SayService {

   List<String> data = new ArrayList<>();

   public void say() {
      data.add(IntStream.rangeClosed(1, 1000000)
         .mapToObj(__ -> "a")
         .collect(Collectors.joining("")) + UUID.randomUUID().toString());
      log.info("I'm {} size:{}", this, data.size());
   }

}
但实际开发的时候,开发同学没有过多思考就把 SayHello 和 SayBye 类加上了 @Service 注解,让它们成为了 Bean,也没有考虑到父类是有状态的。
@Service
@Slf4j
public class SayBye extends SayService {

   @Override
   public void say() {
      super.say();
      log.info("bye");
   }

}

@Service
@Slf4j
public class SayHello extends SayService {

	@Override
	public void say() {
		super.say();
		log.info("hello");
	}

}
在为类标记上 @Service 注解把类型交由容器管理前,首先评估一下类是否有状态,然后为 Bean 设置合适的 Scope。
调用代码:
@Slf4j
@RestController
@RequestMapping("beansingletonandorder")
public class BeanSingletonAndOrderController {

   @Autowired
   List<SayService> sayServiceList;
   @Autowired
   private ApplicationContext applicationContext;

   @GetMapping("test")
   public void test() {
      log.info("====================");
      sayServiceList.forEach(SayService::say);
   }

}
可能有人认为,为 SayHello 和 SayBye 两个类都标记了 @Scope 注解,设置了 PROTOTYPE 的生命周期就可以解决上面的问题。
@Scope(value = ConfigurableBeanFactory.SCOPE_PROTOTYPE)
但实际上还是有问题。因为@RestController 注解 =@Controller 注解 +@ResponseBody 注解,又因为 @Controller 标记了 @Component 元注解,所以 @RestController 注解其实也是一个 Spring Bean。
Bean 默认是单例的,所以单例的 Controller 注入的 Service 也是一次性创建的,即使 Service 本身标识了 prototype 的范围也没用。
修复方式是,让 Service 以代理方式注入。这样虽然 Controller 本身是单例的,但每次都能从代理获取 Service。这样一来,prototype 范围的配置才能真正生效。
@Scope(value = ConfigurableBeanFactory.SCOPE_PROTOTYPE, proxyMode = ScopedProx)
