# Vuex 基础
Vuex 是一个专为 Vue.js 应用程序开发的状态管理模式。它采用集中式存储管理应用的所有组件的状态,并以相应的规则保证状态以一种可预测的方式发生变化。Vuex 也集成到 Vue 的官方调试工具 devtools extension (opens new window) (opens new window),提供了诸如零配置的 time-travel 调试、状态快照导入导出等高级调试功能。
- 1. Vuex 简介
- 2. Hello World 示例
- 3. State
- 4. Getters
- 5. Mutation
- 6. Actions
- 7. Modules
- 7.1. 模块的局部状态
- 7.2. 命名空间
- [7.3. # (opens new window)模块动态注册](#73-httpsvuexvuejsorgzhguidemoduleshtml模块动态注册模块动态注册)
- 7.4. 模块重用
- 8. 参考资料
# 1. Vuex 简介
# 1.1. 什么是状态管理
new Vue({
  // state
  data() {
    return {
      count: 0,
    };
  },
  // view
  template: `
    <div>{{ count }}</div>
  `,
  // actions
  methods: {
    increment() {
      this.count++;
    },
  },
});
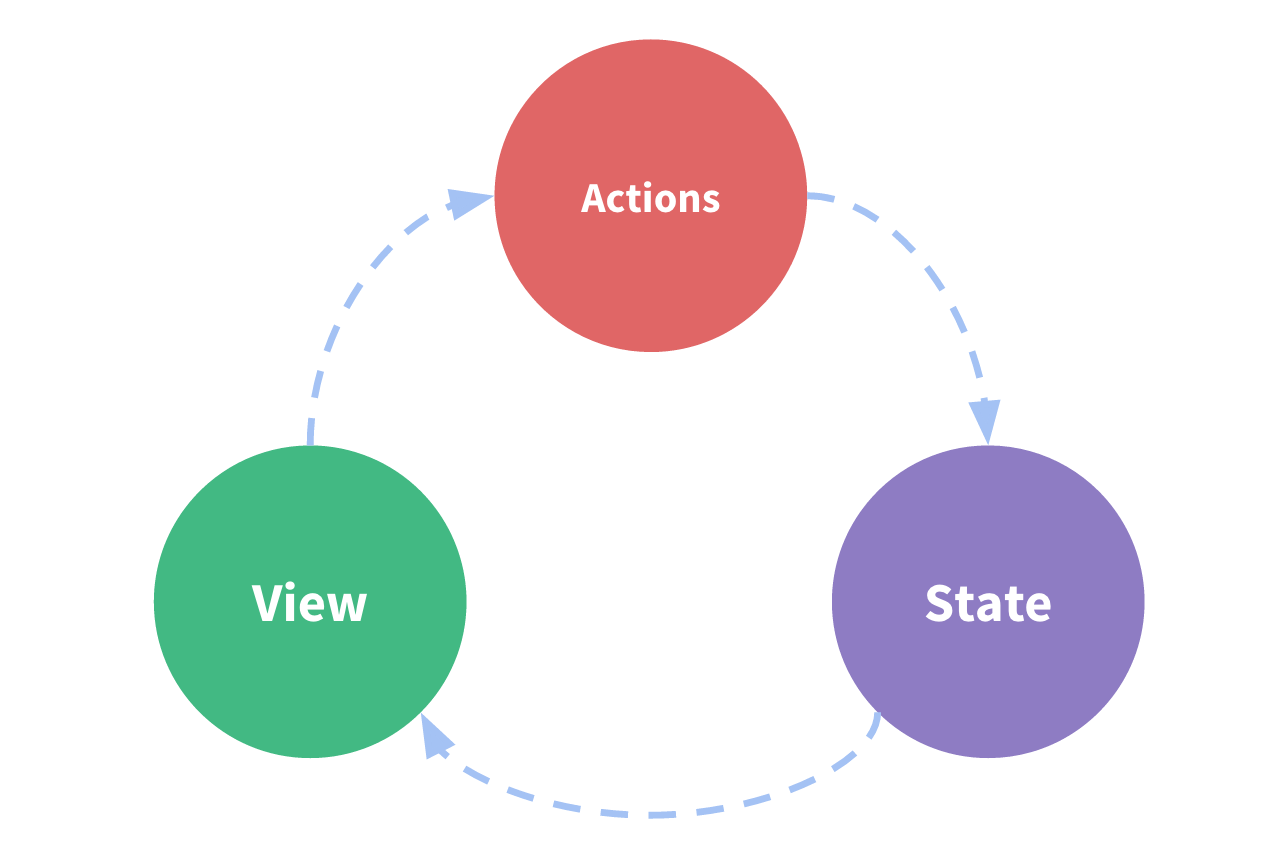
这个状态自管理应用包含以下几个部分:
- state,驱动应用的数据源;
- view,以声明方式将 state 映射到视图;
- actions,响应在 view 上的用户输入导致的状态变化。
但是,当我们的应用遇到多个组件共享状态时,单向数据流的简洁性很容易被破坏:
- 多个视图依赖于同一状态。
- 来自不同视图的行为需要变更同一状态。
对于问题一,传参的方法对于多层嵌套的组件将会非常繁琐,并且对于兄弟组件间的状态传递无能为力。对于问题二,我们经常会采用父子组件直接引用或者通过事件来变更和同步状态的多份拷贝。以上的这些模式非常脆弱,通常会导致无法维护的代码。
因此,我们为什么不把组件的共享状态抽取出来,以一个全局单例模式管理呢?在这种模式下,我们的组件树构成了一个巨大的“视图”,不管在树的哪个位置,任何组件都能获取状态或者触发行为!
通过定义和隔离状态管理中的各种概念并通过强制规则维持视图和状态间的独立性,我们的代码将会变得更结构化且易维护。
这就是 Vuex 背后的基本思想,借鉴了 Flux (opens new window) (opens new window)、Redux (opens new window) (opens new window)和 The Elm Architecture (opens new window) (opens new window)。与其他模式不同的是,Vuex 是专门为 Vue.js 设计的状态管理库,以利用 Vue.js 的细粒度数据响应机制来进行高效的状态更新。
如果你想交互式地学习 Vuex,可以看这个 Scrimba 上的 Vuex 课程 (opens new window) (opens new window),它将录屏和代码试验场混合在了一起,你可以随时暂停并尝试。

# 1.2. 什么时候用 Vuex
如果您不打算开发大型单页应用,使用 Vuex 可能是繁琐冗余的。确实是如此——如果您的应用够简单,您最好不要使用 Vuex。一个简单的 store 模式 (opens new window) (opens new window)就足够您所需了。但是,如果您需要构建一个中大型单页应用,您很可能会考虑如何更好地在组件外部管理状态,Vuex 将会成为自然而然的选择。引用 Redux 的作者 Dan Abramov 的话说就是:
Flux 架构就像眼镜:您自会知道什么时候需要它。
使用 Vuex 并不意味着你需要将所有的状态放入 Vuex。虽然将所有的状态放到 Vuex 会使状态变化更显式和易调试,但也会使代码变得冗长和不直观。如果有些状态严格属于单个组件,最好还是作为组件的局部状态。你应该根据你的应用开发需要进行权衡和确定。
# 1.3. 安装
# 直接下载 / CDN 引用
https://unpkg.com/vuex(opens new window) (opens new window)
Unpkg.com (opens new window) (opens new window)提供了基于 NPM 的 CDN 链接。以上的链接会一直指向 NPM 上发布的最新版本。您也可以通过 https://unpkg.com/vuex@2.0.0 这样的方式指定特定的版本。
在 Vue 之后引入 vuex 会进行自动安装:
<script src="/path/to/vue.js"></script>
<script src="/path/to/vuex.js"></script>
# NPM
npm install vuex --save
# Yarn
yarn add vuex
在一个模块化的打包系统中,您必须显式地通过 Vue.use() 来安装 Vuex:
import Vue from "vue";
import Vuex from "vuex";

Vue.use(Vuex);
当使用全局 script 标签引用 Vuex 时,不需要以上安装过程。
# Promise
Vuex 依赖 Promise (opens new window) (opens new window)。如果你支持的浏览器并没有实现 Promise (比如 IE),那么你可以使用一个 polyfill 的库,例如 es6-promise (opens new window) (opens new window)。
你可以通过 CDN 将其引入:
<script src="https://cdn.jsdelivr.net/npm/es6-promise@4/dist/es6-promise.auto.js"></script>
然后 window.Promise 会自动可用。
如果你喜欢使用诸如 npm 或 Yarn 等包管理器,可以按照下列方式执行安装:
npm install es6-promise --save # npm
yarn add es6-promise # Yarn
或者更进一步,将下列代码添加到你使用 Vuex 之前的一个地方:
import "es6-promise/auto";
# 2. Hello World 示例
每一个 Vuex 应用的核心就是 store(仓库)。“store”基本上就是一个容器,它包含着你的应用中大部分的状态 (state)。Vuex 和单纯的全局对象有以下两点不同:
- Vuex 的状态存储是响应式的。当 Vue 组件从 store 中读取状态的时候,若 store 中的状态发生变化,那么相应的组件也会相应地得到高效更新。
- 你不能直接改变 store 中的状态。改变 store 中的状态的唯一途径就是显式地提交 (commit) mutation。这样使得我们可以方便地跟踪每一个状态的变化,从而让我们能够实现一些工具帮助我们更好地了解我们的应用。
【示例】最简单的 Vuex 示例
<!DOCTYPE html>
<html lang="en-US">
  <head>
    <meta charset="utf-8" />
    <title>HelloWorld</title>
    <script src="https://cdn.jsdelivr.net/npm/vue/dist/vue.js"></script>
    <script src="https://unpkg.com/vuex"></script>
  </head>

  <body>
    <div id="app">
      <p>{{ count }}</p>
      <p>
        <button @click="increment">+</button>
        <button @click="decrement">-</button>
      </p>
    </div>
    <script>
      const store = new Vuex.Store({
        state: {
          count: 0,
        },
        mutations: {
          increment: (state) => state.count++,
          decrement: (state) => state.count--,
        },
      });

      new Vue({
        el: "#app",
        computed: {
          count() {
            return store.state.count;
          },
        },
        methods: {
          increment() {
            store.commit("increment");
          },
          decrement() {
            store.commit("decrement");
          },
        },
      });
    </script>
  </body>
</html>
# 3. State
# 3.1. 单一状态树
Vuex 使用单一状态树——是的,用一个对象就包含了全部的应用层级状态。至此它便作为一个“唯一数据源 (SSOT (opens new window) (opens new window))”而存在。这也意味着,每个应用将仅仅包含一个 store 实例。单一状态树让我们能够直接地定位任一特定的状态片段,在调试的过程中也能轻易地取得整个当前应用状态的快照。
单状态树和模块化并不冲突——在后面的章节里我们会讨论如何将状态和状态变更事件分布到各个子模块中。
存储在 Vuex 中的数据和 Vue 实例中的 data 遵循相同的规则,例如状态对象必须是纯粹 (plain) 的。参考:Vue#data (opens new window) (opens new window)。
# 3.2. 获得 Vuex 状态
那么我们如何在 Vue 组件中展示状态呢?由于 Vuex 的状态存储是响应式的,从 store 实例中读取状态最简单的方法就是在计算属性 (opens new window) (opens new window)中返回某个状态:
// 创建一个 Counter 组件
const Counter = {
  template: `<div>{{ count }}</div>`,
  computed: {
    count() {
      return store.state.count;
    },
  },
};
每当 store.state.count 变化的时候, 都会重新求取计算属性,并且触发更新相关联的 DOM。
然而,这种模式导致组件依赖全局状态单例。在模块化的构建系统中,在每个需要使用 state 的组件中需要频繁地导入,并且在测试组件时需要模拟状态。
Vuex 通过 store 选项,提供了一种机制将状态从根组件“注入”到每一个子组件中(需调用 Vue.use(Vuex)):
const app = new Vue({
  el: "#app",
  // 把 store 对象提供给 “store” 选项,这可以把 store 的实例注入所有的子组件
  store,
  components: { Counter },
  template: `
    <div class="app">
      <counter></counter>
    </div>
  `,
});
通过在根实例中注册 store 选项,该 store 实例会注入到根组件下的所有子组件中,且子组件能通过 this.$store 访问到。让我们更新下 Counter 的实现:
const Counter = {
  template: `<div>{{ count }}</div>`,
  computed: {
    count() {
      return this.$store.state.count;
    },
  },
};
# 3.3. mapState 辅助函数
当一个组件需要获取多个状态的时候,将这些状态都声明为计算属性会有些重复和冗余。为了解决这个问题,我们可以使用 mapState 辅助函数帮助我们生成计算属性,让你少按几次键:
// 在单独构建的版本中辅助函数为 Vuex.mapState
import { mapState } from "vuex";

export default {
  // ...
  computed: mapState({
    // 箭头函数可使代码更简练
    count: (state) => state.count,

    // 传字符串参数 'count' 等同于 `state => state.count`
    countAlias: "count",

    // 为了能够使用 `this` 获取局部状态,必须使用常规函数
    countPlusLocalState(state) {
      return state.count + this.localCount;
    },
  }),
};
当映射的计算属性的名称与 state 的子节点名称相同时,我们也可以给 mapState 传一个字符串数组。
computed: mapState([
  // 映射 this.count 为 store.state.count
  "count",
]);
# 3.4. 对象展开运算符
mapState 函数返回的是一个对象。我们如何将它与局部计算属性混合使用呢?通常,我们需要使用一个工具函数将多个对象合并为一个,以使我们可以将最终对象传给 computed 属性。但是自从有了对象展开运算符 (opens new window) (opens new window),我们可以极大地简化写法:
computed: {
  localComputed () { /* ... */ },
  // 使用对象展开运算符将此对象混入到外部对象中
  ...mapState({
    // ...
  })
}
# 3.5. 组件仍然保有局部状态
使用 Vuex 并不意味着你需要将所有的状态放入 Vuex。虽然将所有的状态放到 Vuex 会使状态变化更显式和易调试,但也会使代码变得冗长和不直观。如果有些状态严格属于单个组件,最好还是作为组件的局部状态。你应该根据你的应用开发需要进行权衡和确定。
# 4. Getters
有时候我们需要从 store 中的 state 中派生出一些状态,例如对列表进行过滤并计数:
computed: {
  doneTodosCount () {
    return this.$store.state.todos.filter(todo => todo.done).length
  }
}
如果有多个组件需要用到此属性,我们要么复制这个函数,或者抽取到一个共享函数然后在多处导入它——无论哪种方式都不是很理想。
Vuex 允许我们在 store 中定义“getter”(可以认为是 store 的计算属性)。就像计算属性一样,getter 的返回值会根据它的依赖被缓存起来,且只有当它的依赖值发生了改变才会被重新计算。
Getter 接受 state 作为其第一个参数:
const store = new Vuex.Store({
  state: {
    todos: [
      { id: 1, text: "...", done: true },
      { id: 2, text: "...", done: false },
    ],
  },
  getters: {
    doneTodos: (state) => {
      return state.todos.filter((todo) => todo.done);
    },
  },
});
# 4.1. 通过属性访问
Getter 会暴露为 store.getters 对象,你可以以属性的形式访问这些值:
store.getters.doneTodos; // -> [{ id: 1, text: '...', done: true }]
Getter 也可以接受其他 getter 作为第二个参数:
getters: {
  // ...
  doneTodosCount: (state, getters) => {
    return getters.doneTodos.length;
  };
}
store.getters.doneTodosCount; // -> 1
我们可以很容易地在任何组件中使用它:
computed: {
  doneTodosCount () {
    return this.$store.getters.doneTodosCount
  }
}
注意,getter 在通过属性访问时是作为 Vue 的响应式系统的一部分缓存其中的。
# 4.2. 通过方法访问
你也可以通过让 getter 返回一个函数,来实现给 getter 传参。在你对 store 里的数组进行查询时非常有用。
getters: {
  // ...
  getTodoById: (state) => (id) => {
    return state.todos.find((todo) => todo.id === id);
  };
}
store.getters.getTodoById(2); // -> { id: 2, text: '...', done: false }
注意,getter 在通过方法访问时,每次都会去进行调用,而不会缓存结果。
# 4.3. mapGetters 辅助函数
mapGetters 辅助函数仅仅是将 store 中的 getter 映射到局部计算属性:
import { mapGetters } from "vuex";

export default {
  // ...
  computed: {
    // 使用对象展开运算符将 getter 混入 computed 对象中
    ...mapGetters([
      "doneTodosCount",
      "anotherGetter",
      // ...
    ]),
  },
};
如果你想将一个 getter 属性另取一个名字,使用对象形式:
...mapGetters({
  // 把 `this.doneCount` 映射为 `this.$store.getters.doneTodosCount`
  doneCount: 'doneTodosCount'
})
# 5. Mutation
更改 Vuex 的 store 中的状态的唯一方法是提交 mutation。Vuex 中的 mutation 非常类似于事件:每个 mutation 都有一个字符串的 事件类型 (type) 和 一个 回调函数 (handler)。这个回调函数就是我们实际进行状态更改的地方,并且它会接受 state 作为第一个参数:
const store = new Vuex.Store({
  state: {
    count: 1,
  },
  mutations: {
    increment(state) {
      // 变更状态
      state.count++;
    },
  },
});
你不能直接调用一个 mutation handler。这个选项更像是事件注册:“当触发一个类型为 increment 的 mutation 时,调用此函数。”要唤醒一个 mutation handler,你需要以相应的 type 调用 store.commit 方法:
store.commit("increment");
# 5.1. 提交载荷(Payload)
你可以向 store.commit 传入额外的参数,即 mutation 的 载荷(payload):
// ...
mutations: {
  increment (state, n) {
    state.count += n
  }
}
store.commit('increment', 10)
在大多数情况下,载荷应该是一个对象,这样可以包含多个字段并且记录的 mutation 会更易读:
// ...
mutations: {
  increment (state, payload) {
    state.count += payload.amount
  }
}
store.commit('increment', {
  amount: 10
})
# 5.2. 对象风格的提交方式
提交 mutation 的另一种方式是直接使用包含 type 属性的对象:
store.commit({
  type: "increment",
  amount: 10,
});
当使用对象风格的提交方式,整个对象都作为载荷传给 mutation 函数,因此 handler 保持不变:
mutations: {
  increment (state, payload) {
    state.count += payload.amount
  }
}
# 5.3. Mutation 需遵守 Vue 的响应规则
既然 Vuex 的 store 中的状态是响应式的,那么当我们变更状态时,监视状态的 Vue 组件也会自动更新。这也意味着 Vuex 中的 mutation 也需要与使用 Vue 一样遵守一些注意事项:
- 最好提前在你的 store 中初始化好所有所需属性。
- 当需要在对象上添加新属性时,你应该
使用
Vue.set(obj, 'newProp', 123), 或者以新对象替换老对象。例如,利用对象展开运算符 (opens new window) (opens new window)我们可以这样写:
state.obj = { ...state.obj, newProp: 123 };
# 5.4. 使用常量替代 Mutation 事件类型
使用常量替代 mutation 事件类型在各种 Flux 实现中是很常见的模式。这样可以使 linter 之类的工具发挥作用,同时把这些常量放在单独的文件中可以让你的代码合作者对整个 app 包含的 mutation 一目了然:
// mutation-types.js
export const SOME_MUTATION = 'SOME_MUTATION'
// store.js
import Vuex from 'vuex'
import { SOME_MUTATION } from './mutation-types'

const store = new Vuex.Store({
  state: { ... },
  mutations: {
    // 我们可以使用 ES2015 风格的计算属性命名功能来使用一个常量作为函数名
    [SOME_MUTATION] (state) {
      // mutate state
    }
  }
})
用不用常量取决于你——在需要多人协作的大型项目中,这会很有帮助。但如果你不喜欢,你完全可以不这样做。
# 5.5. Mutation 必须是同步函数
一条重要的原则就是要记住 mutation 必须是同步函数。为什么?请参考下面的例子:
mutations: {
  someMutation (state) {
    api.callAsyncMethod(() => {
      state.count++
    })
  }
}
现在想象,我们正在 debug 一个 app 并且观察 devtool 中的 mutation 日志。每一条 mutation 被记录,devtools 都需要捕捉到前一状态和后一状态的快照。然而,在上面的例子中 mutation 中的异步函数中的回调让这不可能完成:因为当 mutation 触发的时候,回调函数还没有被调用,devtools 不知道什么时候回调函数实际上被调用——实质上任何在回调函数中进行的状态的改变都是不可追踪的。
# 5.6. 在组件中提交 Mutation
你可以在组件中使用 this.$store.commit('xxx') 提交 mutation,或者使用 mapMutations 辅助函数将组件中的 methods 映射为 store.commit 调用(需要在根节点注入 store)。
import { mapMutations } from "vuex";

export default {
  // ...
  methods: {
    ...mapMutations([
      "increment", // 将 `this.increment()` 映射为 `this.$store.commit('increment')`

      // `mapMutations` 也支持载荷:
      "incrementBy", // 将 `this.incrementBy(amount)` 映射为 `this.$store.commit('incrementBy', amount)`
    ]),
    ...mapMutations({
      add: "increment", // 将 `this.add()` 映射为 `this.$store.commit('increment')`
    }),
  },
};
# 6. Actions
Action 类似于 mutation,不同在于:
- Action 提交的是 mutation,而不是直接变更状态。
- Action 可以包含任意异步操作。
让我们来注册一个简单的 action:
const store = new Vuex.Store({
  state: {
    count: 0,
  },
  mutations: {
    increment(state) {
      state.count++;
    },
  },
  actions: {
    increment(context) {
      context.commit("increment");
    },
  },
});
Action 函数接受一个与 store 实例具有相同方法和属性的 context 对象,因此你可以调用 context.commit 提交一个 mutation,或者通过 context.state 和 context.getters 来获取 state 和 getters。当我们在之后介绍到 Modules (opens new window) 时,你就知道 context 对象为什么不是 store 实例本身了。
实践中,我们会经常用到 ES2015 的 参数解构 (opens new window) (opens new window)来简化代码(特别是我们需要调用 commit 很多次的时候):
actions: {
  increment ({ commit }) {
    commit('increment')
  }
}
# 6.1. 分发 Action
Action 通过 store.dispatch 方法触发:
store.dispatch("increment");
乍一眼看上去感觉多此一举,我们直接分发 mutation 岂不更方便?实际上并非如此,还记得 mutation 必须同步执行这个限制么?Action 就不受约束!我们可以在 action 内部执行异步操作:
actions: {
  incrementAsync ({ commit }) {
    setTimeout(() => {
      commit('increment')
    }, 1000)
  }
}
Actions 支持同样的载荷方式和对象方式进行分发:
// 以载荷形式分发
store.dispatch("incrementAsync", {
  amount: 10,
});

// 以对象形式分发
store.dispatch({
  type: "incrementAsync",
  amount: 10,
});
来看一个更加实际的购物车示例,涉及到调用异步 API 和分发多重 mutation:
actions: {
  checkout ({ commit, state }, products) {
    // 把当前购物车的物品备份起来
    const savedCartItems = [...state.cart.added]
    // 发出结账请求,然后乐观地清空购物车
    commit(types.CHECKOUT_REQUEST)
    // 购物 API 接受一个成功回调和一个失败回调
    shop.buyProducts(
      products,
      // 成功操作
      () => commit(types.CHECKOUT_SUCCESS),
      // 失败操作
      () => commit(types.CHECKOUT_FAILURE, savedCartItems)
    )
  }
}
注意我们正在进行一系列的异步操作,并且通过提交 mutation 来记录 action 产生的副作用(即状态变更)。
# 6.2. 在组件中分发 Action
你在组件中使用 this.$store.dispatch('xxx') 分发 action,或者使用 mapActions 辅助函数将组件的 methods 映射为 store.dispatch 调用(需要先在根节点注入 store):
import { mapActions } from "vuex";

export default {
  // ...
  methods: {
    ...mapActions([
      "increment", // 将 `this.increment()` 映射为 `this.$store.dispatch('increment')`

      // `mapActions` 也支持载荷:
      "incrementBy", // 将 `this.incrementBy(amount)` 映射为 `this.$store.dispatch('incrementBy', amount)`
    ]),
    ...mapActions({
      add: "increment", // 将 `this.add()` 映射为 `this.$store.dispatch('increment')`
    }),
  },
};
# 6.3. 组合 Action
Action 通常是异步的,那么如何知道 action 什么时候结束呢?更重要的是,我们如何才能组合多个 action,以处理更加复杂的异步流程?
首先,你需要明白 store.dispatch 可以处理被触发的 action 的处理函数返回的 Promise,并且 store.dispatch 仍旧返回 Promise:
actions: {
  actionA ({ commit }) {
    return new Promise((resolve, reject) => {
      setTimeout(() => {
        commit('someMutation')
        resolve()
      }, 1000)
    })
  }
}
现在你可以:
store.dispatch("actionA").then(() => {
  // ...
});
在另外一个 action 中也可以:
actions: {
  // ...
  actionB ({ dispatch, commit }) {
    return dispatch('actionA').then(() => {
      commit('someOtherMutation')
    })
  }
}
最后,如果我们利用 async / await (opens new window) (opens new window),我们可以如下组合 action:
// 假设 getData() 和 getOtherData() 返回的是 Promise

actions: {
  async actionA ({ commit }) {
    commit('gotData', await getData())
  },
  async actionB ({ dispatch, commit }) {
    await dispatch('actionA') // 等待 actionA 完成
    commit('gotOtherData', await getOtherData())
  }
}
一个
store.dispatch在不同模块中可以触发多个 action 函数。在这种情况下,只有当所有触发函数完成后,返回的 Promise 才会执行。
# 7. Modules
由于使用单一状态树,应用的所有状态会集中到一个比较大的对象。当应用变得非常复杂时,store 对象就有可能变得相当臃肿。
为了解决以上问题,Vuex 允许我们将 store 分割成模块(module)。每个模块拥有自己的 state、mutation、action、getter、甚至是嵌套子模块——从上至下进行同样方式的分割:
const moduleA = {
  state: () => ({ ... }),
  mutations: { ... },
  actions: { ... },
  getters: { ... }
}

const moduleB = {
  state: () => ({ ... }),
  mutations: { ... },
  actions: { ... }
}

const store = new Vuex.Store({
  modules: {
    a: moduleA,
    b: moduleB
  }
})

store.state.a // -> moduleA 的状态
store.state.b // -> moduleB 的状态
# 7.1. 模块的局部状态
对于模块内部的 mutation 和 getter,接收的第一个参数是模块的局部状态对象。
const moduleA = {
  state: () => ({
    count: 0,
  }),
  mutations: {
    increment(state) {
      // 这里的 `state` 对象是模块的局部状态
      state.count++;
    },
  },

  getters: {
    doubleCount(state) {
      return state.count * 2;
    },
  },
};
同样,对于模块内部的 action,局部状态通过 context.state 暴露出来,根节点状态则为 context.rootState:
const moduleA = {
  // ...
  actions: {
    incrementIfOddOnRootSum({ state, commit, rootState }) {
      if ((state.count + rootState.count) % 2 === 1) {
        commit("increment");
      }
    },
  },
};
对于模块内部的 getter,根节点状态会作为第三个参数暴露出来:
const moduleA = {
  // ...
  getters: {
    sumWithRootCount(state, getters, rootState) {
      return state.count + rootState.count;
    },
  },
};
# 7.2. 命名空间
默认情况下,模块内部的 action、mutation 和 getter 是注册在全局命名空间的——这样使得多个模块能够对同一 mutation 或 action 作出响应。
如果希望你的模块具有更高的封装度和复用性,你可以通过添加 namespaced: true 的方式使其成为带命名空间的模块。当模块被注册后,它的所有 getter、action 及 mutation 都会自动根据模块注册的路径调整命名。例如:
const store = new Vuex.Store({
  modules: {
    account: {
      namespaced: true,

      // 模块内容(module assets)
      state: () => ({ ... }), // 模块内的状态已经是嵌套的了,使用 `namespaced` 属性不会对其产生影响
      getters: {
        isAdmin () { ... } // -> getters['account/isAdmin']
      },
      actions: {
        login () { ... } // -> dispatch('account/login')
      },
      mutations: {
        login () { ... } // -> commit('account/login')
      },

      // 嵌套模块
      modules: {
        // 继承父模块的命名空间
        myPage: {
          state: () => ({ ... }),
          getters: {
            profile () { ... } // -> getters['account/profile']
          }
        },

        // 进一步嵌套命名空间
        posts: {
          namespaced: true,

          state: () => ({ ... }),
          getters: {
            popular () { ... } // -> getters['account/posts/popular']
          }
        }
      }
    }
  }
})
启用了命名空间的 getter 和 action 会收到局部化的 getter,dispatch 和 commit。换言之,你在使用模块内容(module assets)时不需要在同一模块内额外添加空间名前缀。更改 namespaced 属性后不需要修改模块内的代码。
# 在带命名空间的模块内访问全局内容(Global Assets)
如果你希望使用全局 state 和 getter,rootState 和 rootGetters 会作为第三和第四参数传入 getter,也会通过 context 对象的属性传入 action。
若需要在全局命名空间内分发 action 或提交 mutation,将 { root: true } 作为第三参数传给 dispatch 或 commit 即可。
modules: {
  foo: {
    namespaced: true,

    getters: {
      // 在这个模块的 getter 中,`getters` 被局部化了
      // 你可以使用 getter 的第四个参数来调用 `rootGetters`
      someGetter (state, getters, rootState, rootGetters) {
        getters.someOtherGetter // -> 'foo/someOtherGetter'
        rootGetters.someOtherGetter // -> 'someOtherGetter'
      },
      someOtherGetter: state => { ... }
    },

    actions: {
      // 在这个模块中, dispatch 和 commit 也被局部化了
      // 他们可以接受 `root` 属性以访问根 dispatch 或 commit
      someAction ({ dispatch, commit, getters, rootGetters }) {
        getters.someGetter // -> 'foo/someGetter'
        rootGetters.someGetter // -> 'someGetter'

        dispatch('someOtherAction') // -> 'foo/someOtherAction'
        dispatch('someOtherAction', null, { root: true }) // -> 'someOtherAction'

        commit('someMutation') // -> 'foo/someMutation'
        commit('someMutation', null, { root: true }) // -> 'someMutation'
      },
      someOtherAction (ctx, payload) { ... }
    }
  }
}
# 在带命名空间的模块注册全局 action
若需要在带命名空间的模块注册全局 action,你可添加 root: true,并将这个 action 的定义放在函数 handler 中。例如:
{
  actions: {
    someOtherAction ({dispatch}) {
      dispatch('someAction')
    }
  },
  modules: {
    foo: {
      namespaced: true,

      actions: {
        someAction: {
          root: true,
          handler (namespacedContext, payload) { ... } // -> 'someAction'
        }
      }
    }
  }
}
# 带命名空间的绑定函数
当使用 mapState, mapGetters, mapActions 和 mapMutations 这些函数来绑定带命名空间的模块时,写起来可能比较繁琐:
computed: {
  ...mapState({
    a: state => state.some.nested.module.a,
    b: state => state.some.nested.module.b
  })
},
methods: {
  ...mapActions([
    'some/nested/module/foo', // -> this['some/nested/module/foo']()
    'some/nested/module/bar' // -> this['some/nested/module/bar']()
  ])
}
对于这种情况,你可以将模块的空间名称字符串作为第一个参数传递给上述函数,这样所有绑定都会自动将该模块作为上下文。于是上面的例子可以简化为:
computed: {
  ...mapState('some/nested/module', {
    a: state => state.a,
    b: state => state.b
  })
},
methods: {
  ...mapActions('some/nested/module', [
    'foo', // -> this.foo()
    'bar' // -> this.bar()
  ])
}
而且,你可以通过使用 createNamespacedHelpers 创建基于某个命名空间辅助函数。它返回一个对象,对象里有新的绑定在给定命名空间值上的组件绑定辅助函数:
import { createNamespacedHelpers } from "vuex";

const { mapState, mapActions } = createNamespacedHelpers("some/nested/module");

export default {
  computed: {
    // 在 `some/nested/module` 中查找
    ...mapState({
      a: (state) => state.a,
      b: (state) => state.b,
    }),
  },
  methods: {
    // 在 `some/nested/module` 中查找
    ...mapActions(["foo", "bar"]),
  },
};
# 给插件开发者的注意事项
如果你开发的插件(Plugin) (opens new window)提供了模块并允许用户将其添加到 Vuex store,可能需要考虑模块的空间名称问题。对于这种情况,你可以通过插件的参数对象来允许用户指定空间名称:
// 通过插件的参数对象得到空间名称
// 然后返回 Vuex 插件函数
export function createPlugin(options = {}) {
  return function (store) {
    // 把空间名字添加到插件模块的类型(type)中去
    const namespace = options.namespace || "";
    store.dispatch(namespace + "pluginAction");
  };
}
# 7.3. 模块动态注册
在 store 创建之后,你可以使用 store.registerModule 方法注册模块:
import Vuex from "vuex";

const store = new Vuex.Store({
  /* 选项 */
});

// 注册模块 `myModule`
store.registerModule("myModule", {
  // ...
});
// 注册嵌套模块 `nested/myModule`
store.registerModule(["nested", "myModule"], {
  // ...
});
之后就可以通过 store.state.myModule 和 store.state.nested.myModule 访问模块的状态。
模块动态注册功能使得其他 Vue 插件可以通过在 store 中附加新模块的方式来使用 Vuex 管理状态。例如,vuex-router-sync (opens new window) (opens new window)插件就是通过动态注册模块将 vue-router 和 vuex 结合在一起,实现应用的路由状态管理。
你也可以使用 store.unregisterModule(moduleName) 来动态卸载模块。注意,你不能使用此方法卸载静态模块(即创建 store 时声明的模块)。
注意,你可以通过 store.hasModule(moduleName) 方法检查该模块是否已经被注册到 store。
# 保留 state
在注册一个新 module 时,你很有可能想保留过去的 state,例如从一个服务端渲染的应用保留 state。你可以通过 preserveState 选项将其归档:store.registerModule('a', module, { preserveState: true })。
当你设置 preserveState: true 时,该模块会被注册,action、mutation 和 getter 会被添加到 store 中,但是 state 不会。这里假设 store 的 state 已经包含了这个 module 的 state 并且你不希望将其覆写。
# 7.4. 模块重用
有时我们可能需要创建一个模块的多个实例,例如:
- 创建多个 store,他们公用同一个模块 (例如当
runInNewContext选项是false或'once'时,为了在服务端渲染中避免有状态的单例 (opens new window) (opens new window)) - 在一个 store 中多次注册同一个模块
如果我们使用一个纯对象来声明模块的状态,那么这个状态对象会通过引用被共享,导致状态对象被修改时 store 或模块间数据互相污染的问题。
实际上这和 Vue 组件内的 data 是同样的问题。因此解决办法也是相同的——使用一个函数来声明模块状态(仅 2.3.0+ 支持):
const MyReusableModule = {
  state: () => ({
    foo: "bar",
  }),
  // mutation, action 和 getter 等等...
};