
《极客时间教程 - Java 并发编程实战》笔记二
《极客时间教程 - Java 并发编程实战》笔记二
Lock 和 Condition(上):隐藏在并发包中的管程
再造管程的理由
已有 synchronized,还需要 Lock 的原因——需要锁支持以下能力以破坏不可抢占条件:
- 响应中断:阻塞线程收到中断信号后唤醒,释放已持有的锁,避免死锁
- 支持超时:一段时间内未获取锁则返回错误,而非无限阻塞
- 非阻塞获取锁:尝试获取失败直接返回,不进入阻塞
// 支持中断的 API
void lockInterruptibly()
  throws InterruptedException;
// 支持超时的 API
boolean tryLock(long time, TimeUnit unit)
  throws InterruptedException;
// 支持非阻塞获取锁的 API
boolean tryLock();
如何保证可见性
ReentrantLock 内部持有 volatile 成员变量 state,加锁/解锁时读写 state,由 volatile 保证可见性。
什么是可重入锁
所谓可重入锁,指的是线程可以重复获取同一把锁。
公平锁与非公平锁
ReentrantLock 中实现了公平锁和非公平锁。
//无参构造函数:默认非公平锁
public ReentrantLock() {
    sync = new NonfairSync();
}
//根据公平策略参数创建锁
public ReentrantLock(boolean fair) {
    sync = fair ? new FairSync()
                : new NonfairSync();
}- 公平锁:等待时间长的线程优先被唤醒
- 非公平锁:不保证公平,等待时间短的线程可能先被唤醒
用锁的最佳实践
- 永远只在更新对象的成员变量时加锁
- 永远只在访问可变的成员变量时加锁
- 永远不在调用其他对象的方法时加锁
Lock 和 Condition(下):Dubbo 如何用管程实现异步转同步?
Condition 实现了管程模型中的条件变量。阻塞队列需要两个条件变量:notFull(队列不满)和 notEmpty(队列不空)。
public class BlockedQueue<T>{
  final Lock lock = new ReentrantLock();
  // 条件变量:队列不满
  final Condition notFull = lock.newCondition();
  // 条件变量:队列不空
  final Condition notEmpty = lock.newCondition();

  // 入队
  void enq(T x) {
    lock.lock();
    try {
      while (队列已满){
        // 等待队列不满
        notFull.await();
      }
      // 省略入队操作。..
      // 入队后,通知可出队
      notEmpty.signal();
    }finally {
      lock.unlock();
    }
  }
  // 出队
  void deq(){
    lock.lock();
    try {
      while (队列已空){
        // 等待队列不空
        notEmpty.await();
      }
      // 省略出队操作。..
      // 出队后,通知可入队
      notFull.signal();
    }finally {
      lock.unlock();
    }
  }
}
Lock 和 Condition 实现的管程,线程等待和通知需要调用 await()、signal()、signalAll(),它们的语义和 wait()、notify()、notifyAll() 是相同的。
同步与异步
- 同步:调用方需要等待结果
- 异步:调用方不需要等待结果
Dubbo 源码分析
RPC 调用在 TCP 层面发送请求后不会等待响应。Dubbo 通过 Lock + Condition 实现异步转同步:调用方阻塞等待结果,RPC 返回后唤醒调用方。
public class DubboInvoker{
  Result doInvoke(Invocation inv){
    return currentClient.request(inv, timeout).get();
  }
}
核心实现:
// 创建锁与条件变量
private final Lock lock = new ReentrantLock();
private final Condition done = lock.newCondition();

// 调用方通过该方法等待结果
Object get(int timeout){
  long start = System.nanoTime();
  lock.lock();
  try {
	while (!isDone()) {
	  done.await(timeout);
      long cur=System.nanoTime();
	  if (isDone() ||
          cur-start > timeout){
	    break;
	  }
	}
  } finally {
	lock.unlock();
  }
  if (!isDone()) {
	throw new TimeoutException();
  }
  return returnFromResponse();
}
// RPC 结果是否已经返回
boolean isDone() {
  return response != null;
}
// RPC 结果返回时调用该方法
private void doReceived(Response res) {
  lock.lock();
  try {
    response = res;
    if (done != null) {
      done.signal();
    }
  } finally {
    lock.unlock();
  }
}
Semaphore:如何快速实现一个限流器?
信号量模型
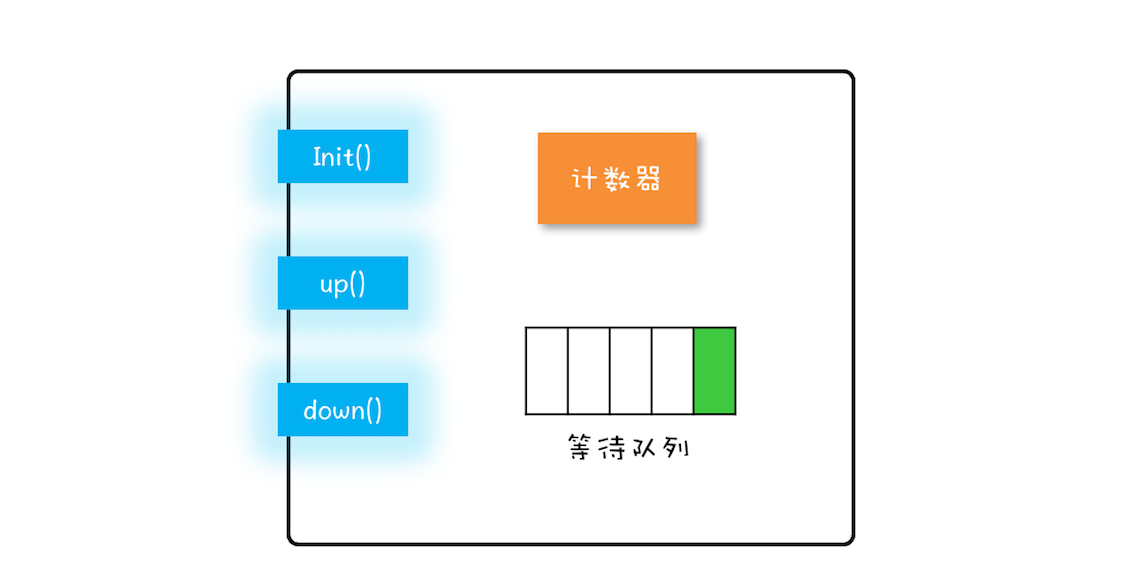
信号量模型:一个计数器 + 一个等待队列 + 三个方法(init()、down()、up())。
class Semaphore{
  // 计数器
  int count;
  // 等待队列
  Queue queue;
  // 初始化操作
  Semaphore(int c){
    this.count=c;
  }
  //
  void down(){
    this.count--;
    if(this.count<0){
      // 将当前线程插入等待队列
      // 阻塞当前线程
    }
  }
  void up(){
    this.count++;
    if(this.count<=0) {
      // 移除等待队列中的某个线程 T
      // 唤醒线程 T
    }
  }
}down()/up() 最早称为 P/V 操作(PV 原语),Java 并发包中对应 acquire()/release()。
如何使用信号量
进入临界区前执行 acquire(),退出后执行 release():
static int count;
// 初始化信号量
static final Semaphore s
    = new Semaphore(1);
// 用信号量保证互斥
static void addOne() {
  s.acquire();
  try {
    count+=1;
  } finally {
    s.release();
  }
}
快速实现一个限流器
Semaphore 可以允许多个线程访问一个临界区。
class ObjPool<T, R> {
  final List<T> pool;
  // 用信号量实现限流器
  final Semaphore sem;
  // 构造函数
  ObjPool(int size, T t){
    pool = new Vector<T>(){};
    for(int i=0; i<size; i++){
      pool.add(t);
    }
    sem = new Semaphore(size);
  }
  // 利用对象池的对象,调用 func
  R exec(Function<T,R> func) {
    T t = null;
    sem.acquire();
    try {
      t = pool.remove(0);
      return func.apply(t);
    } finally {
      pool.add(t);
      sem.release();
    }
  }
}
// 创建对象池
ObjPool<Long, String> pool =
  new ObjPool<Long, String>(10, 2);
// 通过对象池获取 t,之后执行
pool.exec(t -> {
    System.out.println(t);
    return t.toString();
});
ReadWriteLock:如何快速实现一个完备的缓存?
读写锁允许多个线程同时读共享变量,写操作互斥。读多写少场景下性能优于互斥锁。
快速实现一个缓存
class Cache<K,V> {
  final Map<K, V> m =
    new HashMap<>();
  final ReadWriteLock rwl =
    new ReentrantReadWriteLock();
  // 读锁
  final Lock r = rwl.readLock();
  // 写锁
  final Lock w = rwl.writeLock();
  // 读缓存
  V get(K key) {
    r.lock();
    try { return m.get(key); }
    finally { r.unlock(); }
  }
  // 写缓存
  V put(K key, V value) {
    w.lock();
    try { return m.put(key, v); }
    finally { w.unlock(); }
  }
}
实现缓存的按需加载
读锁读缓存,未命中时升级为写锁查询数据库(双重检查):
class Cache<K,V> {
  final Map<K, V> m =
    new HashMap<>();
  final ReadWriteLock rwl =
    new ReentrantReadWriteLock();
  final Lock r = rwl.readLock();
  final Lock w = rwl.writeLock();

  V get(K key) {
    V v = null;
    //读缓存
    r.lock();         ①
    try {
      v = m.get(key); ②
    } finally{
      r.unlock();     ③
    }
    //缓存中存在,返回
    if(v != null) {   ④
      return v;
    }
    //缓存中不存在,查询数据库
    w.lock();         ⑤
    try {
      //再次验证
      //其他线程可能已经查询过数据库
      v = m.get(key); ⑥
      if(v == null){  ⑦
        //查询数据库
        v=省略代码无数
        m.put(key, v);
      }
    } finally{
      w.unlock();
    }
    return v;
  }
}
读写锁的升级与降级
锁升级(读锁→写锁):ReadWriteLock 不支持。
锁降级(写锁→读锁):支持。释放写锁前获取读锁,再释放写锁:
class CachedData {
  Object data;
  volatile boolean cacheValid;
  final ReadWriteLock rwl =
    new ReentrantReadWriteLock();
  // 读锁
  final Lock r = rwl.readLock();
  //写锁
  final Lock w = rwl.writeLock();

  void processCachedData() {
    // 获取读锁
    r.lock();
    if (!cacheValid) {
      // 释放读锁,因为不允许读锁的升级
      r.unlock();
      // 获取写锁
      w.lock();
      try {
        // 再次检查状态
        if (!cacheValid) {
          data = ...
          cacheValid = true;
        }
        // 释放写锁前,降级为读锁
        // 降级是可以的
        r.lock(); ①
      } finally {
        // 释放写锁
        w.unlock();
      }
    }
    // 此处仍然持有读锁
    try {use(data);}
    finally {r.unlock();}
  }
}
StampedLock:有没有比读写锁更快的锁?
StampedLock 支持的三种锁模式
StampedLock 支持三种模式:
- 写锁:与 ReadWriteLock 写锁语义相同,加锁返回 stamp,解锁传入 stamp
- 悲观读锁:允许多线程同时获取,与写锁互斥
- 乐观读:无锁,性能最高,允许写操作并发执行,读后需
validate(stamp)验证
final StampedLock sl =
  new StampedLock();

// 获取/释放悲观读锁示意代码
long stamp = sl.readLock();
try {
  //省略业务相关代码
} finally {
  sl.unlockRead(stamp);
}

// 获取/释放写锁示意代码
long stamp = sl.writeLock();
try {
  //省略业务相关代码
} finally {
  sl.unlockWrite(stamp);
}
StampedLock 性能优于 ReadWriteLock 的关键:乐观读允许写操作并发执行,而 ReadWriteLock 的多线程读会阻塞所有写操作。
乐观读示例:先 tryOptimisticRead() 获取 stamp,读入局部变量,再 validate(stamp) 验证期间是否有写操作,若有则升级为悲观读锁:
class Point {
  private int x, y;
  final StampedLock sl =
    new StampedLock();
  //计算到原点的距离
  int distanceFromOrigin() {
    // 乐观读
    long stamp =
      sl.tryOptimisticRead();
    // 读入局部变量,
    // 读的过程数据可能被修改
    int curX = x, curY = y;
    //判断执行读操作期间,
    //是否存在写操作,如果存在,
    //则 sl.validate 返回 false
    if (!sl.validate(stamp)){
      // 升级为悲观读锁
      stamp = sl.readLock();
      try {
        curX = x;
        curY = y;
      } finally {
        //释放悲观读锁
        sl.unlockRead(stamp);
      }
    }
    return Math.sqrt(
      curX * curX + curY * curY);
  }
}
进一步理解乐观读
StampedLock 的乐观读与数据库的乐观锁异曲同工。
StampedLock 使用注意事项
- 不可重入:
StampedLock不支持重入 - 不支持条件变量:悲观读锁、写锁均不支持
- 中断问题:线程阻塞在
readLock()/writeLock()上时调用interrupt()会导致 CPU 飙升。如需中断支持,使用readLockInterruptibly()/writeLockInterruptibly()
final StampedLock lock
  = new StampedLock();
Thread T1 = new Thread(()->{
  // 获取写锁
  lock.writeLock();
  // 永远阻塞在此处,不释放写锁
  LockSupport.park();
});
T1.start();
// 保证 T1 获取写锁
Thread.sleep(100);
Thread T2 = new Thread(()->
  //阻塞在悲观读锁
  lock.readLock()
);
T2.start();
// 保证 T2 阻塞在读锁
Thread.sleep(100);
//中断线程 T2
//会导致线程 T2 所在 CPU 飙升
T2.interrupt();
T2.join();所以,使用 StampedLock 一定不要调用中断操作。
StampedLock 使用模板
final StampedLock sl =
  new StampedLock();

// 乐观读
long stamp =
  sl.tryOptimisticRead();
// 读入方法局部变量
......
// 校验 stamp
if (!sl.validate(stamp)){
  // 升级为悲观读锁
  stamp = sl.readLock();
  try {
    // 读入方法局部变量
    .....
  } finally {
    //释放悲观读锁
    sl.unlockRead(stamp);
  }
}
//使用方法局部变量执行业务操作
......
StampedLock 写模板:
long stamp = sl.writeLock();
try {
  // 写共享变量
  ......
} finally {
  sl.unlockWrite(stamp);
}
CountDownLatch 和 CyclicBarrier:如何让多线程步调一致?
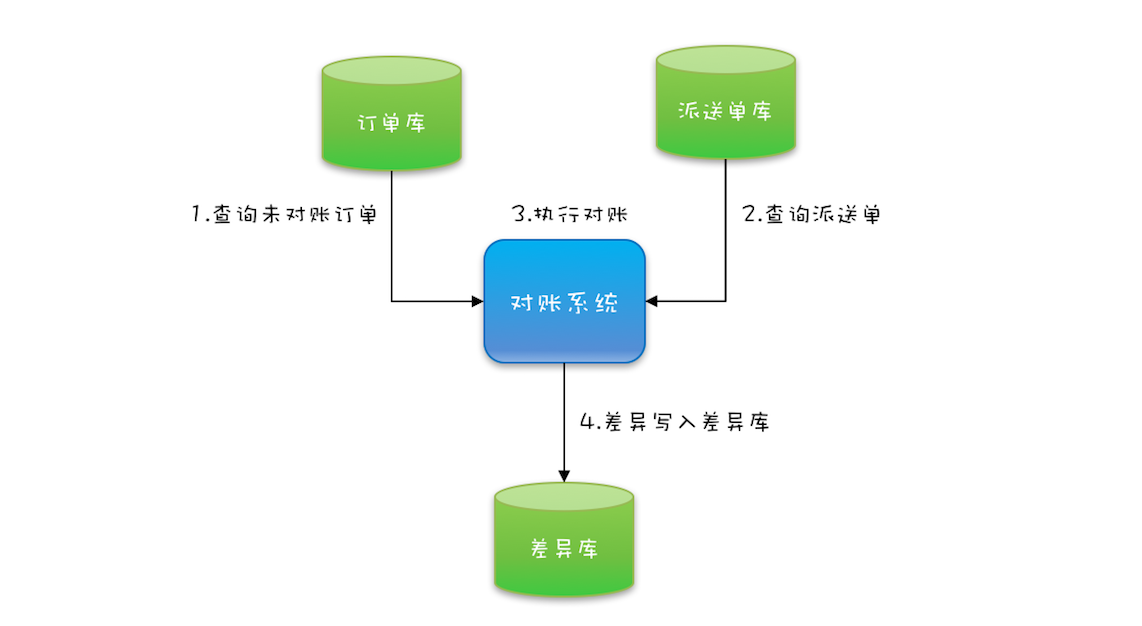
对账系统优化示例:
while(存在未对账订单){
  // 查询未对账订单
  pos = getPOrders();
  // 查询派送单
  dos = getDOrders();
  // 执行对账操作
  diff = check(pos, dos);
  // 差异写入差异库
  save(diff);
}
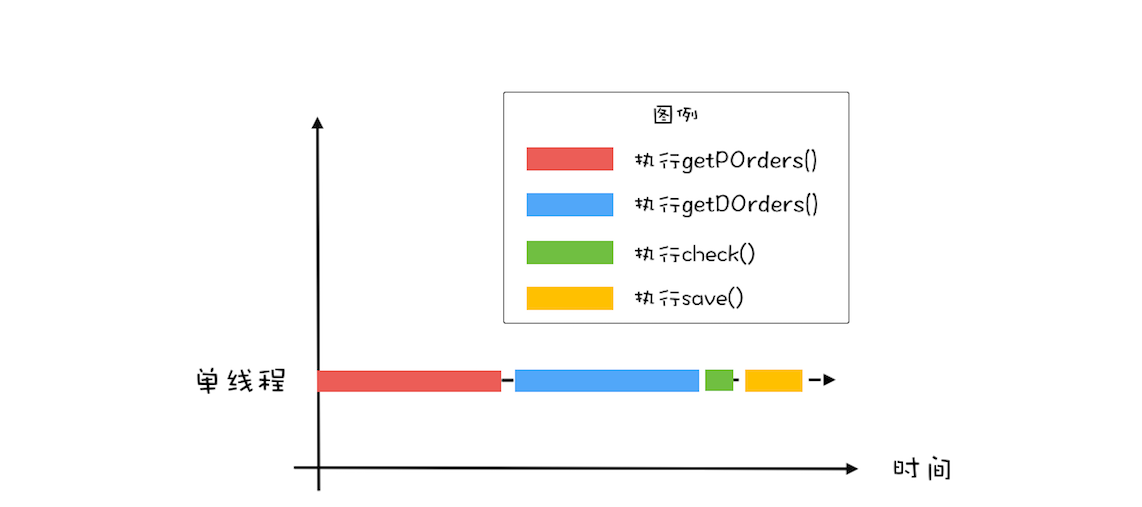
利用并行优化对账系统
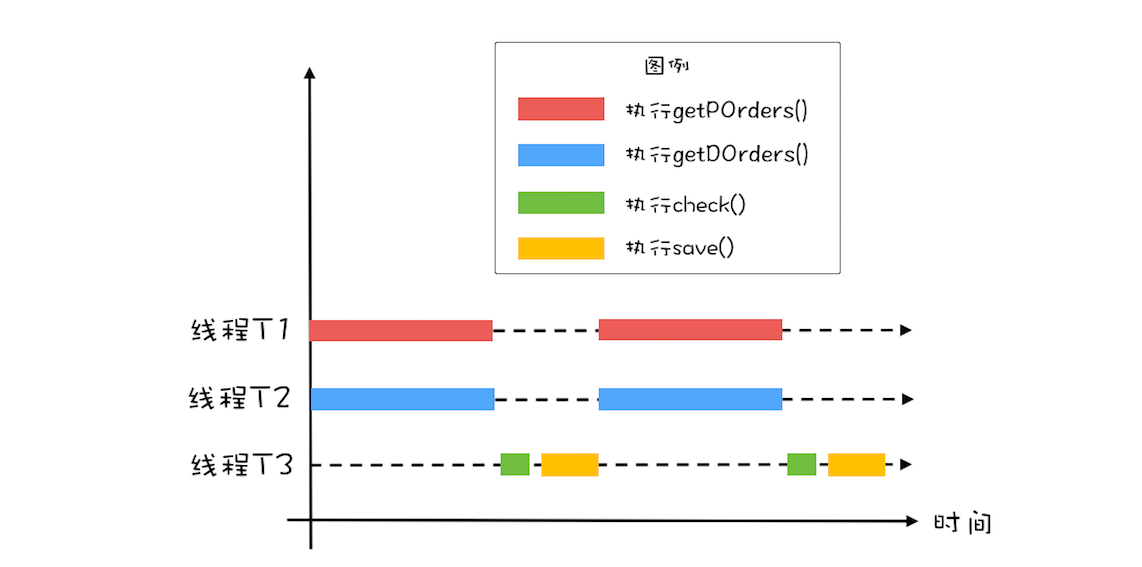
并行查询订单和派送单,再串行对账:
用 CountDownLatch 实现线程等待
// 创建 2 个线程的线程池
Executor executor =
  Executors.newFixedThreadPool(2);
while(存在未对账订单){
  // 计数器初始化为 2
  CountDownLatch latch =
    new CountDownLatch(2);
  // 查询未对账订单
  executor.execute(()-> {
    pos = getPOrders();
    latch.countDown();
  });
  // 查询派送单
  executor.execute(()-> {
    dos = getDOrders();
    latch.countDown();
  });

  // 等待两个查询操作结束
  latch.await();

  // 执行对账操作
  diff = check(pos, dos);
  // 差异写入差异库
  save(diff);
}
进一步优化性能
双线程并行查询 + 单线程对账,流水线式处理:
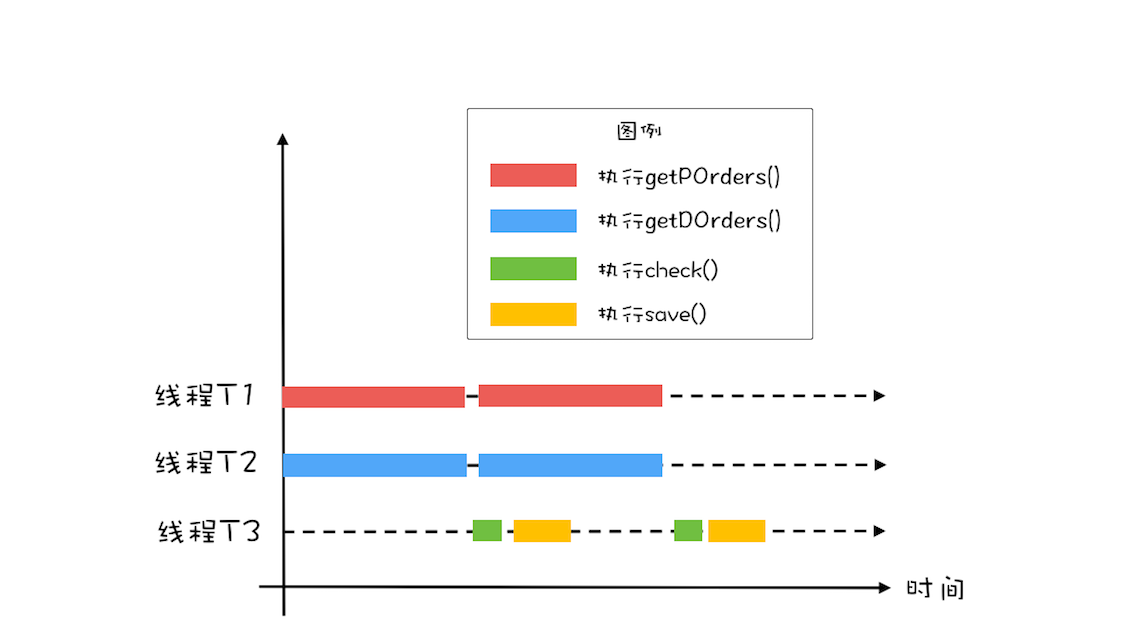
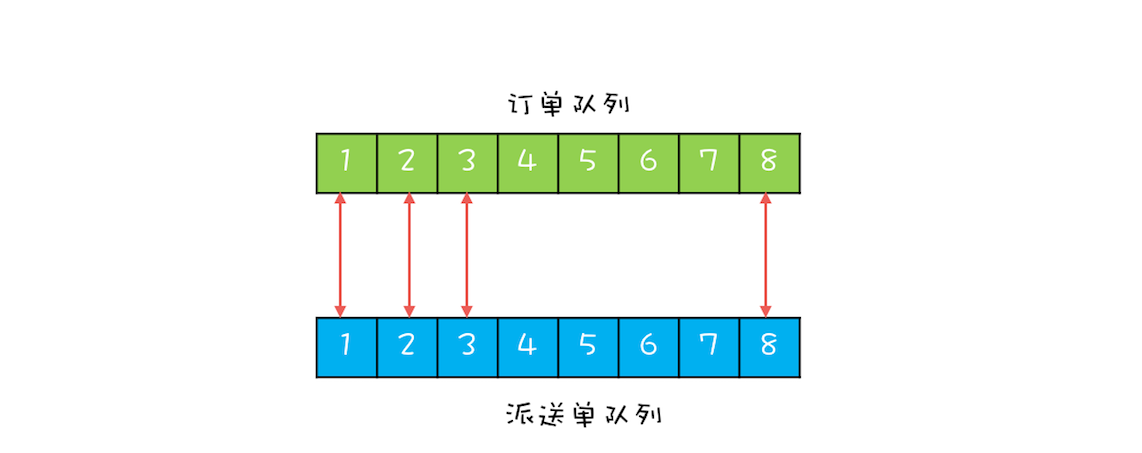
用 CyclicBarrier 实现线程同步
CyclicBarrier 计数器自动重置,减到 0 时自动重置初始值,并支持回调函数:
// 订单队列
Vector<P> pos;
// 派送单队列
Vector<D> dos;
// 执行回调的线程池
Executor executor =
  Executors.newFixedThreadPool(1);
final CyclicBarrier barrier =
  new CyclicBarrier(2, ()->{
    executor.execute(()->check());
  });

void check(){
  P p = pos.remove(0);
  D d = dos.remove(0);
  // 执行对账操作
  diff = check(p, d);
  // 差异写入差异库
  save(diff);
}

void checkAll(){
  // 循环查询订单库
  Thread T1 = new Thread(()->{
    while(存在未对账订单){
      // 查询订单库
      pos.add(getPOrders());
      // 等待
      barrier.await();
    }
  });
  T1.start();
  // 循环查询运单库
  Thread T2 = new Thread(()->{
    while(存在未对账订单){
      // 查询运单库
      dos.add(getDOrders());
      // 等待
      barrier.await();
    }
  });
  T2.start();
}
CountDownLatch 与 CyclicBarrier 对比
| 特性 | CountDownLatch | CyclicBarrier |
|---|---|---|
| 场景 | 一个线程等待多个线程 | 一组线程互相等待 |
| 计数器 | 不可循环,减到 0 后 await() 直接通过 | 可循环,减到 0 自动重置 |
| 回调 | 无 | 支持回调函数 |
并发容器:都有哪些“坑”需要我们填?
同步容器及其注意事项
- 组合操作需注意竞态条件:即便每个操作保证原子性,组合操作也不能保证
- 迭代器遍历是容易被忽视的坑:遍历中操作不能保证原子性,需加锁互斥
- 同步容器:基于
synchronized实现,如Vector、Stack、Hashtable
并发容器及其注意事项
Java 1.5 前的同步容器性能差(所有方法用 synchronized,串行度太高)。1.5 后提供并发容器:
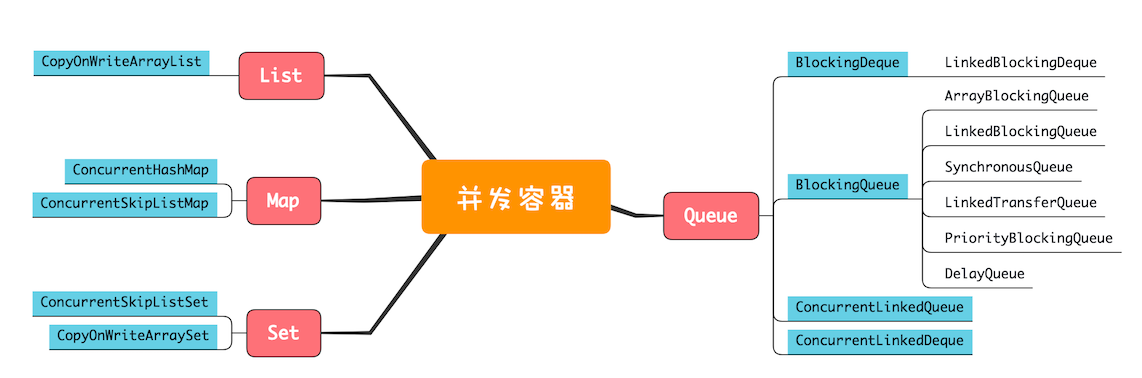
List
CopyOnWriteArrayList:写时复制,读操作无锁。
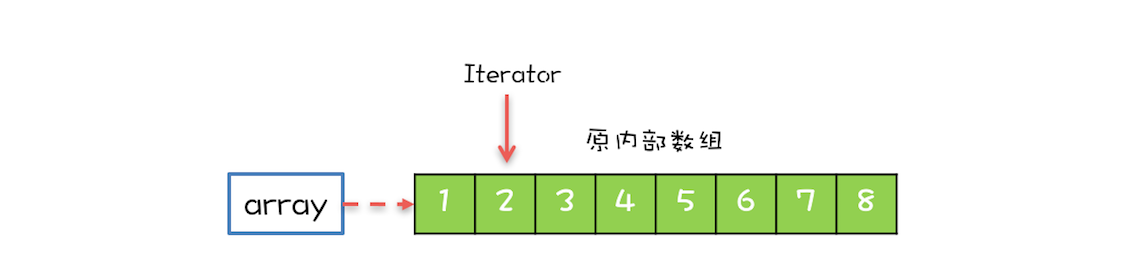
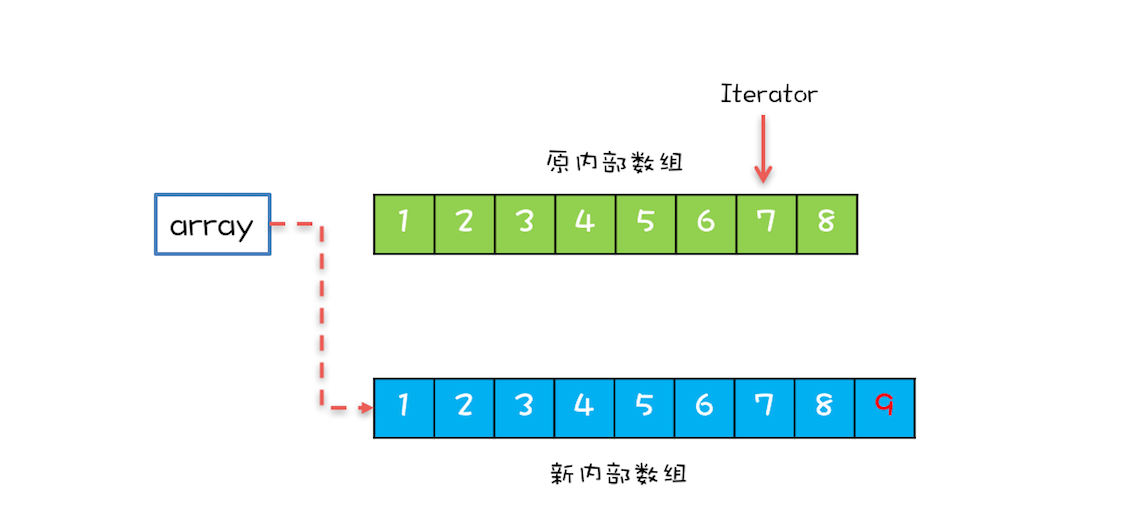
- 内部维护数组
array,迭代器遍历array - 写操作时复制数组,在新数组上执行,写完后
array指向新数组,读写可并行 - 注意:仅适用于写少场景,容忍读写短暂不一致;迭代器只读,不支持增删改
Map
| 实现 | Key 有序性 | 时间复杂度 |
|---|---|---|
ConcurrentHashMap | 无序 | O(1) |
ConcurrentSkipListMap | 有序(跳表) | O(log n) |
注意:两者的 key 和 value 不能为 null,否则抛 NullPointerException。

Set
CopyOnWriteArraySet:参考CopyOnWriteArrayListConcurrentSkipListSet:参考ConcurrentSkipListMap
Queue
Java 并发包中 Queue 按两个维度分类:
- 阻塞 vs 非阻塞:阻塞队列满时入队阻塞,空时出队阻塞
- 单端 vs 双端:单端队尾入/队首出;双端首尾均可入出
命名规则:阻塞队列用 Blocking 标识,单端用 Queue,双端用 Deque。
原子类:无锁工具类的典范
无锁方案 vs 互斥锁方案:性能更优(无加锁/解锁开销,无线程切换开销),同时保证互斥性。
无锁方案的实现原理
CAS(Compare And Swap)指令:包含 3 个参数(内存地址 A、比较值 B、新值 C),仅当内存值等于 B 时才更新为 C。CAS 作为 CPU 指令本身保证原子性。
- CAS 通常伴随自旋(循环尝试)
- CAS 存在 ABA 问题
看 Java 如何实现原子化的 count += 1
AtomicLong 的 getAndIncrement() 方法会转调 unsafe.getAndAddLong() 方法。这里 this 和 valueOffset 两个参数可以唯一确定共享变量的内存地址。
final long getAndIncrement() {
  return unsafe.getAndAddLong(
    this, valueOffset, 1L);
}
unsafe.getAndAddLong() 方法的源码如下:
public final long getAndAddLong(Object o, long offset, long delta){
  long v;
  do {
    // 读取内存中的值
    v = getLongVolatile(o, offset);
  } while (!compareAndSwapLong(o, offset, v, v + delta));
  return v;
}
//原子性地将变量更新为 x
//条件是内存中的值等于 expected
//更新成功则返回 true
native boolean compareAndSwapLong(
  Object o, long offset,
  long expected,
  long x);
原子类概览
Java 并发包提供的原子类分为五类:
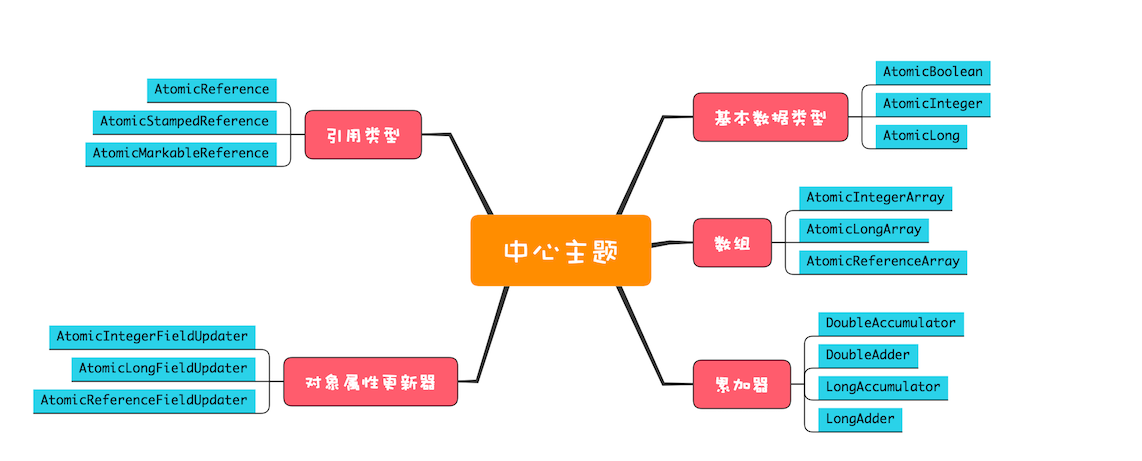
1. 原子化的基本数据类型
AtomicBoolean、AtomicInteger、AtomicLong:
getAndIncrement() //原子化 i++
getAndDecrement() //原子化的 i--
incrementAndGet() //原子化的++i
decrementAndGet() //原子化的--i
//当前值+=delta,返回+=前的值
getAndAdd(delta)
//当前值+=delta,返回+=后的值
addAndGet(delta)
//CAS 操作,返回是否成功
compareAndSet(expect, update)
//以下四个方法
//新值可以通过传入 func 函数来计算
getAndUpdate(func)
updateAndGet(func)
getAndAccumulate(x,func)
accumulateAndGet(x,func)
2. 原子化的对象引用类型
AtomicReference:方法同原子化基本数据类型AtomicStampedReference:增加版本号(int),解决 ABA 问题AtomicMarkableReference:版本号简化为 Boolean,解决 ABA 问题
boolean compareAndSet(
  V expectedReference,
  V newReference,
  int expectedStamp,
  int newStamp)
AtomicMarkableReference 的实现机制则更简单,将版本号简化成了一个 Boolean 值,方法签名如下:
boolean compareAndSet(
  V expectedReference,
  V newReference,
  boolean expectedMark,
  boolean newMark)
3. 原子化数组
AtomicIntegerArray、AtomicLongArray、AtomicReferenceArray:原子化更新数组元素,方法同基本类型,多一个索引参数。
4. 原子化对象属性更新器
AtomicIntegerFieldUpdater、AtomicLongFieldUpdater、AtomicReferenceFieldUpdater:通过反射原子化更新对象属性。
- 对象属性必须是
volatile类型 - 原子操作方法比基本类型多一个对象引用参数
boolean compareAndSet(
  T obj,
  int expect,
  int update)
5. 原子化的累加器
DoubleAccumulator、DoubleAdder、LongAccumulator、LongAdder:仅支持累加操作,速度更快,不支持 compareAndSet()。
原子类总结
- 无锁方案性能优,基本不会死锁(但可能饥饿/活锁)
- 原子类针对单个共享变量,多变量原子性问题建议用互斥锁
Executor 与线程池:如何创建正确的线程池?
线程是重量级对象,应避免频繁创建和销毁。
线程池是一种生产者-消费者模式
线程池采用生产者-消费者模式:使用方是生产者,线程池是消费者。
如何使用 Java 中的线程池
ThreadPoolExecutor 的构造函数:
ThreadPoolExecutor(
  int corePoolSize,
  int maximumPoolSize,
  long keepAliveTime,
  TimeUnit unit,
  BlockingQueue<Runnable> workQueue,
  ThreadFactory threadFactory,
  RejectedExecutionHandler handler)
参数说明:
- corePoolSize:最小线程数
- maximumPoolSize:最大线程数
- keepAliveTime & unit:空闲线程存活时间,超时且线程数 > corePoolSize 时回收
- workQueue:工作队列
- threadFactory:自定义线程创建方式(如指定线程名)
- handler:拒绝策略
CallerRunsPolicy:提交任务的线程自己执行AbortPolicy:默认,抛RejectedExecutionExceptionDiscardPolicy:直接丢弃DiscardOldestPolicy:丢弃最老任务,新任务入队
Java 在 1.6 版本还增加了 allowCoreThreadTimeOut(boolean value) 方法,它可以让所有线程都支持超时,这意味着如果项目很闲,就会将项目组的成员都撤走。
使用线程池要注意些什么
- 强烈建议使用有界队列:
Executors默认使用无界LinkedBlockingQueue,高负载下易导致 OOM - 拒绝策略要慎重:有界队列触发拒绝策略时默认抛异常,建议自定义拒绝策略并配合降级策略
- 异常处理:
execute()提交任务异常时无通知,建议在任务内捕获所有异常
try {
  //业务逻辑
} catch (RuntimeException x) {
  //按需处理
} catch (Throwable x) {
  //按需处理
}
Future:如何用多线程实现最优的“烧水泡茶”程序?
如何获取任务执行结果
通过 3 个 submit() 方法和 FutureTask 获取任务结果:
// 提交 Runnable 任务
Future<?>
  submit(Runnable task);
// 提交 Callable 任务
<T> Future<T>
  submit(Callable<T> task);
// 提交 Runnable 任务及结果引用
<T> Future<T>
  submit(Runnable task, T result);
Future 接口 5 个方法:cancel()、isCancelled()、isDone()、get()、get(timeout, unit)(支持超时)。
FutureTask 同时实现 Runnable 和 Future,可作为任务提交给线程池或直接被 Thread 执行:
// 取消任务
boolean cancel(
  boolean mayInterruptIfRunning);
// 判断任务是否已取消
boolean isCancelled();
// 判断任务是否已结束
boolean isDone();
// 获得任务执行结果
get();
// 获得任务执行结果,支持超时
get(long timeout, TimeUnit unit);
FutureTask 实现了 Runnable 和 Future 接口,由于实现了 Runnable 接口,所以可以将 FutureTask 对象作为任务提交给 ThreadPoolExecutor 去执行,也可以直接被 Thread 执行;又因为实现了 Future 接口,所以也能用来获得任务的执行结果。
// 创建 FutureTask
FutureTask<Integer> futureTask
  = new FutureTask<>(()-> 1+2);
// 创建线程池
ExecutorService es =
  Executors.newCachedThreadPool();
// 提交 FutureTask
es.submit(futureTask);
// 获取计算结果
Integer result = futureTask.get();
FutureTask 对象直接被 Thread 执行的示例代码如下所示。
// 创建 FutureTask
FutureTask<Integer> futureTask
  = new FutureTask<>(()-> 1+2);
// 创建并启动线程
Thread T1 = new Thread(futureTask);
T1.start();
// 获取计算结果
Integer result = futureTask.get();
实现最优的“烧水泡茶”程序
两个 FutureTask:ft1(洗水壶→烧开水→泡茶)和 ft2(洗茶壶→洗茶杯→拿茶叶),ft1 泡茶前调用 ft2.get() 等待茶叶:

// 创建任务 T2 的 FutureTask
FutureTask<String> ft2
  = new FutureTask<>(new T2Task());
// 创建任务 T1 的 FutureTask
FutureTask<String> ft1
  = new FutureTask<>(new T1Task(ft2));
// 线程 T1 执行任务 ft1
Thread T1 = new Thread(ft1);
T1.start();
// 线程 T2 执行任务 ft2
Thread T2 = new Thread(ft2);
T2.start();
// 等待线程 T1 执行结果
System.out.println(ft1.get());

// T1Task 需要执行的任务:
// 洗水壶、烧开水、泡茶
class T1Task implements Callable<String>{
  FutureTask<String> ft2;
  // T1 任务需要 T2 任务的 FutureTask
  T1Task(FutureTask<String> ft2){
    this.ft2 = ft2;
  }
  @Override
  String call() throws Exception {
    System.out.println("T1: 洗水壶。..");
    TimeUnit.SECONDS.sleep(1);

    System.out.println("T1: 烧开水。..");
    TimeUnit.SECONDS.sleep(15);
    // 获取 T2 线程的茶叶
    String tf = ft2.get();
    System.out.println("T1: 拿到茶叶:"+tf);

    System.out.println("T1: 泡茶。..");
    return "上茶:" + tf;
  }
}
// T2Task 需要执行的任务:
// 洗茶壶、洗茶杯、拿茶叶
class T2Task implements Callable<String> {
  @Override
  String call() throws Exception {
    System.out.println("T2: 洗茶壶。..");
    TimeUnit.SECONDS.sleep(1);

    System.out.println("T2: 洗茶杯。..");
    TimeUnit.SECONDS.sleep(2);

    System.out.println("T2: 拿茶叶。..");
    TimeUnit.SECONDS.sleep(1);
    return "龙井";
  }
}
// 一次执行结果:
T1: 洗水壶。..
T2: 洗茶壶。..
T1: 烧开水。..
T2: 洗茶杯。..
T2: 拿茶叶。..
T1: 拿到茶叶:龙井
T1: 泡茶。..
上茶:龙井
CompletableFuture:异步编程没那么难
异步化是利用多线程优化性能的基础。
CompletableFuture 的核心优势
// 任务 1:洗水壶 -> 烧开水
CompletableFuture<Void> f1 =
  CompletableFuture.runAsync(()->{
  System.out.println("T1: 洗水壶。..");
  sleep(1, TimeUnit.SECONDS);

  System.out.println("T1: 烧开水。..");
  sleep(15, TimeUnit.SECONDS);
});
// 任务 2:洗茶壶 -> 洗茶杯 -> 拿茶叶
CompletableFuture<String> f2 =
  CompletableFuture.supplyAsync(()->{
  System.out.println("T2: 洗茶壶。..");
  sleep(1, TimeUnit.SECONDS);

  System.out.println("T2: 洗茶杯。..");
  sleep(2, TimeUnit.SECONDS);

  System.out.println("T2: 拿茶叶。..");
  sleep(1, TimeUnit.SECONDS);
  return " 龙井 ";
});
// 任务 3:任务 1 和任务 2 完成后执行:泡茶
CompletableFuture<String> f3 =
  f1.thenCombine(f2, (__, tf)->{
    System.out.println("T1: 拿到茶叶:" + tf);
    System.out.println("T1: 泡茶。..");
    return " 上茶:" + tf;
  });
// 等待任务 3 执行结果
System.out.println(f3.join());

void sleep(int t, TimeUnit u) {
  try {
    u.sleep(t);
  }catch(InterruptedException e){}
}
// 一次执行结果:
T1: 洗水壶。..
T2: 洗茶壶。..
T1: 烧开水。..
T2: 洗茶杯。..
T2: 拿茶叶。..
T1: 拿到茶叶:龙井
T1: 泡茶。..
上茶:龙井
创建 CompletableFuture 对象
默认使用公共 ForkJoinPool(线程数 = CPU 核数)。建议根据不同业务类型创建不同线程池,避免慢 I/O 任务阻塞整个线程池。
//使用默认线程池
static CompletableFuture<Void>
  runAsync(Runnable runnable)
static <U> CompletableFuture<U>
  supplyAsync(Supplier<U> supplier)
//可以指定线程池
static CompletableFuture<Void>
  runAsync(Runnable runnable, Executor executor)
static <U> CompletableFuture<U>
  supplyAsync(Supplier<U> supplier, Executor executor)
创建完 CompletableFuture 对象之后,会自动地异步执行 runnable.run() 方法或者 supplier.get() 方法。
CompletionStage 接口
描述任务间的时序关系。
1. 串行关系
thenApply(fn):接收参数 + 返回值,返回CompletionStage<R>thenAccept(consumer):接收参数 + 无返回值,返回CompletionStage<Void>thenRun(action):无参数 + 无返回值,返回CompletionStage<Void>thenCompose(fn):创建子流程,结果同thenApply
Async 后缀表示异步执行 fn/consumer/action。
CompletionStage<R> thenApply(fn);
CompletionStage<R> thenApplyAsync(fn);
CompletionStage<Void> thenAccept(consumer);
CompletionStage<Void> thenAcceptAsync(consumer);
CompletionStage<Void> thenRun(action);
CompletionStage<Void> thenRunAsync(action);
CompletionStage<R> thenCompose(fn);
CompletionStage<R> thenComposeAsync(fn);
2. AND 汇聚关系
thenCombine、thenAcceptBoth、runAfterBoth 系列:
CompletionStage<R> thenCombine(other, fn);
CompletionStage<R> thenCombineAsync(other, fn);
CompletionStage<Void> thenAcceptBoth(other, consumer);
CompletionStage<Void> thenAcceptBothAsync(other, consumer);
CompletionStage<Void> runAfterBoth(other, action);
CompletionStage<Void> runAfterBothAsync(other, action);
3. OR 汇聚关系
applyToEither、acceptEither、runAfterEither 系列:
CompletionStage applyToEither(other, fn);
CompletionStage applyToEitherAsync(other, fn);
CompletionStage acceptEither(other, consumer);
CompletionStage acceptEitherAsync(other, consumer);
CompletionStage runAfterEither(other, action);
CompletionStage runAfterEitherAsync(other, action);
CompletionService:如何批量执行异步任务?
Future 的问题:按提交顺序获取结果,慢任务会阻塞后续结果的处理。
解决方案:阻塞队列收集结果,先完成的先处理。CompletionService 封装了这一模式。
// 创建线程池
ExecutorService executor =
  Executors.newFixedThreadPool(3);
// 异步向电商 S1 询价
Future<Integer> f1 =
  executor.submit(
    ()->getPriceByS1());
// 异步向电商 S2 询价
Future<Integer> f2 =
  executor.submit(
    ()->getPriceByS2());
// 异步向电商 S3 询价
Future<Integer> f3 =
  executor.submit(
    ()->getPriceByS3());

// 获取电商 S1 报价并保存
r=f1.get();
executor.execute(()->save(r));

// 获取电商 S2 报价并保存
r=f2.get();
executor.execute(()->save(r));

// 获取电商 S3 报价并保存
r=f3.get();
executor.execute(()->save(r));
如果获取电商 S1 报价的耗时很长,那么即便获取电商 S2 报价的耗时很短,也无法让保存 S2 报价的操作先执行,因为这个主线程都阻塞在了 f1.get() 操作上。这点小瑕疵你该如何解决呢?
估计你已经想到了,增加一个阻塞队列,获取到 S1、S2、S3 的报价都进入阻塞队列,然后在主线程中消费阻塞队列,这样就能保证先获取到的报价先保存到数据库了。下面的示例代码展示了如何利用阻塞队列实现先获取到的报价先保存到数据库。
// 创建阻塞队列
BlockingQueue<Integer> bq =
  new LinkedBlockingQueue<>();
//电商 S1 报价异步进入阻塞队列
executor.execute(()->
  bq.put(f1.get()));
//电商 S2 报价异步进入阻塞队列
executor.execute(()->
  bq.put(f2.get()));
//电商 S3 报价异步进入阻塞队列
executor.execute(()->
  bq.put(f3.get()));
//异步保存所有报价
for (int i=0; i<3; i++) {
  Integer r = bq.take();
  executor.execute(()->save(r));
}
利用 CompletionService 实现询价系统
创建方式:ExecutorCompletionService(Executor executor) 或指定自定义 BlockingQueue。
示例:
// 创建线程池
ExecutorService executor =
  Executors.newFixedThreadPool(3);
// 创建 CompletionService
CompletionService<Integer> cs = new
  ExecutorCompletionService<>(executor);
// 异步向电商 S1 询价
cs.submit(()->getPriceByS1());
// 异步向电商 S2 询价
cs.submit(()->getPriceByS2());
// 异步向电商 S3 询价
cs.submit(()->getPriceByS3());
// 将询价结果异步保存到数据库
for (int i=0; i<3; i++) {
  Integer r = cs.take().get();
  executor.execute(()->save(r));
}
CompletionService 接口说明
CompletionService 接口提供的方法有 5 个,这 5 个方法的方法签名如下所示。
Future<V> submit(Callable<V> task);
Future<V> submit(Runnable task, V result);
Future<V> take()
  throws InterruptedException;
Future<V> poll();
Future<V> poll(long timeout, TimeUnit unit)
  throws InterruptedException;
利用 CompletionService 实现 Dubbo 中的 Forking Cluster
Forking 集群模式:并行调用多个查询服务,只要有一个成功返回即可。
geocoder(addr) {
  //并行执行以下 3 个查询服务,
  r1=geocoderByS1(addr);
  r2=geocoderByS2(addr);
  r3=geocoderByS3(addr);
  //只要 r1,r2,r3 有一个返回
  //则返回
  return r1|r2|r3;
}
利用 CompletionService 实现:并行提交任务,取最快返回结果,取消其他任务:
// 创建线程池
ExecutorService executor =
  Executors.newFixedThreadPool(3);
// 创建 CompletionService
CompletionService<Integer> cs =
  new ExecutorCompletionService<>(executor);
// 用于保存 Future 对象
List<Future<Integer>> futures =
  new ArrayList<>(3);
//提交异步任务,并保存 future 到 futures
futures.add(
  cs.submit(()->geocoderByS1()));
futures.add(
  cs.submit(()->geocoderByS2()));
futures.add(
  cs.submit(()->geocoderByS3()));
// 获取最快返回的任务执行结果
Integer r = 0;
try {
  // 只要有一个成功返回,则 break
  for (int i = 0; i < 3; ++i) {
    r = cs.take().get();
    //简单地通过判空来检查是否成功返回
    if (r != null) {
      break;
    }
  }
} finally {
  //取消所有任务
  for(Future<Integer> f : futures)
    f.cancel(true);
}
// 返回结果
return r;
CompletionService 总结
- 融合
Executor+BlockingQueue,简化批量异步任务管理 - 结果有序化:先完成的先进队列,避免无谓等待
- 线程池隔离:多个
ExecutorCompletionService可用不同线程池,避免慢任务拖全应用
Fork_Join:单机版的 MapReduce
对于简单的并行任务,你可以通过“线程池 +Future”的方案来解决;如果任务之间有聚合关系,无论是 AND 聚合还是 OR 聚合,都可以通过 CompletableFuture 来解决;而批量的并行任务,则可以通过 CompletionService 来解决。
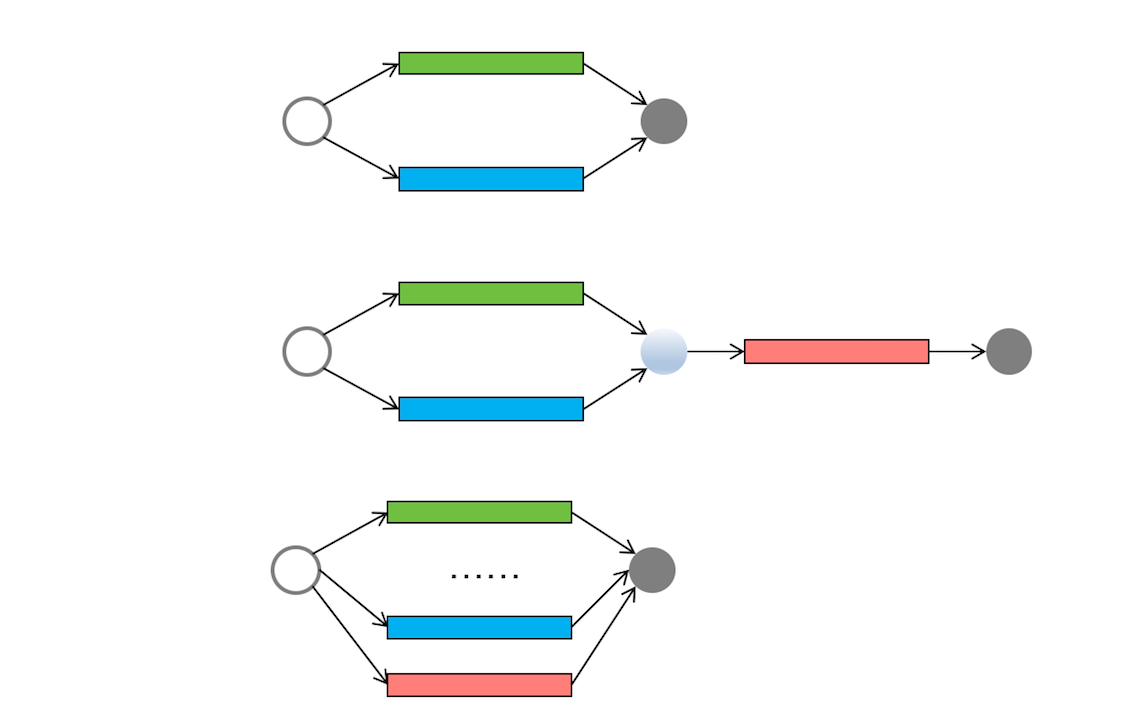
除了简单并行、聚合、批量并行这三种任务模型,还有一种“分治”的任务模型。
分治:把复杂问题分解成相似子问题,递归求解后合并结果。
分治任务模型
两个阶段:任务分解(迭代分解至可直接求解)+ 结果合并(逐层合并子任务结果)。
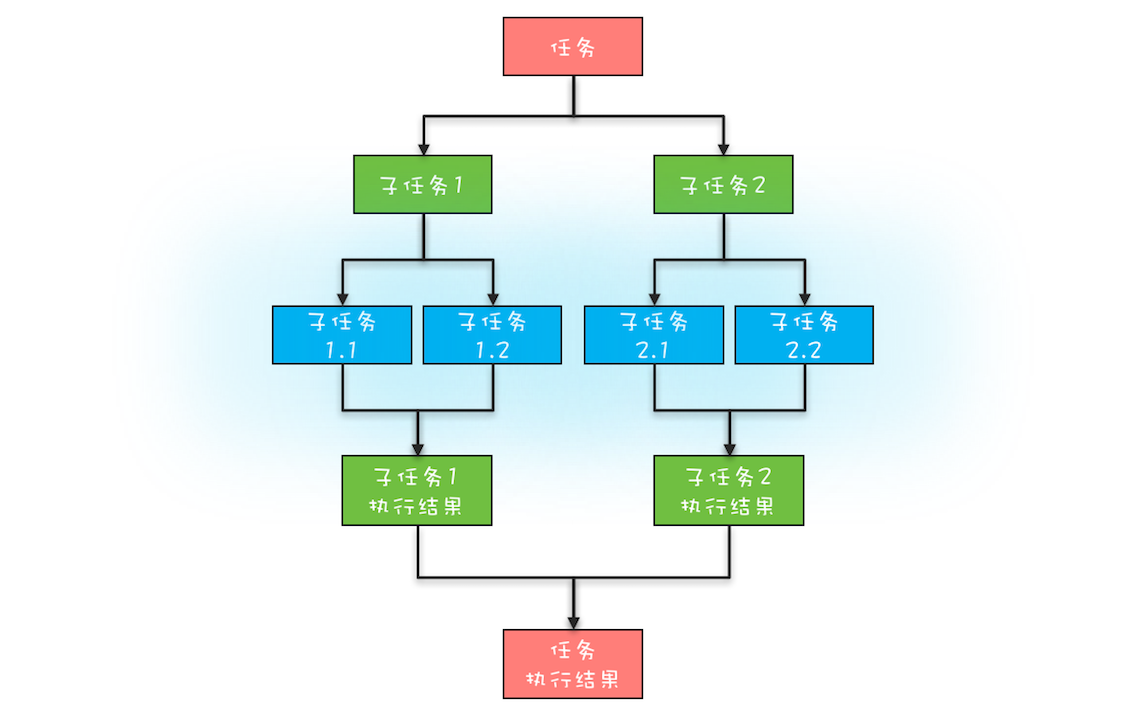
简版分治任务模型图
在这个分治任务模型里,任务和分解后的子任务具有相似性,这种相似性往往体现在任务和子任务的算法是相同的,但是计算的数据规模是不同的。具备这种相似性的问题,我们往往都采用递归算法。
Fork/Join 的使用
Fork/Join 框架支持分治任务模型:Fork = 任务分解,Join = 结果合并。
ForkJoinPool:分治任务的线程池ForkJoinTask:分治任务抽象类fork():异步执行子任务join():阻塞等待子任务结果- 子类:
RecursiveAction(无返回值)、RecursiveTask(有返回值),均通过compute()实现逻辑
接下来实现斐波那契数列(Java 官方示例):
static void main(String[] args){
  //创建分治任务线程池
  ForkJoinPool fjp =
    new ForkJoinPool(4);
  //创建分治任务
  Fibonacci fib =
    new Fibonacci(30);
  //启动分治任务
  Integer result =
    fjp.invoke(fib);
  //输出结果
  System.out.println(result);
}
//递归任务
static class Fibonacci extends
    RecursiveTask<Integer>{
  final int n;
  Fibonacci(int n){this.n = n;}
  protected Integer compute(){
    if (n <= 1)
      return n;
    Fibonacci f1 =
      new Fibonacci(n - 1);
    //创建子任务
    f1.fork();
    Fibonacci f2 =
      new Fibonacci(n - 2);
    //等待子任务结果,并合并结果
    return f2.compute() + f1.join();
  }
}
ForkJoinPool 工作原理
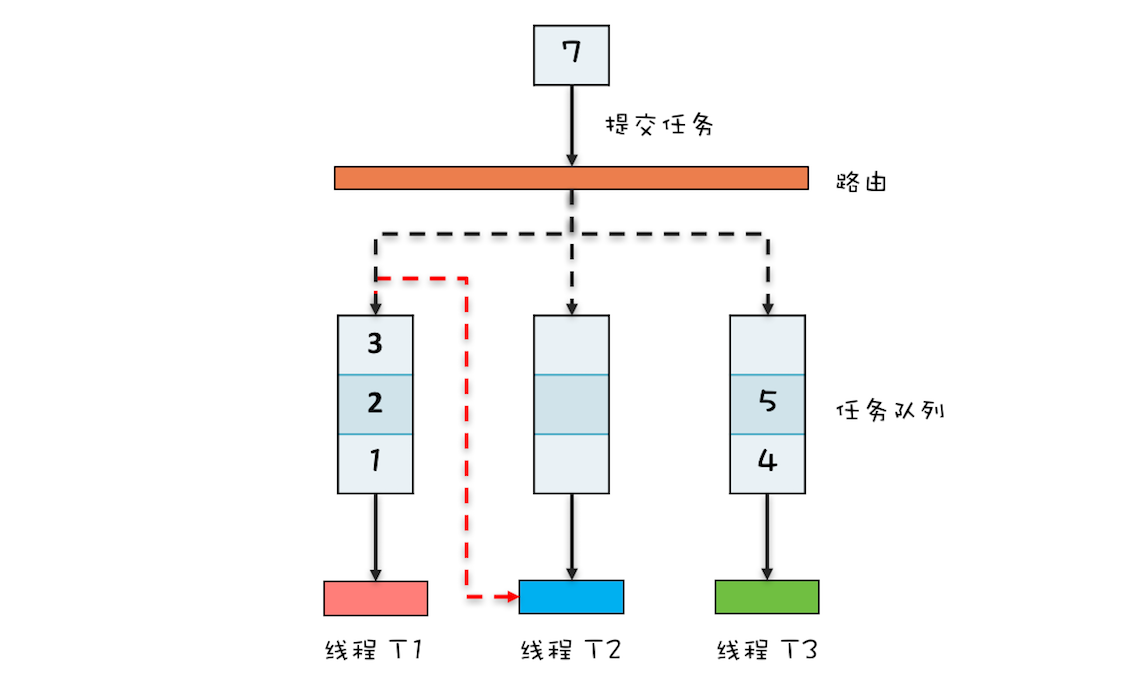
- 内部有多个任务队列(不同于 ThreadPoolExecutor 的单队列)
- 提交任务时按路由规则分配到某个队列,子任务提交到工作线程对应队列
- 任务窃取:空闲线程可“窃取”其他队列的任务,保证负载均衡
- 任务队列采用双端队列,工作线程和窃取线程从不同端消费,减少竞争
模拟 MapReduce 统计单词数量
二分法递归拆分文件,统计单词数后逐级汇总:
static void main(String[] args){
  String[] fc = {"hello world",
          "hello me",
          "hello fork",
          "hello join",
          "fork join in world"};
  //创建 ForkJoin 线程池
  ForkJoinPool fjp =
      new ForkJoinPool(3);
  //创建任务
  MR mr = new MR(
      fc, 0, fc.length);
  //启动任务
  Map<String, Long> result =
      fjp.invoke(mr);
  //输出结果
  result.forEach((k, v)->
    System.out.println(k+":"+v));
}
//MR 模拟类
static class MR extends
  RecursiveTask<Map<String, Long>> {
  private String[] fc;
  private int start, end;
  //构造函数
  MR(String[] fc, int fr, int to){
    this.fc = fc;
    this.start = fr;
    this.end = to;
  }
  @Override protected
  Map<String, Long> compute(){
    if (end - start == 1) {
      return calc(fc[start]);
    } else {
      int mid = (start+end)/2;
      MR mr1 = new MR(
          fc, start, mid);
      mr1.fork();
      MR mr2 = new MR(
          fc, mid, end);
      //计算子任务,并返回合并的结果
      return merge(mr2.compute(),
          mr1.join());
    }
  }
  //合并结果
  private Map<String, Long> merge(
      Map<String, Long> r1,
      Map<String, Long> r2) {
    Map<String, Long> result =
        new HashMap<>();
    result.putAll(r1);
    //合并结果
    r2.forEach((k, v) -> {
      Long c = result.get(k);
      if (c != null)
        result.put(k, c+v);
      else
        result.put(k, v);
    });
    return result;
  }
  //统计单词数量
  private Map<String, Long>
      calc(String line) {
    Map<String, Long> result =
        new HashMap<>();
    //分割单词
    String [] words =
        line.split("\\s+");
    //统计单词数量
    for (String w : words) {
      Long v = result.get(w);
      if (v != null)
        result.put(w, v+1);
      else
        result.put(w, 1L);
    }
    return result;
  }
}
ForkJoin 总结
- Fork/Join 是分治任务的并行计算框架,类似单机版 MapReduce
ForkJoinPool支持任务窃取,负载均衡好- Java 1.8 Stream API 的并行流基于
ForkJoinPool - 建议用不同 ForkJoinPool 执行不同类型计算任务(CPU 密集型 vs I/O 密集型)
如果你对 ForkJoinPool 详细的实现细节感兴趣,也可以参考 Doug Lea 的论文。
并发工具类模块热点问题答疑
略