Maven 教程之发布 jar 到私服或中央仓库
Maven 教程之发布 jar 到私服或中央仓库
发布 jar 包到中央仓库
为了避免重复造轮子,相信每个 Java 程序员都想打造自己的脚手架或工具包(自己定制的往往才是最适合自己的)。那么如何将自己的脚手架发布到中央仓库呢?下面我们将一步步来实现。
在 Sonatype 创建 Issue
(1)注册 Sonatype 账号
发布 Java 包到 Maven 中央仓库,首先需要在 Sonatype 网站创建一个工单(Issues)。
第一次使用这个网站的时候需要注册自己的帐号(这个帐号和密码需要记住,后面会用到)。
(2)创建 Issue
注册账号成功后,根据你 Java 包的功能分别写上Summary、Description、Group Id、SCM url以及Project URL等必要信息,可以参见我之前创建的 Issue:OSSRH-36187。
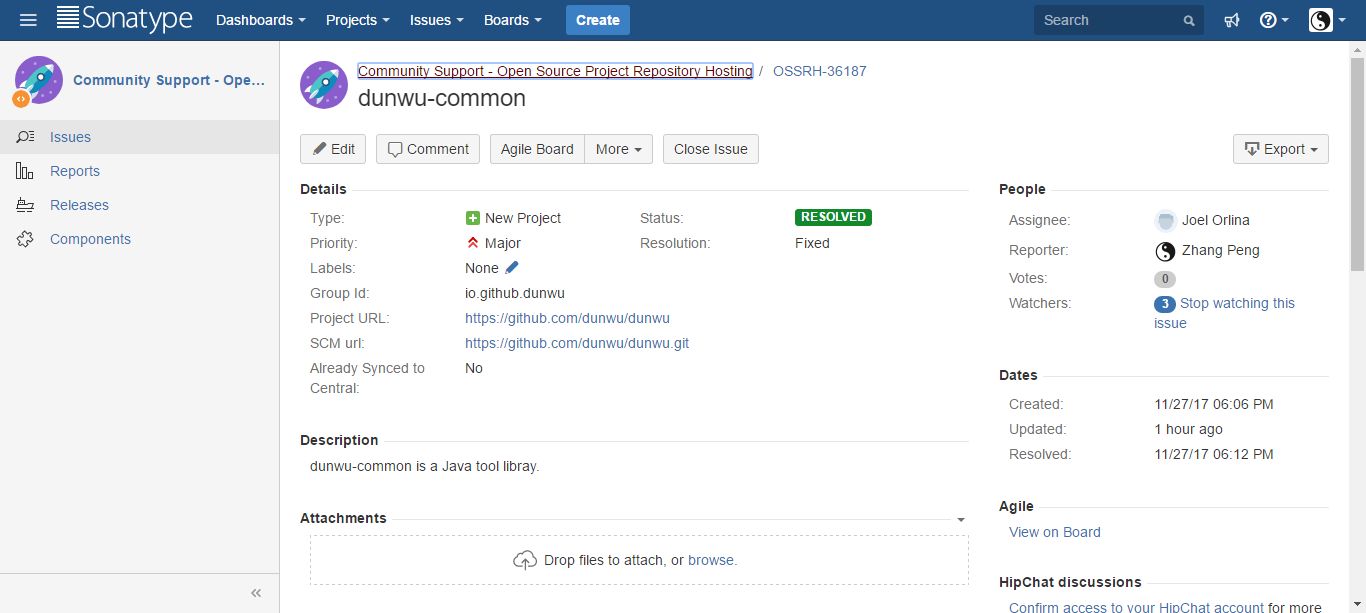
创建完之后需要等待 Sonatype 的工作人员审核处理,审核时间还是很快的,我的审核差不多等待了两小时。当 Issue 的 Status 变为RESOLVED后,就可以进行下一步操作了。
说明:如果你的 Group Id 填写的是自己的网站(我的就是这种情况),Sonatype 的工作人员会询问你那个 Group Id 是不是你的域名,你只需要在上面回答是就行,然后就会通过审核。
使用 GPG 生成公私钥对
(1)安装 Gpg4win
Windows 系统,可以下载 Gpg4win 软件来生成密钥对。
安装后,执行命令 gpg --version 检查是否安装成功。
C:\Program Files (x86)\GnuPG\bin>gpg --version
gpg (GnuPG) 2.2.10
libgcrypt 1.8.3
Copyright (C) 2018 Free Software Foundation, Inc.
License GPLv3+: GNU GPL version 3 or later <https://gnu.org/licenses/gpl.html>
This is free software: you are free to change and redistribute it.
There is NO WARRANTY, to the exdunwu permitted by law.

Home: C:/Users/Administrator/AppData/Roaming/gnupg
Supported algorithms:
Pubkey: RSA, ELG, DSA, ECDH, ECDSA, EDDSA
Cipher: IDEA, 3DES, CAST5, BLOWFISH, AES, AES192, AES256, TWOFISH,
        CAMELLIA128, CAMELLIA192, CAMELLIA256
Hash: SHA1, RIPEMD160, SHA256, SHA384, SHA512, SHA224
Compression: Uncompressed, ZIP, ZLIB, BZIP2
(2)生成密钥对
执行命令 gpg --gen-key
C:\Program Files (x86)\GnuPG\bin>gpg --gen-key
gpg (GnuPG) 2.2.10; Copyright (C) 2018 Free Software Foundation, Inc.
This is free software: you are free to change and redistribute it.
There is NO WARRANTY, to the exdunwu permitted by law.

Note: Use "gpg --full-generate-key" for a full featured key generation dialog.

GnuPG needs to construct a user ID to identify your key.

Real name: Zhang Peng
Email address: forbreak@163.com
You selected this USER-ID:
    "Zhang Peng <forbreak@163.com>"

Change (N)ame, (E)mail, or (O)kay/(Q)uit? O
说明:按照提示,依次输入用户名、邮箱。
(3)查看公钥
C:\Program Files (x86)\GnuPG\bin>gpg --list-keys

gpg: checking the trustdb
gpg: marginals needed: 3  completes needed: 1  trust model: pgp
gpg: depth: 0  valid:   2  signed:   0  trust: 0-, 0q, 0n, 0m, 0f, 2u
gpg: next trustdb check due at 2020-11-05
C:/Users/Administrator/AppData/Roaming/gnupg/pubring.kbx
--------------------------------------------------------
pub   rsa2048 2018-11-06 [SC] [expires: 2020-11-06]
      E4CE537A3803D49C35332221A306519BAFF57F60
uid           [ultimate] forbreak <forbreak@163.com>
sub   rsa2048 2018-11-06 [E] [expires: 2020-11-06]
说明:其中,E4CE537A3803D49C35332221A306519BAFF57F60 就是公钥
(4)将公钥发布到 PGP 密钥服务器
执行 gpg --keyserver hkp://pool.sks-keyservers.net --send-keys 发布公钥:
C:\Program Files (x86)\GnuPG\bin>gpg --keyserver hkp://pool.sks-keyservers.net --send-keys E4CE537A3803D49C35332221A306519BAFF57F60
gpg: sending key A306519BAFF57F60 to hkp://pool.sks-keyservers.net
🔔 注意:有可能出现 gpg: keyserver receive failed: No dat 错误,等大约 30 分钟后再执行就不会报错了。
(5)查看公钥是否发布成功
执行 gpg --keyserver hkp://pool.sks-keyservers.net --recv-keys 查看公钥是否发布成功。
C:\Program Files (x86)\GnuPG\bin>gpg --keyserver hkp://pool.sks-keyservers.net --recv-keys E4CE537A3803D49C35332221A306519BAFF57F60
gpg: key A306519BAFF57F60: "forbreak <forbreak@163.com>" not changed
gpg: Total number processed: 1
gpg:              unchanged: 1
Maven 配置
完成了前两个章节的准备工作,就可以将 jar 包上传到中央仓库了。当然了,我们还要对 maven 做一些配置。
settings.xml 配置
一份完整的 settings.xml 配置示例如下:
<?xml version="1.0" encoding="UTF-8"?>

<settings xmlns="http://maven.apache.org/SETTINGS/1.0.0"
  xmlns:xsi="http://www.w3.org/2001/XMLSchema-instance" xsi:schemaLocation="http://maven.apache.org/SETTINGS/1.0.0 http://maven.apache.org/xsd/settings-1.0.0.xsd">

  <pluginGroups>
    <pluginGroup>org.sonatype.plugins</pluginGroup>
  </pluginGroups>

  <!-- 用户名、密码就是 Sonatype 账号、密码 -->
  <servers>
    <server>
      <id>sonatype-snapshots</id>
      <username>xxxxxx</username>
      <password>xxxxxx</password>
    </server>
    <server>
      <id>sonatype-staging</id>
      <username>xxxxxx</username>
      <password>xxxxxx</password>
    </server>
  </servers>

  <!-- 使用 aliyun maven 仓库加速下载 -->
  <mirrors>
    <mirror>
      <id>nexus-aliyun</id>
      <mirrorOf>*</mirrorOf>
      <name>Aliyun</name>
      <url>http://maven.aliyun.com/nexus/groups/public</url>
    </mirror>
  </mirrors>

  <!-- gpg 的密码,注意,这里不是指公钥 -->
  <profiles>
    <profile>
      <id>sonatype</id>
      <properties>
        <gpg.executable>C:/Program Files (x86)/GnuPG/bin/gpg.exe</gpg.executable>
        <gpg.passphrase>xxxxxx</gpg.passphrase>
      </properties>
    </profile>
  </profiles>

  <activeProfiles>
    <activeProfile>sonatype</activeProfile>
  </activeProfiles>
</settings>
pom.xml 配置
(1)添加 licenses、scm、developers 配置:
<licenses>
  <license>
    <name>The Apache Software License, Version 2.0</name>
    <url>http://www.apache.org/licenses/LICENSE-2.0.txt</url>
    <distribution>repo</distribution>
  </license>
</licenses>

<developers>
  <developer>
    <name>xxxxxx</name>
    <email>forbreak@163.com</email>
    <url>https://github.com/dunwu</url>
  </developer>
</developers>

<scm>
  <url>https://github.com/dunwu/dunwu</url>
  <connection>git@github.com:dunwu/dunwu.git</connection>
  <developerConnection>https://github.com/dunwu</developerConnection>
</scm>
(2)添加 distributionManagement 配置
<distributionManagement>
  <snapshotRepository>
    <id>sonatype-snapshots</id>
    <url>https://oss.sonatype.org/content/repositories/snapshots</url>
  </snapshotRepository>
  <repository>
    <id>sonatype-staging</id>
    <url>https://oss.sonatype.org/service/local/staging/deploy/maven2</url>
  </repository>
</distributionManagement>
说明:
<snapshotRepository>指定的是 snapshot 仓库地址;<repository>指定的是 staging (正式版)仓库地址。需要留意的是,这里的 id 需要和 settings.xml 中的<server>的 id 保持一致。
(3)添加 profiles 配置
 <profiles>
  <profile>
    <id>sonatype</id>
    <build>
      <plugins>
        <plugin>
          <groupId>org.sonatype.plugins</groupId>
          <artifactId>nexus-staging-maven-plugin</artifactId>
          <version>1.6.7</version>
          <extensions>true</extensions>
          <configuration>
            <serverId>sonatype-snapshots</serverId>
            <nexusUrl>https://oss.sonatype.org/</nexusUrl>
            <autoReleaseAfterClose>true</autoReleaseAfterClose>
          </configuration>
        </plugin>
        <plugin>
          <groupId>org.apache.maven.plugins</groupId>
          <artifactId>maven-javadoc-plugin</artifactId>
          <version>3.0.1</version>
          <configuration>
            <failOnError>false</failOnError>
            <quiet>true</quiet>
          </configuration>
          <executions>
            <execution>
              <id>attach-javadocs</id>
              <goals>
                <goal>jar</goal>
              </goals>
            </execution>
          </executions>
        </plugin>

        <plugin>
          <groupId>org.apache.maven.plugins</groupId>
          <artifactId>maven-gpg-plugin</artifactId>
          <version>1.6</version>
          <executions>
            <execution>
              <id>sign-artifacts</id>
              <phase>verify</phase>
              <goals>
                <goal>sign</goal>
              </goals>
            </execution>
          </executions>
        </plugin>
      </plugins>
    </build>
  </profile>
</profiles>
部署和发布
按照上面的步骤配置完后,一切都已经 OK。
此时,使用 mvn clean deploy -P sonatype 命令就可以发布 jar 包到中央仓库了:
说明:-P 参数后面的 sonatype 需要和 pom.xml 中
<profile>的 id 保持一致,才能激活 profile。
部署 maven 私服
工作中,Java 程序员开发的商用 Java 项目,一般不想发布到中央仓库,使得人人尽知。这时,我们就需要搭建私服,将 maven 服务器部署在公司内部网络,从而避免 jar 包流传出去。怎么做呢,让我们来一步步学习吧。
下载安装 Nexus
进入官方下载地址,选择合适版本下载。

本人希望将 Nexus 部署在 Linux 机器,所以选用的是 Unix 版本。
这里,如果想通过命令方式直接下载(比如用脚本安装),可以在官方历史发布版本页面中找到合适版本,然后执行以下命令:
wget -O /opt/maven/nexus-unix.tar.gz http://download.sonatype.com/nexus/3/nexus-3.13.0-01-unix.tar.gz
tar -zxf nexus-unix.tar.gz
解压后,有两个目录:
- nexus-3.13.0-01 - 包含了 Nexus 运行所需要的文件。是 Nexus 运行必须的。
- sonatype-work - 包含了 Nexus 生成的配置文件、日志文件、仓库文件等。当我们需要备份 Nexus 的时候默认备份此目录即可。
启动停止 Nexus
进入 nexus-3.13.0-01/bin 目录,有一个可执行脚本 nexus。
执行 ./nexus,可以查看允许执行的参数,如下所示,含义可谓一目了然:
$ ./nexus
Usage: ./nexus {start|stop|run|run-redirect|status|restart|force-reload}
- 启动 nexus -
./nexus start - 停止 nexus -
启动成功后,在浏览器中访问 http://<ip>:8081,欢迎页面如下图所示:
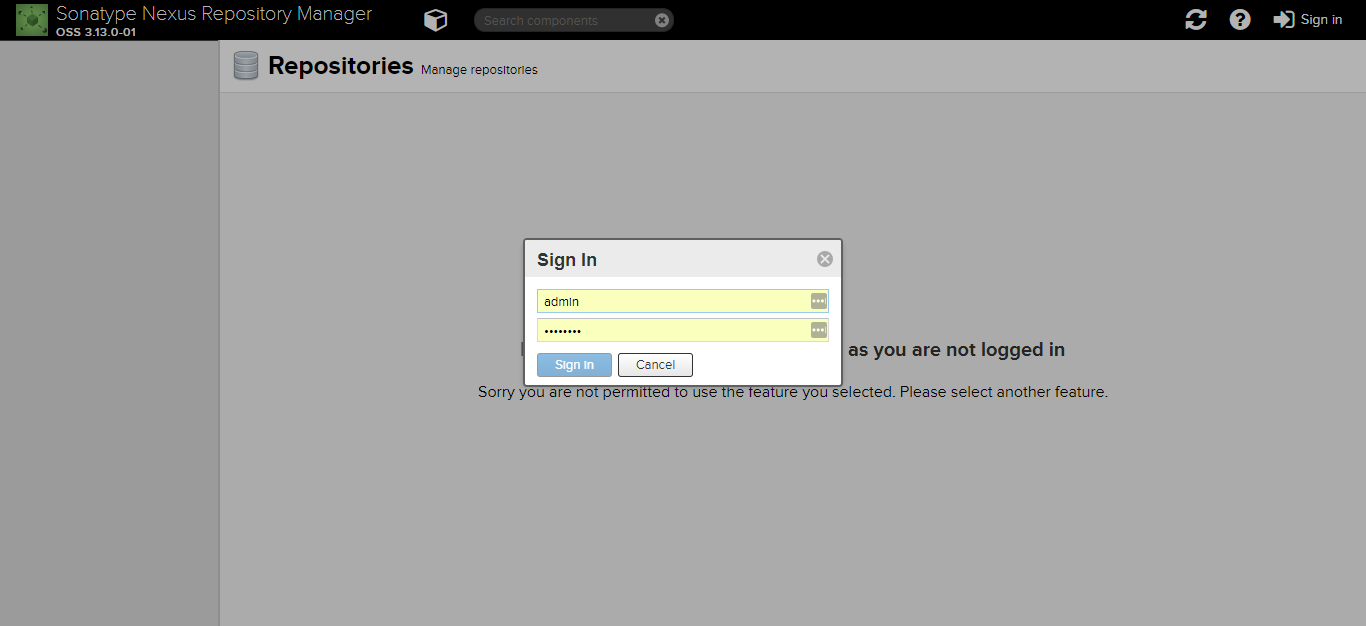
点击右上角 Sign in 登录,默认用户名/密码为:admin/admin123。
有必要提一下的是,在 Nexus 的 Repositories 管理页面,展示了可用的 maven 仓库,如下图所示:
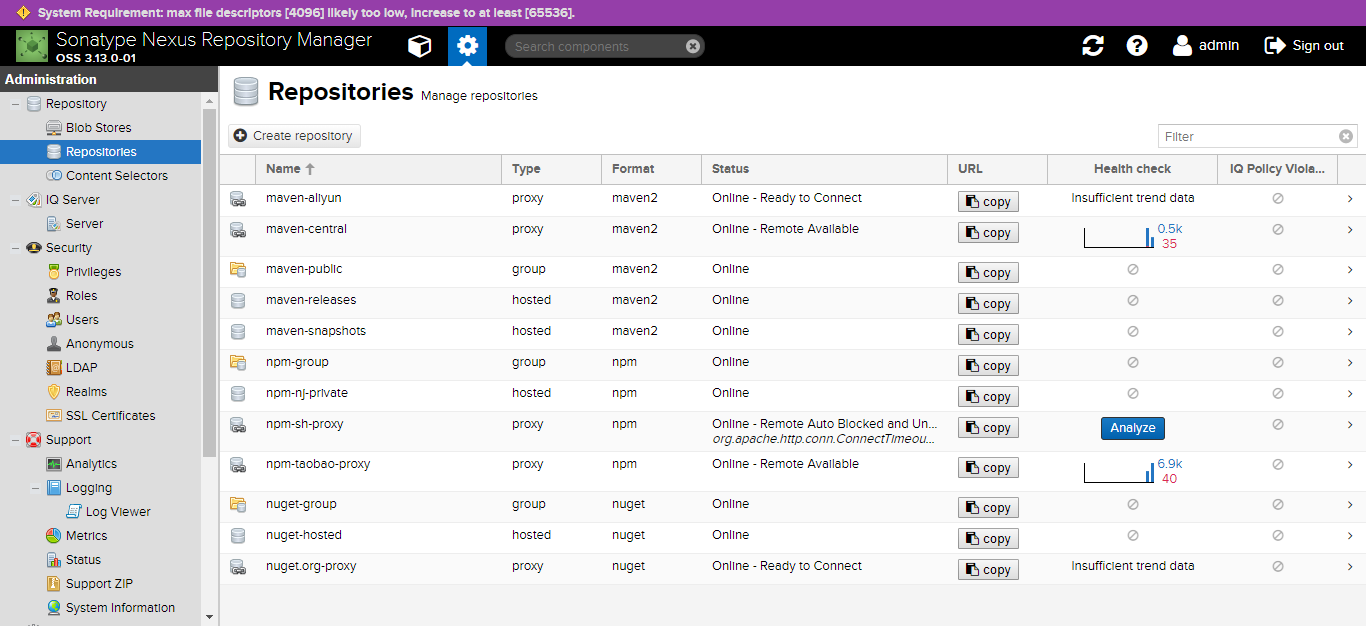
说明:
- maven-central - maven 中央库(如果没有配置 mirror,默认就从这里下载 jar 包),从 https://repo1.maven.org/maven2/ 获取资源
- maven-releases - 存储私有仓库的发行版 jar 包
- maven-snapshots - 存储私有仓库的快照版(调试版本) jar 包
- maven-public - 私有仓库的公共空间,把上面三个仓库组合在一起对外提供服务,在本地 maven 基础配置 settings.xml 中使用。
使用 Nexus
如果要使用 Nexus,还必须在 settings.xml 和 pom.xml 中配置认证信息。
配置 settings.xml
一份完整的 settings.xml:
<?xml version="1.0" encoding="UTF-8"?>

<settings xmlns="http://maven.apache.org/SETTINGS/1.0.0"
  xmlns:xsi="http://www.w3.org/2001/XMLSchema-instance" xsi:schemaLocation="http://maven.apache.org/SETTINGS/1.0.0 http://maven.apache.org/xsd/settings-1.0.0.xsd">
  <pluginGroups>
    <pluginGroup>org.sonatype.plugins</pluginGroup>
  </pluginGroups>

  <!-- Maven 私服账号信息 -->
  <servers>
    <server>
      <id>releases</id>
      <username>admin</username>
      <password>admin123</password>
    </server>
    <server>
      <id>snapshots</id>
      <username>admin</username>
      <password>admin123</password>
    </server>
  </servers>

  <!-- jar 包下载地址 -->
  <mirrors>
    <mirror>
      <id>public</id>
      <mirrorOf>*</mirrorOf>
      <url>http://10.255.255.224:8081/repository/maven-public/</url>
    </mirror>
  </mirrors>

  <profiles>
    <profile>
      <id>zp</id>
      <repositories>
        <repository>
          <id>central</id>
          <url>http://central</url>
          <releases>
            <enabled>true</enabled>
          </releases>
          <snapshots>
            <enabled>true</enabled>
          </snapshots>
        </repository>
      </repositories>
      <pluginRepositories>
        <pluginRepository>
          <id>central</id>
          <url>http://central</url>
          <releases>
            <enabled>true</enabled>
          </releases>
          <snapshots>
            <enabled>true</enabled>
            <updatePolicy>always</updatePolicy>
          </snapshots>
        </pluginRepository>
      </pluginRepositories>
    </profile>
  </profiles>

  <activeProfiles>
    <activeProfile>zp</activeProfile>
  </activeProfiles>
</settings>
配置 pom.xml
在 pom.xml 中添加如下配置:
  <distributionManagement>
    <repository>
      <id>releases</id>
      <name>Releases</name>
      <url>http://10.255.255.224:8081/repository/maven-releases</url>
    </repository>
    <snapshotRepository>
      <id>snapshots</id>
      <name>Snapshot</name>
      <url>http://10.255.255.224:8081/repository/maven-snapshots</url>
    </snapshotRepository>
  </distributionManagement>
🔔 注意:
<repository>和<snapshotRepository>的 id 必须和settings.xml配置文件中的<server>标签中的 id 匹配。<url>标签的地址需要和 maven 私服的地址匹配。
执行 maven 构建
如果要使用 settings.xml 中的私服配置,必须通过指定 -P zp 来激活 profile。
示例:
## 编译并打包 maven 项目
$ mvn clean package -Dmaven.skip.test=true -P zp

## 编译并上传 maven 交付件(jar 包)
$ mvn clean deploy -Dmaven.skip.test=true -P zp